Prusa PCB Factory : Draw and Drill pcbs
thingiverse
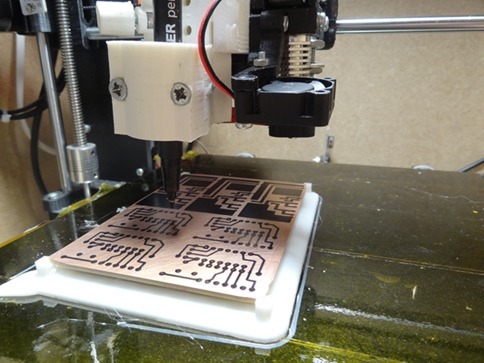
How to use your 3D printer to help mking PCBs ? This is an experiment to show how a 3D printer can be used for drawing and drilling PCBs. I have designed a tool holder to allow adding Tools to the printer head. The principle is that the Tools does not replace or impact the 3D printing feature. Add the tool when you need it, remove it when you want to 3D print.... A small utility software is needed to convert circuit designs into gcode files : I use Design Spark 7.2 to design the pcb, then a utility script that converts files into gcode information. Objective is to be able to draw with a etch resist pen and drill on pcb copper clads. ( etching is still needed). The key principle is that the utility software will read the pcb design and generate a gcode file to print a plastic support on your printer bed at a precise position and that will have the exact dimensions of the PCB you want to build. ( generated gcode files uses 1,75mm PLA filament, a ini file needs to be modified to use different printer settings). You need to leave the plastic support sticked in place, and even reinforce it in this position by using some additional scotch so that it doesnt move from it's position. Now that the support is printed, you can put the copper clad on it and launch gcode files to draw and drill at precise positions. Following are 4 points to be able to reproduce this experiment : A. FIND A WAY TO FIX THE TOOL HOLDER on the printer without removing the PLA head. I provide some stl files to hold the pen and drill, but you can use any other solution to hold the pen and drill tool . Please just pay attention to a few things : 1) The printer will home before it draws. the gohome (x=0,y=0,z=0) must be working fine with the tools mounted. on my printer when in go to home position, the pen or drill tool is outside the bed. which is what we want. 2) The tool holder should not replace the printer PLA head. The idea is to add a tool holder to your printer without impacting the 3D printing capabilities . 3) I have done my tests only on a prusa emotion tech printer. some design activities may be needed for any other printer. 4) The Tool holder are modular ;you will typically need to screw together a tool slider and a tool holder of the correct diameter . This should then slide into the MultitoolRail. sand a bit if it does not slide easy enough, B CALIBRATE the Tools : The procedure to caligrate each tool ( pen or drill ) is easy : the plastic support has an arrow : move manually the edge of the pen or drill tool to the edge of the Arrow position. then read x,y,z values from your printer. You can then update the ini file with this information and generate all the gcode files to draw and drill.. the gcode files will know exactly how to move the Tools on the plastic support.... Note : you can also edit easily the generated gcode file with the x,y,z information that you read, i will post an example in a different thingiverse post. C PRINT and DRILL the PCB When you have prepared the calibration and generated the gcode files, then you can put your copper clad on the plastic support on your printer bed. This means that your copper clad will be at a precisely known position on your printerbed . You can run the pen_copper_top.gcode to draw the pcb.... the pen will move on the coper clad and draw the pcb tracks. You need to etch the pcb. Then you can launch the gcode to drill ( there is one gcode file per drill size) . D SOFTWARE : The utiliy software will require the following additional free software : - slic3r.exe must be installed on the computer - openscad.exe must be installed on the computer - DesignSpark 7.2 PCB editing sofware is needed to export odb++ files. More detailed instructions, and download ( non free) of the utility : http://prusapcbfactory.highlevelbits.fr/index.php You can also test the concept with a test circuit board : it is a circuit board to host a MCP3008 volt Analog converter (SPI). https://www.thingiverse.com/thing:2469533
With this file you will be able to print Prusa PCB Factory : Draw and Drill pcbs with your 3D printer. Click on the button and save the file on your computer to work, edit or customize your design. You can also find more 3D designs for printers on Prusa PCB Factory : Draw and Drill pcbs.