Prusa SL1S enclosure
prusaprinters
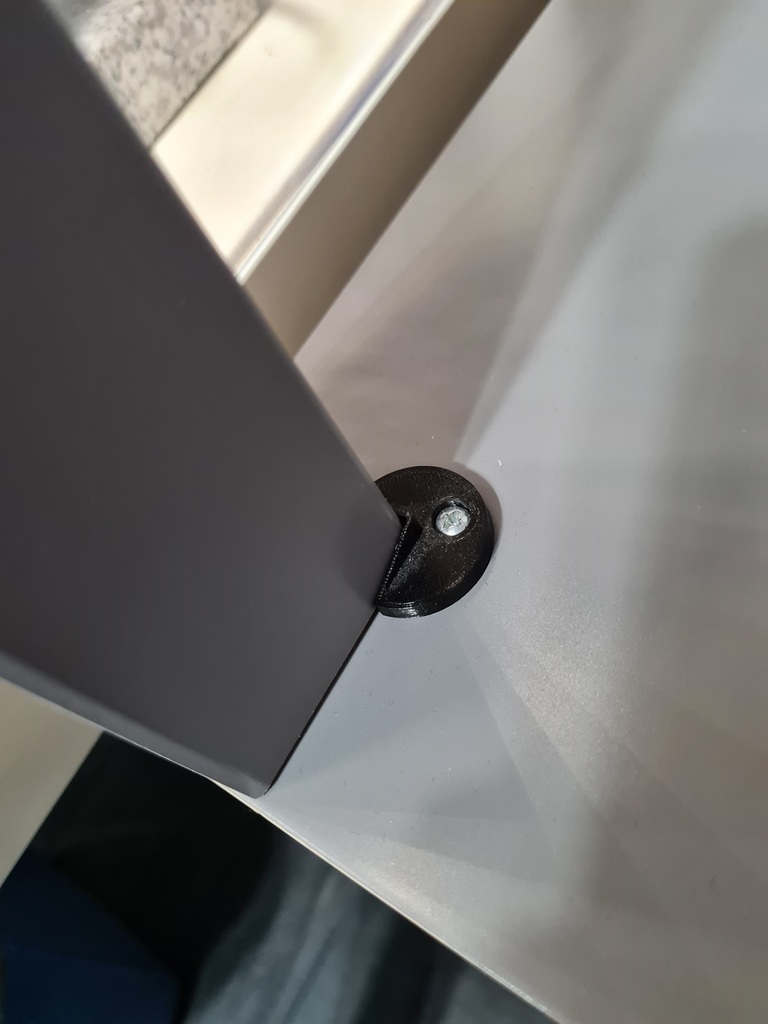
<h3>2022-01-10 update</h3><p><br>It works! I've been using the sl1s now for a couple of days and the odors go out. If I'd do this again I would change the configuration so that (assuming CW1S on left side, SL1S on right side of the table)<br>- Left and back side plastic panes would be static i.e. mounted to the table<br>- Front, top and right side panes would be bundled together as a removable part<br>This would allow unhindered access to SL1S when removing the print</p><h3> </h3><h3> </h3><h3>Pre-word</h3><p>There is probably more sensible, fast and user friendly way to do the enclosure for the SL1S printer. My approach here is based on several factors:<br>• The lead time for SL1S is longish so I had time to think and tinker the enclosure<br>• I already had some of the hardware available<br>○ Tables<br>○ 2.5 mm metal rod<br>○ Cutting board<br>○ Screws and bolts and nuts<br>○ Magnets<br>• I found some almost-made-to-fit hardware in local stores on-the-shelf<br>○ Fan<br>○ Wheels<br>○ Plastic planes<br>○ Telescopic drawer supports</p><p>As I didn't have the printer at the time of build I also made several assumptions<br>• The enclosure doesn't have to be air tight as there is a fan pushing the airflow out (of a window)<br>• SL1S and CW1S total weight is enough that the light alignment parts are adequate to keep 2 tables mounted on top of each other<br>• There might be situation where opening only the front plane is enough.</p><p>Printing parts<br>• 20 % infill<br>• Adaptive cubic infill<br>• Supports when needed<br>• 70% infill for some of the smaller parts<br>All connectors are designed with zero tolerance, depending your printer and slicer there might be a need to sand them a bit in order to make parts fit</p><p>Please let me know if some files are missing or any instructions are unclear.</p><h3>Lack</h3><p>Table tower<br>• 2 x Ikea Lack table set <a href="https://www.ikea.com/fi/fi/p/lack-sarjapoeytae-2-osaa-harmaa-60349262/">https://www.ikea.com/fi/fi/p/lack-sarjapoeytae-2-osaa-harmaa-60349262/</a><br>• 1 x <a href="https://www.biltema.fi/rakentaminen/helat-ja-helatarvikkeet/kalustepyorat/jarrullinen-kaksoispyora-4-kpl-2000041371">https://www.biltema.fi/rakentaminen/helat-ja-helatarvikkeet/kalustepyorat/jarrullinen-kaksoispyora-4-kpl-2000041371</a><br>• Lack leg alignment.stl (x4)</p><p>Using taller legs, the work plane height with the wheels is 97 cm, switching one or 2 set of legs to shorter ones provides work plane height of 87 or 77 cm • Print 4 x part • Put tables on top of each other, align and and screw printed parts on to the top of lower table. • Screw wheels to the lower table. Work plane<br>• 1 x Ikea Sysselsätta cutting board <a href="https://www.ikea.com/fi/fi/p/sysselsaetta-leikkuulauta-30359016/">https://www.ikea.com/fi/fi/p/sysselsaetta-leikkuulauta-30359016/</a><br>• 1 x Telescopic drawer support <a href="https://www.biltema.fi/rakentaminen/saranat/erikoissaranat/teleskooppikannattimet-2-kpl-2000018627">https://www.biltema.fi/rakentaminen/saranat/erikoissaranat/teleskooppikannattimet-2-kpl-2000018627</a><br>• Lack cutting board ends 2.stl<br>• Lack cutting board mount x4.stl</p><p>• Don't overtighten the screws, both the cutting board and the Lack table are soft materials, especially the table which is in practice made of honeycomb cardboard • Attach the drawer supports to printed parts with screws that come with the HW • Align to front, screw and glue to the bottom of the upper table. Handle<br>• Lack handlebar.stl<br>Screw to the front of the lower table</p><h3>Enclosure bottom</h3><p>Parts<br>• 80 mm Noctua fan <a href="https://noctua.at/en/nf-a8-pwm">https://noctua.at/en/nf-a8-pwm</a><br>• Multipipe <a href="https://www.biltema.fi/rakentaminen/lvi/putkistot/viemariputket/multipipe-yleisputki-2000034704">https://www.biltema.fi/rakentaminen/lvi/putkistot/viemariputket/multipipe-yleisputki-2000034704</a><br>• 14* countersunk head wood screws, mine are 4.2x32 mm which from length point of view might be overkill but I just happen to have such<br>• 01 SL1S enclosure left bottom front.stl<br>• 02 SL1S enclosure left bottom back.stl<br>• 03 SL1S enclosure back bottom left.stl<br>• 04 SL1S enclosure back bottom middle.stl<br>○ This fits into MK2.5 print area if the settings include No skirt and there are support blockers at both sides of the part<br>• 05 SL1S enclosure back bottom right.stl<br>• 06 SL1S enclosure right bottom back.stl<br>• 07 SL1S enclosure right bottom front.stl<br>• 08 SL1S enclosure right bottom top.stl<br>• 09 SL1S enclosure left bottom top.stl<br>• 10 SL1S enclosure noctua cable.stl<br>• 11 SL1S enclosure noctua inner cover.stl<br>• 14 SL1S enclosure back bottom middle pipe.stl</p><p>• Push Noctua fan into 04 SL1S enclosure back bottom middle.stl, take care of correct alignment and cable. ○ The printed part has holes for Noctua anti-vibration pads but I didn't use them despite designing the mounts • Push fan cable out through the printed part via the hole • Add 10 SL1S enclosure noctua cable.stl pieces. The pieces are intentionally longer than the back piece depth for easier removal • Push 14 SL1S enclosure back bottom middle pipe.stl into 04 SL1S enclosure back bottom middle.stl • Place 11 SL1S enclosure noctua inner cover.stl The pipe I'm using for the outgoing air has adjustable diameter so it fits pretty tight without any additional screws or glue or like. Your mileage may vary.</p><p>The shorter slot area on back bottom middle.stl around the fan mount slot is 90x18 mm. Cut corresponding slot to the back plastic sheet with your preferred tolerances.</p><p>Connect the following to each other to create the bottom frame<br>• 01 SL1S enclosure left bottom front.stl<br>• 02 SL1S enclosure left bottom back.stl<br>• 03 SL1S enclosure back bottom left.stl<br>• 04 SL1S enclosure back bottom middle.stl<br>• 05 SL1S enclosure back bottom right.stl<br>• 06 SL1S enclosure right bottom back.stl<br>• 07 SL1S enclosure right bottom front.stl<br>Screw the frame to the Lack table</p><p>I originally had screw tabs on the pieces also on the inside but while mounting mine, some of the tabs cut off so those were probably not very beneficial. Stl's for these are SL1S enclosure … _with inner tab.stl -files</p><p>To the back corners add</p><ul><li>08 SL1S enclosure right bottom top.stl</li></ul><p>09 SL1S enclosure left bottom top.stl</p><h3>Enclosure top</h3><p>Parts<br>• 2* 600x400x4 plastic sheet <a href="https://www.biltema.fi/rakentaminen/muovilevyt/muovilasit/muovilasi-200003003040">https://www.biltema.fi/rakentaminen/muovilevyt/muovilasit/muovilasi-200003003040</a> SL1S enclosure top right front.stl<br>• 41 SL1S enclosure top right back.stl<br>• 42 SL1S enclosure top middle front.stl<br>• 43 SL1S enclosure top middle back.stl<br>• 44 SL1S enclosure top left front.stl<br>• 45 SL1S enclosure top left back.stl<br>• 46 SL1S enclosure top right back2.stl<br>• 47 SL1S enclosure top left back2.stl<br>• 48 SL1S enclosure top handles.stl</p><p>Cut the sheets to 400x400 and 200x400 mm size ( = 2<i> 400x400, 2</i> 200x400)<br>Connect the printed parts to create the top frame<br>Push 200x400 sheet into the horisontal slots in the top frame<br>Do not use screws yet except for 48 SL1S enclosure top handles.stl</p><h3>Enclosure front</h3><p>Parts<br>• 1<i> 600x400x4 plastic sheet </i><a href="https://www.biltema.fi/rakentaminen/muovilevyt/muovilasit/muovilasi-2000030030"><i>https://www.biltema.fi/rakentaminen/muovilevyt/muovilasit/muovilasi-2000030030</i></a><br><i>• 8</i> M3x16 & nylocs (Front bottom)<br>• 7* M3x16 & nylocs (Front top)</p><p>Front bottom<br>• 20 SL1S enclosure front bottom left inner.stl<br>• 21 SL1S enclosure front bottom middle inner.stl<br>• 22 SL1S enclosure front bottom right inner.stl<br>• 23 SL1S enclosure front bottom left outer.stl<br>• 24 SL1S enclosure front bottom middle outer.stl<br>• 25 SL1S enclosure front bottom right outer.stl<br>• 26 SL1S enclosure front bottom handle.stl<br>• 27 SL1S enclosure front bottom vent.stl</p><p>Align parts 20-25 to the plastic sheet, mark screw holes. I recommend using 3.5 mm or 4 mm drill bit in order to be able to tune part alignment. I didn't and then suffered the consequences<br>The 27 SL1S enclosure front bottom vent.stl is not probably needed at all but I had it designed so I printed it<br>Push 26 SL1S enclosure front bottom handle.stl into 24 SL1S enclosure front bottom middle outer.stl and secure with glue</p><p>Front top<br>• 29 SL1S enclosure front top left.stl<br>• 30 SL1S enclosure front top middle.stl<br>• 31 SL1S enclosure front top right.stl</p><p>Connect printed parts<br>Push the top frame onto the sheet<br>Do not drill holes to the top of the sheet yet</p><h3>Assembly</h3><p>Parts<br>• 1<i> 600x400x4 plastic sheet </i><a href="https://www.biltema.fi/rakentaminen/muovilevyt/muovilasit/muovilasi-2000030030"><i>https://www.biltema.fi/rakentaminen/muovilevyt/muovilasit/muovilasi-2000030030</i></a><br><i>• 2</i> 400x400x4 plastic sheet (see Enclosure top)<br>• 16<i> magnet - diameter 5 mm, height 1 mm</i><br><i>• 2.5 mm metal rod</i><br><i>• 28 SL1S enclosure front bottom mid latch.stl</i><br><i>• 12 SL1S enclosure back bottom side cable v1.stl</i><br><i>• 13 SL1S enclosure back bottom side cable v2.stl</i><br><i>• 50 SL1S enclosure back corner mid connector.stl</i><br><i>• 2</i> 28 SL1S enclosure front bottom mid latch.stl<br>• M3x16 and M3x20 screws with nylocs</p><p>Cut ~90x18 mm slot to a long side of the 600x400 sheet. This is the back side sheet and the slot is needed around the fan mount area.</p><p>Place the sheets into the botton frame and ensure that there is enough space for the sheets to move semi-freely in vertical dimension. Sand the sheets from the bottom sides if more tolerance is needed.<br>Align sheets so that top levels are at same height, screw in place with 50 SL1S enclosure back corner mid connector.stl's.</p><p>Push top frame onto the sheets that are mounted on the bottom frame.<br>Mark screw locations on back and side sheets for the top frame, drill holes and install screws.<br>M3x16's to side holes, M3x20's to top holes</p><p>Place the front sheet into it's place. Align to correct height by nudging the sheet top frame in relation the the sheet. Everything should be snug fit when the parts are aligned correctly.<br>Mark screw locations to the front sheet, might be worth drilling holes as oval in vertical dimension if additional alignment is needed.<br>Install screws (M3x16)</p><p>Check that the front sheet fits properly in terms of width. Align top frame width from the 200x400 sheet slots if needed.<br>Mark screw locations on the top frame, drill and install screws (M3x16)</p><p>Add metal rod pieces to the hinge between top frame and front sheet</p><p>Glue magnets to 28 SL1S enclosure front bottom mid latch.stl parts, make sure to align them properly compared to each other<br>Install 28 SL1S enclosure front bottom mid latch.stl's to front and side sheets</p><p>Category: 3D Printer Accessories</p>
With this file you will be able to print Prusa SL1S enclosure with your 3D printer. Click on the button and save the file on your computer to work, edit or customize your design. You can also find more 3D designs for printers on Prusa SL1S enclosure.