PTC Heater For Saturn S & OG Printers + Generic & Stand Alone
prusaprinters
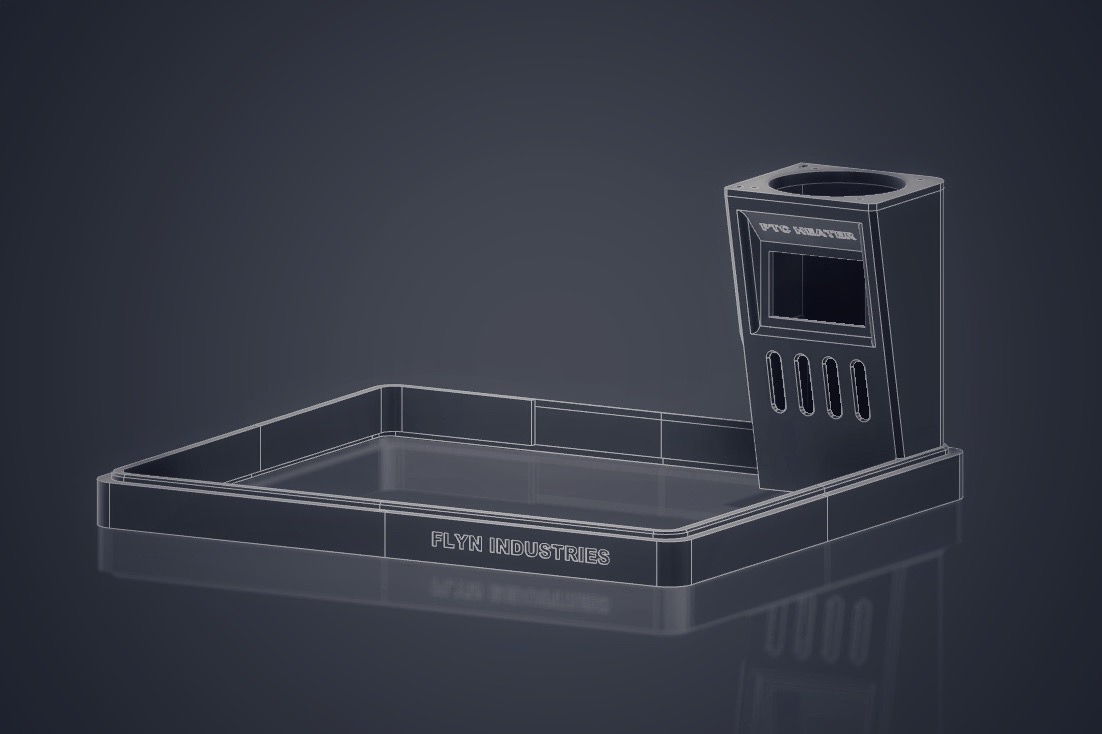
<p>Here is my design for an automatic thermostat controlled & fully programmable PTC heater system mainly for the Elegoo Saturn S & OG printers. I have included a stand-alone & a generic version.</p><p>PRINTING</p><p>The parts have been designed for easy FDM printing with minimal supports required, but I'm sure printing them in SLA will be perfectly fine too.</p><p>ASSEMBLY</p><p>Put the small metal thermistor in the holder at the bottom first, Needle nose pliers will help you hold it, or a piece of silicone tube pushed on the end will work too, & then poke two fingers through the screen aperture to place it.</p><p>Pass the heater unit wires through the holes in the Top. Attach the fan & heater unit to the Top, use the original screws. The Top will clip into the Body when the time comes.</p><p>When placing the heater's high current wiring try to keep it away from the screen & away from the rounded rear corner side, keep it to the squared off rear corner. My screen went a bit funny when the heater wires were in the rounded corner, the thermistor reading would change to “LLL”. Moving the high current wires to the other side fixed this.</p><p>take 2 of the riser ring parts at a time & check they fit your printer top without big gaps or large overhangs. Work your way round. Once you’ve confirmed the fit is good use super glue to connect the riser ring sections. Do this on a known flat smooth surface!! Wait for the glue to fully dry then test fit to the brim of your printer & cover! Adjust the fit if needed.</p><p>The tower body is meant to be super glued to the corner of Ring Part 2 with the shaped overhang of the body resting on the top lip of the riser ring part. check the bottom of the body is level with the recessed lip on the underside of the riser ring part, not the very bottom of the ring part. <br> </p><p>However BEFORE you do this wire up the unit & test, use the male XT30 connector on the unit & pass the XT30 out the back of the round hole nearest the rounded corner & into the square hole in the Ring Part 2 & dot some glue there to hold it. Don't use a lot! Then glue the body unit to the ring part. The female XT30 is to be used on the main power cable.</p><p>BUYING PARTS</p><p>The parts can be found on amazon for cheap. YOU MUST buy the 100w PTC 12v heater, make sure you have that version, DO NOT buy the 150w version or any 24v versions.</p><p>https://m.aliexpress.com/item/32813489272.html</p><p><br>The screen is on amazon, search “DC 12V Digital Display Adjustable Micro Computer Electronic Thermostat Switch” or “W1209WK 12V Digital LED Thermostat” get the one that looks the same as mine.</p><p>https://m.aliexpress.com/item/32792581212.html</p><p>THIS IS IMPORTANT! You need a small rectangular rocker switch that can take 8-10a DC. The switch must not sit outside the line of the body or it might hit the printer cover when in use. It is designed for the type of switch in the photos.</p><p>Do NOT MISS this step or you will have a fire & burn your house down!</p><p>You will also NEED thick wires, I'm talking 14awg here! No joke. These things pull a LOT of current. They are the wires drawn in thick red/black lines in the wiring diagram, see last photo. Use Ferrules on these wires into the screen.</p><p>Regular wire is fine for the screen power & fan power wires.</p><p>You will need a pair of Yellow XT30 connectors.</p><p>Lastly you will need a GOOD power supply! Do not scrimp here! </p><p>Tapping the printer power supply or a spare port will kill your printer & power supply & probably cause a fire! Also DO NOT use anything less than 10a (120w) 12v DC power supply. </p><p>I would seriously recommend a Meanwell 12.5a (150w) 12v DC PSU RS-150-12.</p><p>https://www.meanwell-web.com/en-gb/ac-dc-single-output-enclosed-power-supply-output-rs--150--12</p><p>You have been warned about the power requirements & dangers of this thing & the parts you are using. If you choose to not follow my instructions & something bad happens, that's on you. I hold NO responsibility or liability for anyone using this unit in any way, correctly or not.</p><p>USE AT YOUR OWN RISK. <br> </p><p>Huge thanks to X50arm for the inspiration! </p>
With this file you will be able to print PTC Heater For Saturn S & OG Printers + Generic & Stand Alone with your 3D printer. Click on the button and save the file on your computer to work, edit or customize your design. You can also find more 3D designs for printers on PTC Heater For Saturn S & OG Printers + Generic & Stand Alone.