Pumpkin Bot (Arduino)
thingiverse
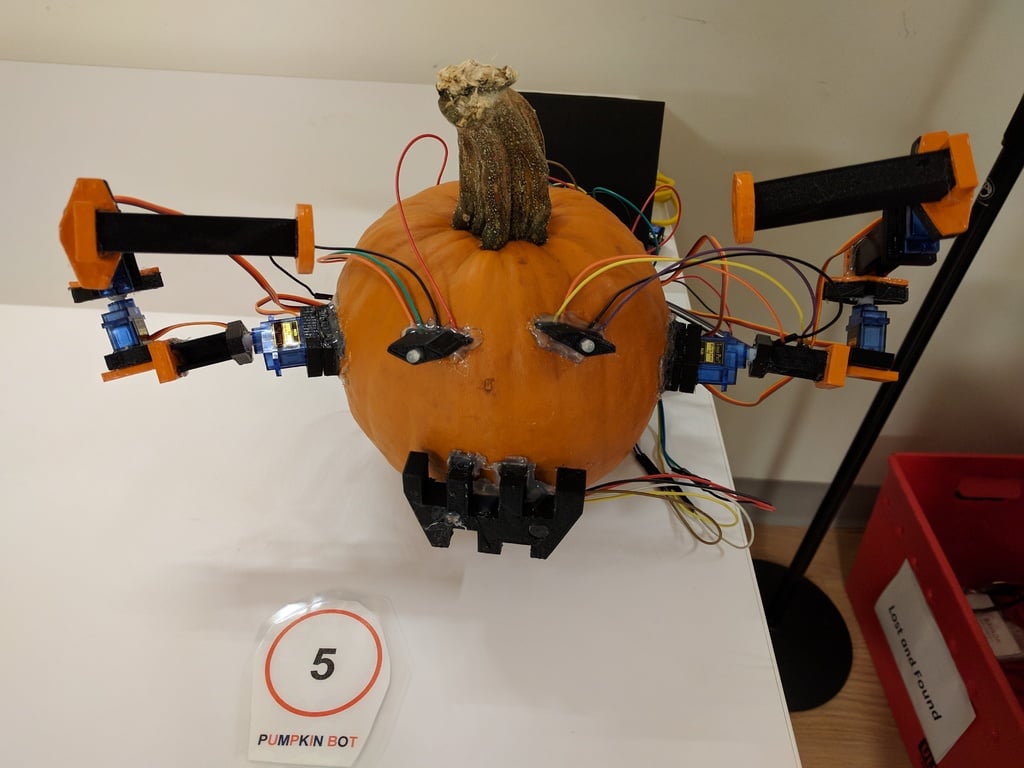
Please consider subscribing to my YouTube page for cool VR/360 tours of maps from video games: https://youtube.com/mintyfries These are some projects I worked on, including a robotic pumpkin that I entered into a contest at work. Despite spending almost 9 hours on this, between 14 entries, I only got two votes out of almost 100. I guess nobody was impressed by a robotic pumpkin. Anyway, this is a robotic pumpkin which runs on Arduino (I used an Arduino Mega 2560 for convenience sake, but any Arduino could work). It uses six servos (those popular clear-blue-plastic mini servos with the cross-shaped arms). I ended up running three of the servos directly from the Arduino, and then putting the other three on a 9-volt battery. The eyes have spaces for rgb LEDs, and the mouth has one hole for an Adarfuit electret microphone breakout, and one hole for a photoresistor. Combined with Arduino code, the pumpkin bot can be made to dance when it detects a clap (via the microphone), change the color of its eyes, spring into action when the lights turn on, etc. I even added an HC-05 Bluetooth module to allow for voice control from an Android phone. When you ask the pumpkin bot to give you a hug, it extends its arms and waits. Then when you place your hand in front of the photoresistor, it detects the change in lighting and then gives your arm a quick little hug. To be honest, I couldn't get all this Arduino stuff working in time for the contest, so I just ended up making it scratch its head after being plugged in (which is what I was doing after 9 hours of labor). I might get around to creating a full fledged Instructables page complete with code and assembly instructions. But if you know the basics of Arduino, you can probably figure out how to do some pretty cool stuff without my help. Assembling the arms is fairly intuitive (for instance, put the "servo connector" piece on the ends of each servo, put the "long connector" piece into the other end of one of the servo connectors, then put a "servo mount" piece at the end of that "long connector", etc). I used hot glue to combine each part. Just apply a liberal dab to each piece and then press it into the other piece and wait a few seconds for it to cool. Reference the pictures of the completed robot to see how the pieces go together. To mount each arm to the pumpkin, it's necessary to drill two small holes into the pumpkin. I forget which drill bit I used, but just make a hole large enough to fit the long extension of the "root" piece, then push the root piece into the hole, and seal with hot glue. That should hold the arm. This design could use a lot more work. Its range of motion is extremely limited, and merely angling some of the connectors differently could help a lot. Feel free to make improvements.
With this file you will be able to print Pumpkin Bot (Arduino) with your 3D printer. Click on the button and save the file on your computer to work, edit or customize your design. You can also find more 3D designs for printers on Pumpkin Bot (Arduino).