Pumpkinland - where pumpkins come to life
thingiverse
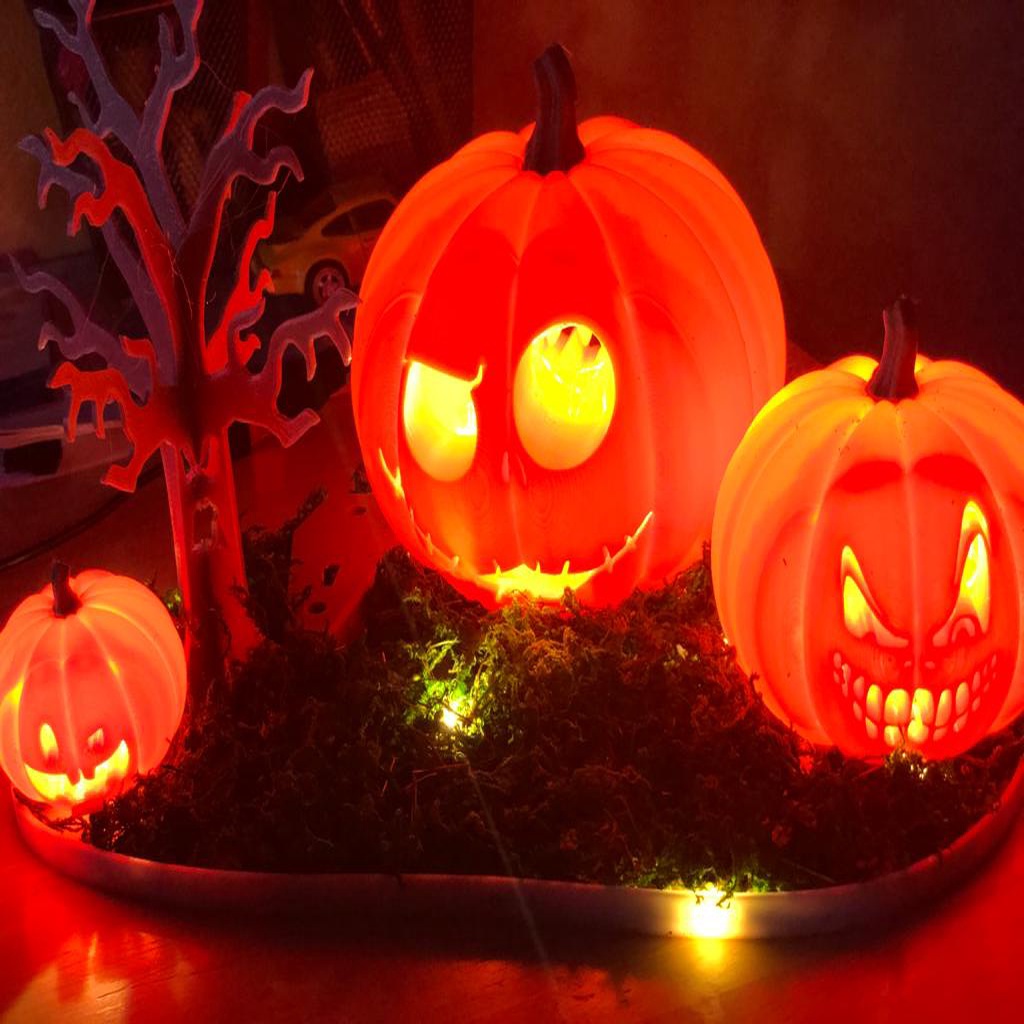
I wanted to create a thematic Halloween decoration that can sit on a desktop and can run on a more sustainable power source. This decoration requires a bit of tinkering. I enjoyed designing and making this. I hope you all like it too. Models from thingyverse - Jack-o-Lantern from @thjelmfelt | Link: https://www.thingiverse.com/thing:2590046 - Pumpkin clips from @syure | Link: https://www.thingiverse.com/thing:3112280 - Realistic Pumpkin stem from @Jyoungun76 | Link: https://www.thingiverse.com/thing:3182848 - 3D tree remixed from @NitroXpress | Link: https://www.thingiverse.com/thing:3916636 Modelled parts * Pumpkin seats * Pumpkin base * Grave/ switchboard Prints for the setup *3 X Jack-o-Lantern set (Full, 70%, 40% scale) (use the 'mid section with hole' part) *1 X Base *3 X Pumpkin seats (for Full, 70%, 40% scale pumpkins) *1 X Grave *1 X 3D tree (X,Y = 90% scale, Z = 100% scale) Other setup items *5 X M3-5mm screws (or can use the hot glue) *1 X Fairy LEDs (similar to https://amzn.to/2BauGYe) *1 X USB A 2.0 cable *1 X moss/ grass lookalike/ dirt Assembly items/tools Multimeter, wire cutters, soldering iron, hot glue Assembly - Take the fairy light power box and take out the circuit box without ripping the wires going to LEDs - Cut the USB wire keeping the male USB intact - Identify the power carrying USB wires with the multimeter. (if you don't have a multimeter, then it will take a few tries. Usually dark and light colors are negative and positive, while colors like green and blue are signals) - solder/ connect the USB to positive and negative of the circuit - screw the USB circuit to the grave/ switchboard print - Screw the grave to the top-left holes on the base plate. - Secure the outgoing USB wire with hot glue to the notch in the back. - Screw the pumpkin seats on the base plate. Biggest one on top-left, then medium one on right and smallest one on the bottom left or bottom right - orient the slots on the pumpkin seats to take lights from top-left to right and then back to the bottom-left - assemble the 3D tree and glue it near the grave - Route the LEDs through the slots and landscape. for lighting the pumpkins you can bunch them and glue them on the seats or can let them float inside the pumpkin for effect. for 20 LEDs 7-8 for biggest pumpkin, 5-6 for medium one and 2-3 for the smallest one. - glue the moss/ dirt/ grass lookalike on the base plate - assemble the pumpkins and put them on the seats
With this file you will be able to print Pumpkinland - where pumpkins come to life with your 3D printer. Click on the button and save the file on your computer to work, edit or customize your design. You can also find more 3D designs for printers on Pumpkinland - where pumpkins come to life.