Push Block
thingiverse
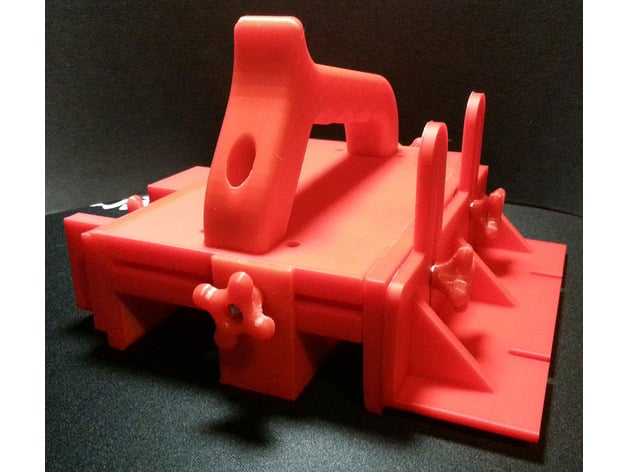
This is a user manual for a 3D printed tool called the Push Block. It's designed to make it safer to use a circular saw or router under a table by allowing you to push a piece of wood while keeping your hands away from the blade. Here are some key points from the manual: **Caution**: This is a safety tool, and the user takes full responsibility for its use. **Modifications made to the design**: * The handle is ergonomic and can be turned up to 15°. * A small part called "tail" slides into the back of another part called "bottom", allowing it to automatically push the end of a piece of wood. **Printing tips**: * No bridges or supports are needed, but a brim or raft may help prevent warping for certain parts. * The tool requires a lot of filament and patience to print. **Assembly**: * Use a Ø4 mm tap to make threads on each side of the main part before assembly. * Assemble the tool following the order shown in the pictures. * Note that the back knob is different from other knobs. **Required parts**: * 1 x Knob_bottom_back * 6 x knob * 2 x Side * 1 x handle * 1 x Main * 2 x Insert * 1 x bottom * 1 x router plate * 1 x Stabilizing plate * 1 x Tail * 1 x side plate **Required materials**: * Ø4 mm tap (optional) * 2 screws M5×30/35 mm with cruciform head for the handle * 2 M5 nuts for the handle * 8 screws TBHC BASE PLATE M4X16 STAINLESS A2 for the sides * 6 bolts HT M4X20 for the knobs * 6 M4 nuts for the knobs * Non-skid coating to place in lower part Overall, this manual provides clear instructions on how to print and assemble a useful tool for safer woodworking.
With this file you will be able to print Push Block with your 3D printer. Click on the button and save the file on your computer to work, edit or customize your design. You can also find more 3D designs for printers on Push Block.