Push-down button with a ballpoint pen spring
thingiverse
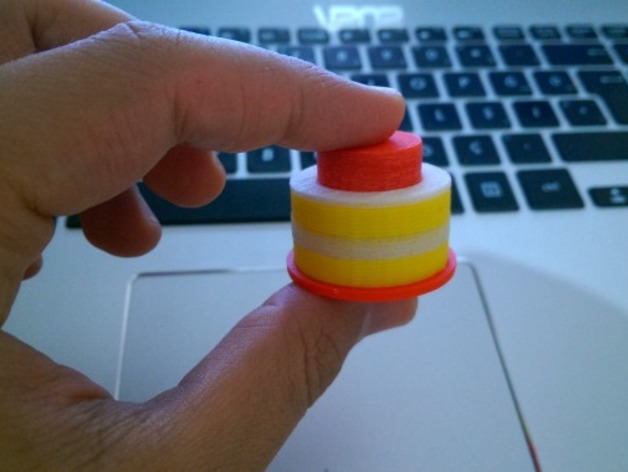
This is a push-down button consisting of three independent components: an inner, upper outer, and lower outer part, as well as a typical ballpoint pen's spring. When these components are combined, the button can easily move down and be pushed, returning to its initial position when released. Print Settings: * Printer Brand: * Up! * Printer: * Up Mini * Rafts: Yes * Supports: No * Resolution: 0.2mm * Infill: 20% Notes: There will be no need for support if printed in the position shown in the pictures. Post-Printing: After printing, you may need to rub the inner parts' exterior surface with a mere touch. If not, it may be difficult to push down the button. After the parts have become accustomed to each other, pushing the button will be a very enjoyable action. Use a ballpoint spring with a diameter of 0.4mm and a length of 30mm. How I Designed This: The design consists of four main components: upper outer, lower outer, inner (button), and inner (button) - more. Each component is designed to fit together smoothly, allowing for easy assembly and disassembly. Project: Push-down button with a ballpoint pen spring This project involves creating a three-piece push button combined with a ballpoint pen spring. The button can be pushed down and returns to its initial position when released thanks to the spring. After printing, the individually designed parts can easily be joined together. Overview & Background: Buttons are an indispensable part of our daily lives, even as touch screens become increasingly popular. They help us control electronic devices easily. It's essential for students to understand how a tool works before using it. By completing this project, you'll learn how push buttons work and develop an understanding of their operating principles. Objectives: Students who participate in this project should expect to learn: * How a button works * How a simple interlocking system can be designed * How to integrate 3D printed plastic with other materials (a spring made of aluminum) * The relationship between the button's height and the spring's total height * Which criteria must be considered to make the button pushable * The relationship between the button's push and release movements * How to design a product efficiently Audiences: This project is suitable for 10th grade students and above. Subjects: Physics (springs), math, geometry, technology and design, industrial product design. Skills Learned (Standards): By completing this project, students will be able to: * Create a circular button * Align more than one shape to the center of each other * Transform a cylinder into a tube * Design a suitable hole for using a ballpoint pen spring inside the button * Design separate parts that can be intertwined easily * Develop an understanding of how to produce a product more efficiently * Develop an understanding of how to use a combination of different materials in one product * Understand how push buttons work Lesson/Activity: To complete this project, first have students search about push buttons. Bring an example to class to provide firsthand information about how push buttons work. Secondly, after gathering data, each student can generate an idea that will help people or solve a problem related to push buttons. Lastly, give students a deadline and ask them to test their prototype in the problem context. This will allow them to detect any obstacles or incorrect parts and come up with ideas for improvement. Duration: It may take 2-3 class hours to complete this project. In the first hour, let students generate their own ideas, which will lead to a unique or innovative push button design in Tinkercad. Preparation: Tinkercad is free, and you don't need any special technologies. Before starting the project, all students should have been shown basic Tinkercad commands and alignment functions. You'll also need a simple ballpoint pen for each project, along with one spring ready to use. References: Before starting the project, review push button functionality and mode of operation with the teacher or students. Rubric and assessment: Students should design a three-piece push button at the end of the project. Each part should be printed separately, and the inner part should move inside the outer part frictionlessly. The spring must fit smoothly into both upper and lower parts.
With this file you will be able to print Push-down button with a ballpoint pen spring with your 3D printer. Click on the button and save the file on your computer to work, edit or customize your design. You can also find more 3D designs for printers on Push-down button with a ballpoint pen spring.