Putting Aid
thingiverse
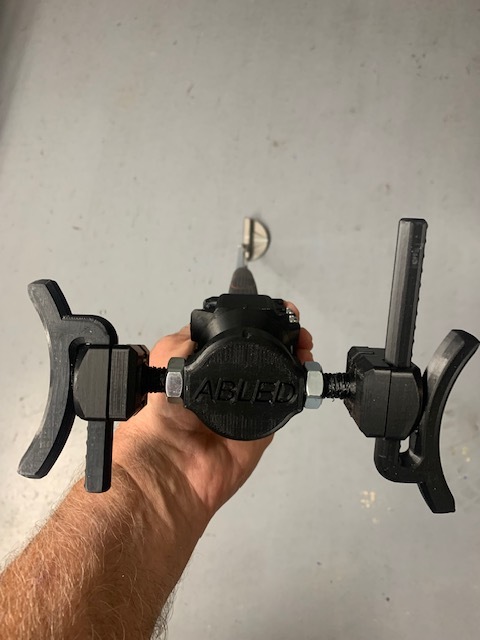
Putting Aid for Tremors or Practice This “ABLED” Putting Aid was designed for golfers that developed Essential Tremors and Parkinson. With these two handicaps because of the tremors, it’s extremely difficult to putt because of the shaking of your hands. With the triangle design this putting aid is used to minimize hand and wrist movement, helps to eliminate excessive wrist action in the stroke and improves the rhythm & timing of the stroke up to 40% helping with minimizing hand tremors and encourages a smooth pendulum stroke. We have also Found the ABLED putting Aid is a perfect practice device. The putting aid simply attaches to the putter grip, assuring the forearms and Shoulder Alignment to Square you up to your Target-line. The clubface stays squarer during the putting stroke increasing the direction consistency, starting more putts on the intended target-line! Practicing this bio-mechanical principle will improve your putting stroke consistency and improved stroke, leads to improved roll and fewer putts. Shopping list 3 pcs 10-24 thread x 1-1/2” Pan head Philp screw 3 pcs 10-24 Hex nut 1 pc #10 x 2-3/4” Philip pan head Sheet Metal screw 1 pc #10 x 2” Philp pan head Sheet Metal screw 2 pcs 1/2-13 thread hex nut Short Arm Clamp Assemble 1/2-13 x 1 ¼ Long Thread Lock Arm (3D print, high quality, 50% infill, no support). Short Arm Clamp (3D print, high quality, 50% infill, no support). Short Arm Brace (3D print, high quality, 50% infill, no support). Philp pan head Sheet Metal screw #10 x 2-3/4” #10 x 2” 1/2-13 thread hex nut Assemble Instructions Place ½-13 nut onto short Lock Arm Place Short Arm Clamp onto Short Arm Lock Insert #10 x 2” Philp pan head Sheet Metal screw into center and Fasten Short Arm Clamp Insert Short Arm Brace and tighten screw. (The #10 x2” screw will help strengthen the 1/2-13 x 1 ¼ Long Thread Lock Arm). Long Arm Clamp Assemble 1/2-13 x 2” Long Thread Lock Arm (3D print, high quality, 50% infill, no support). Short Arm Clamp (3D print, high quality, 50% infill, no support). Short Arm Brace (3D print, high quality, 50% infill, no support). Philp pan head Sheet Metal screw #10 x 2-3/4” 1/2-13 thread hex nut Assemble Instructions Place ½-13 nut onto short Lock Arm Place Short Arm Clamp onto Short Arm Lock Insert #10 x 2” Philp pan head Sheet Metal screw into center and Fasten Short Arm Clamp Insert Long Arm Brace and tighten screw. (The #10 x2-2/4” screw will help strengthen the 1/2-13 x 2” Long Thread Lock Arm). Putting Aid Base Assemble Putting Aid Base (3D print, setting high quality, 50% infill, no support). Long Arm Assemble Short Arm Assemble Screw the Long Arm Assembly into threaded hole in the Putting Aid Base (side facing “D” of ABLED) Screw the Short Arm Assembly into threaded hole in the Putting Aid Base (side facing “A” of ABLED) Putting Aid Grip Clamp Assemble Grip Clamp (3D print, setting high quality, 50% infill, no support). Grip Clamp Plate (3D print, setting high quality, 50% infill, no support). 3 pcs 10-24 thread x 1-1/2” Pan head Philp screw 3 pcs 10-24 Hex nut Insert Hex Nuts in the Grip Clamp Plate Fasten the Grip clamp plate with the Grip Clamp with 10-24 screws Mounting Grip Clamp onto Putting Grip Most putter grips have a flat surface which aids in alignment of the putt head. We have put a flat surface on the Grip Clamp to assist in lining up the Putting Aid to the putter face. Mounting Grip Clamp onto Putting Grip and Adjusting Mounting the Grip Clamp Most putter grips have a flat surface which aids in alignment of the putt head. We have put a flat surface on the Grip Clamp to assist in lining up the Putting Aid to the putter face. Adjusting There are many styles of holding the putter which is why we have adjustments for the both the Arm position and the wrist position. 1. For the Arm position: we have a threaded connection t bring the arm closer or further from the putter, once position a locking screw to secure position. 2. For the wrist position: loosen the Philip screw, slide the Arm Brace to a comfortable position, tighten Philips screw.
With this file you will be able to print Putting Aid with your 3D printer. Click on the button and save the file on your computer to work, edit or customize your design. You can also find more 3D designs for printers on Putting Aid.