Puzzle ring bracelet (parametric, OpenSCAD)
prusaprinters
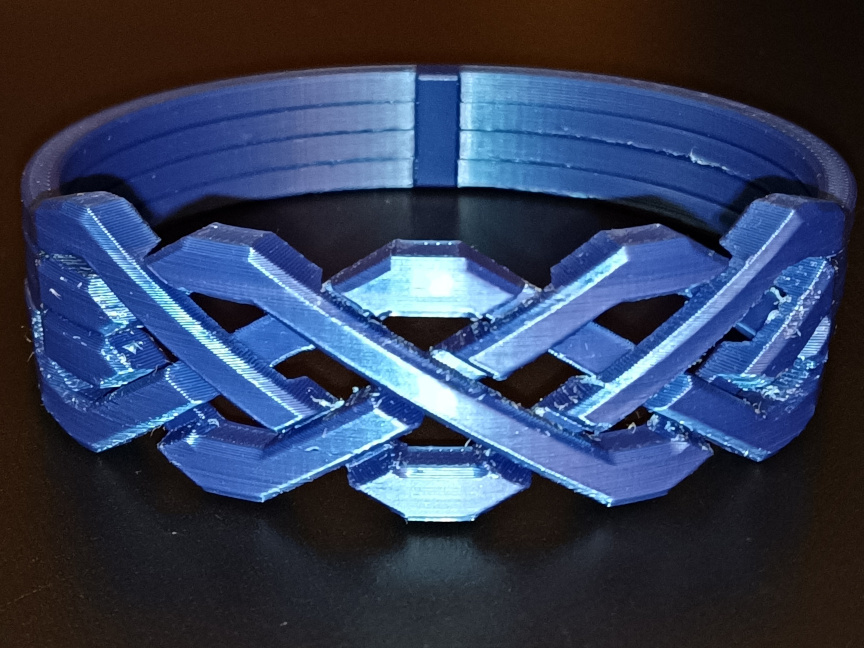
<p>This puzzle ring (sometimes called a "Turkish wedding ring" or "harem ring") has four interlocking bands. However, this one isn't a finger ring because the puzzle is too delicate when printed that small (I tried it). So I made it into a bracelet.</p><p>The puzzle is rather difficult at first, but once you learn it, it's fairly easy to assemble after scrambling the interlocking parts. The puzzle <a href="https://ourpastimes.com/puzzle-ring-instructions-4596068.html">solution is available online</a>. No force is required; if you do it right, it just slips together.</p><p>The size can be adjusted with the OpenSCAD parameters. The STL files provided are elliptical rings with 90mm and 80mm axes, which fits a rather large hand (larger than mine, as you can see from the photograph).</p><p>In the OpenSCAD script, the "soluble" setting renders the entire assembled ring, with 0.2mm gaps between them, to be filled with soluble support material. See printing notes below for caveats.</p><p>The "insoluble" setting is for break-away supports, and is much faster if the same material is used for everything. However, the two inner rings have rough stepped surfaces because they are not being printed parallel to the buildplate.</p><p>The "clip" setting prints a small clip to hold the puzzle together.</p><h3>Print Settings</h3><p><strong>Printer: </strong> Prusa i3 MK3S MMU2S</p><p><strong>Supports: </strong>Yes</p><p><strong>Resolution: </strong>0.20 mm layers, 0.4mm nozzle</p><p><strong>Infill:</strong></p><ul><li>25% cubic</li><li><strong>Important:</strong> In PrusaSlicer or Sli3r, set Infill > Advanced > Solid infill threshold area to 150.</li></ul><p><strong>Filament: </strong>Prusament PLA, 3DMaker PVA</p><h4><strong>Notes:</strong></h4><p>Printing with soluble supports result is a wipe tower that is a bit heavier then the final part, and takes about 12 hours. You can separate the object into different parts and print two rings a different color. This results in a wipe tower almost twice as heavy (over 100g), and takes about 17 hours.</p><p>When printing with soluble support, the 1-layer gaps between the rings are intended to be filled with soluble support material. Although the height difference between these gaps is a multiple of 0.2mm layer height, the overall height of the part on the buildplate may not align with the layers. You may need to go into the variable layer settings and tweak a small region below these gaps to get them to align, so that one layer of support material is printed in each gap.</p><p>You could get away with less support material by printing it standing on its edge, but you would end up with weak rings that may break too easily at layer boundaries. Printed on its side, the rings are made from continuous layers all the way around, adding stiffness to help support the weaker puzzle area, which should be printed with solid infill.</p><p>The bottom of the center "V" of the pattern definitely needs support, because it has hardly any contact with the buildplate and doesn't connect to its ring until the build reaches the top. I had one failed print in which this part came loose because it had only a brim, not support.</p><p><strong>This is a challenging print for the MMU2S.</strong> PVA is soft and flexible, and quite stringy, causing load or unload failures in the MMU2S several times during the print.</p><p>Because PLA and PVA going through the same extruder <a href="https://www.antalife.com/2020/07/project-just-how-multi-material-is.html">weakens the PLA regardless of the purge volume</a>, it's important that the puzzle pattern has solid infill, otherwise it breaks easily because the layer bonds are poor after dissolving the PVA. The rings themselves have sufficient horizontal surface area to hold together well with normal infill.</p><h3>Post-Printing</h3><p>I don't know about other PVA, but with 3DMaker PVA, it takes a few hours of soaking in warm water to soften the PVA enough where it can be picked out of crevices with a toothpick. It takes some patience to get all the pieces clean, and they are delicate, so try not to apply any force.</p><p>Same is true when printing with break-away supports. Gently pry the bits of support material off with needle-nose pliers. Don't hurry.</p><h3>How I Designed This</h3><p>This was a difficult project. After studying some of these rings, I realized that a 3D model could be made using four intersecting waves with cutouts strategically placed where they intersect. I started writing the OpenSCAD code 2 years ago for a finger-ring, and upon printing it, I learned that one cannot really print a puzzle ring that small and expect it to hold together. So I made it into a bracelet, designed the break-away model, and had a failed print (it printed but the rings were not layed out properly and it couldn't be solved), so I put it aside. Resurrecting it a couple years later, I could barely understand my own code, but it came back to me as I worked with it.<br> </p><p> </p><p>Category: Puzzles</p>
With this file you will be able to print Puzzle ring bracelet (parametric, OpenSCAD) with your 3D printer. Click on the button and save the file on your computer to work, edit or customize your design. You can also find more 3D designs for printers on Puzzle ring bracelet (parametric, OpenSCAD).