Pygmy Boats Kayak Kit Tools
thingiverse
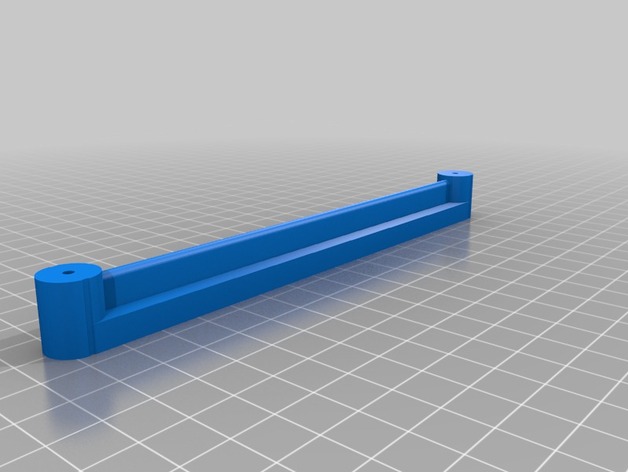
These are tools to assist builders of Pygmy Boats stitch and glue kayak kits. (Stitch and glue kits use precision cut thin marine plywood planks that are stitched together with short pieces of wire – then edge-glued with epoxy. After the wire stitches are pulled, the seams are filled and sanded, and the boat is covered in fiberglass inside and out.) Pygmy Boats: http://www.pygmyboats.com/index.html It’s the stitch wires and their little holes we are dealing with here… My Pygmy Poke tools are to assist in drilling the many 1/16 inch holes that will be stitched with the wire. Pygmy Poke-6a: This is for the drilling the majority of the holes, which are 6 inches apart ¼ inch from the edges of the planks. Pygmy suggests a guide piece of wood 6 ½ inches long and ½ inch wide. A hole is drilled at each end, centered left and right, 1/4 inch from the end. You drill the hole, keep the drill bit in place, and swing the other end around to position for the next hole, etc. Problem is that you may go through a lot of those wooden guides. I drilled 300 test holes in a piece of pine 2x4 with just one end of the prototype Pygmy Poke and could have accurately drilled 100 or more holes – a total of 600 – 800 holes per guide. The underside of each guide hole has been relieved just a little to handle saw-dust from your drilling. The height of each guide “tower” is 5/8 inch so you can drill two layers of 4mm plywood using the 1/16 inch bit in a 1/4 inch hex base – the type used with cordless screwdrivers. (In the photo with the ruler, the hole on the right is after 300 holes. We've lost one layer of the four -- .4mm.) UPDATE: After drilling a bunch of holes I rounded the spine of the Poke-6 to make it a little more comfortable. Pygmy Half-Poke-2: This is an all-around guide and positioning aid. The guide holes are set 2 inches apart for locations that require additional stitch wires. The guide tower has three indexing grooves. The other guide hole has an alignment notch. Pygmy Button: One the trickiest things I've encountered so far is getting the planks aligned properly in the extreme bow and stern. These are essentially butt joints between the planks and the wire stitches don't give you the right kind of force to make a smooth joint all the time (and is the most common glitch I see on Pygmy Boats). This button goes on the inside of the hull any place where the planks meet flat, rather than as a chine. You'll need to use scrap Mylar or Mylar tape on the bottom of the button, because when you epoxy the seams, some will pass through the stitch holes and the seams. I wish I had these when I built my boat, but the 3D printer was on the other coast. (I printed these out 24 at a time.) The Pygmy Bend tools are to assist cutting and forming the short pieces of wire used for the temporary stitches. Pygmy Bend-1: This tool speeds up cutting and pre-bending all those 3 ½ inch pieces of wire. The tool is used with the tower on the left side and should be clamped or screwed to a work bench or table. The wire to be cut is slid from right to left in the center groove all the way into the hole at the base of the tower. Use sidecutters to cut the wire at the right side of the Pygmy Bend’s base. Then take the 3 ½ inch wire and place it vertically into the hole at the top of the tower. Bend the wire 90 degrees towards you using the guide groove. Then another 90 degree bend downwards using the vertical guide groove. The wire is now shaped like a staple. Pygmy Bend-2: This tool uses the same method for cutting the wire to length. To bend the wire into the staple shape, center it in the groove atop the two towers. Grip the wire with a pair of pliers held horizontally. Draw the wire straight down, using the vertical grooves as guides. This will create the “staple” shape. Be very careful: The legs of the staple will fold and point up. Your plier jaws will need to be a shade less than 1/2 inch to match the distance between the holes in the planks. I ground about 1.5mm from a pair of inexpensive lineman's pliers. Pygmy Cut: Use this if all you want to do is measure and cut your stitch wires to 3 1/2 inches. Maker Notes: All: Robo3D R1+ printer using Simplify3D; Hatchbox PLA; Medium resolution. Pygmy Poke-6: 4 layers bottom, sides, and top; 35% infill; 1 hour, 14 minutes. Pygmy Half-Poke-2: 4 layers bottom, sides, and top; 35% infill; 28 minutes. Pygmy Button: 3 layers all bottom, sides, and top; 35 % infill, 2 hours and 45 minutes to print 24 buttons. Pygmy Bend-1: 4 layers bottom, sides, and top; 35% infill; 3 hours, 30 minutes. Pygmy Bend-2: 4 layers bottom and sides; 6 layers top; 35% infill; 3 hours, 54 minutes. Pygmy Cut: 4 layers bottom, sides, and top; 35% infill; 2 hours 34 minutes. Warning: Both Pygmy Bend tools have the warning “SHARP!” set into the tool base. This is because you will be handling pieces of wire with sharp ends. Wear gloves. Print Settings Printer Brand: Robo 3D Printer: R1 ABS + PLA Model Rafts: No Supports: No Resolution: Medium Infill: 35% How I Designed This Built using the free online version of TinkerCad.
With this file you will be able to print Pygmy Boats Kayak Kit Tools with your 3D printer. Click on the button and save the file on your computer to work, edit or customize your design. You can also find more 3D designs for printers on Pygmy Boats Kayak Kit Tools.