QAV250 Cheap Racing FPV Quadcopter
thingiverse
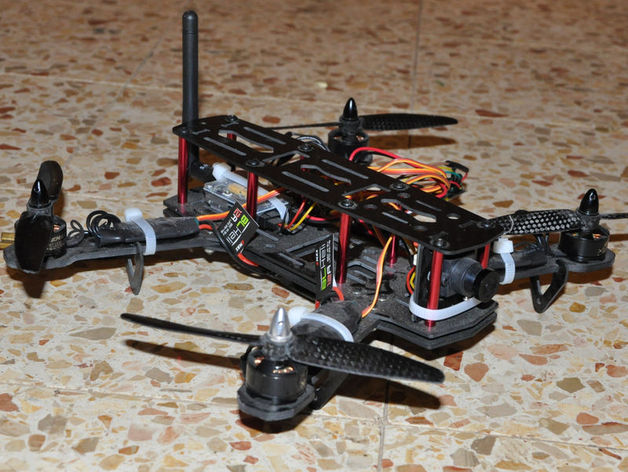
The FPV racing quadcopter is one of the best experience you can get from RC Toys. this instructable will explain how you can build your own 250 class racing quadcopter, with FPV system to place your eyes in the sky. Parts for the quadcopter Frame: Qav250 carbon fiber racing frame. Motors: 4 EMAX MT1806 KV2280 Brushless Motors. Propellers: CF 5040 propellers. ESC: 4 SimonK Series 12A ESC. Flight Controller: CC3D Flight Controller. Battery: 3s 1500mah lipo battery . - good for 12-15 minutes of flight time Radio: FlySky i6 newer with iA6B receiver . T-Plug: Amass T Plug . Parts for the FPV system BAttery: 2200mah 11.1v lipo battery (can power the goggles for 5 hours) . Transmitter: Boscam FPV 5.8G 200mW AV Wireless Transmitter . Receiver: 200mW AV Wireless-Receiver . Monitor: 4.3 inch tft display . Camera: Micro CCD camera. $7.99 foam box Or get this fpv goggles i've already posted here: http://www.thingiverse.com/thing:1427970 How I Designed This Building the quadcopter The FPV racing quadcopter is one of the best experience you can get from RC Toys. this instructable will explain how you can build your own 250 class racing quadcopter, with FPV system to place your eyes in the sky.. Building the quadcopter the first step of building the quadcopter is building the frame, just follow the instractions you got with the frame and build all the chassis. The quadcopter includes 4 motors, 2 CW motors and 2 CCW motors, the motors installation order: front left arm - CW motor front right arm - CCW motor rear left arm - CCW motor rear right motor - CW motor when you install the motors, point the wires to the arm of the chassis. the ESC has 5 wires and a plug, the 3 black wires needs to be connected to the motors. for CW rotation you need to connect the wires straight from the esc to the motor (first ESC wire to first motor wire, second wire to second wire, third wire to third wire). for the CCW rotation you just need to switch between the second to the third wire. (first ESC wire to first motor wire, second wire to third wire, third wire to second wire) connect and solder all the ESC red wires together to the T-plug red wire, and the black wires to the black one. after you make all the connections with solder, you can connect the flight controller. connect the ESC to the cc3d in this order connect the motor output 1 to the front left ESC connect the motor output 2 to the front right ESC connect the motor output 3 to the rear left ESC connect the motor output 4 to the rear right ESC Connect the 2.4Ghz reciever to the CC3D flight controller, just plug the connections from the reciever output to the cc3d inputs, (channel 1 to input 1, channel 2 to input 2, etc..) you need to connect at least 6 channels. This is all the wiring you neet to make for the quadcopter, when you finish the wiring you need to update the cc3d firmware and make a calibration. the CC3D flight controller works with the exelent opensource openpilot program. download the software and install it to your pc, follow the instructions in the open pilot UI and make the installation.
With this file you will be able to print QAV250 Cheap Racing FPV Quadcopter with your 3D printer. Click on the button and save the file on your computer to work, edit or customize your design. You can also find more 3D designs for printers on QAV250 Cheap Racing FPV Quadcopter.