QCX Transceiver Lasercut Housing by OE1WBS
thingiverse
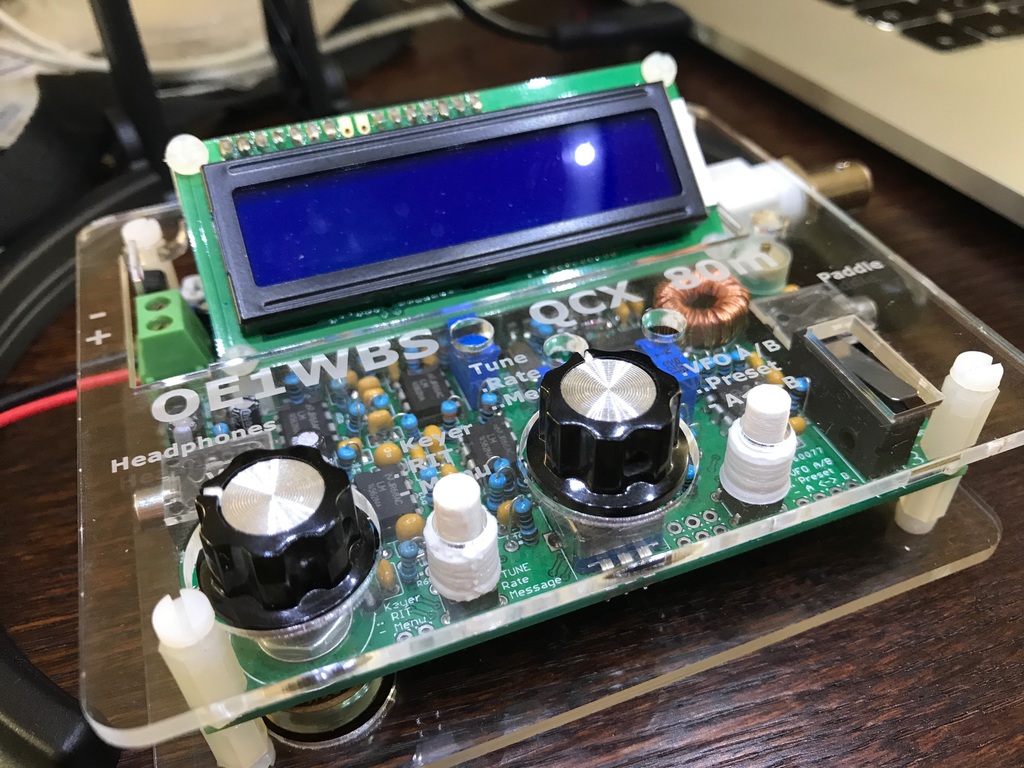
**40 degree display brackets:** For a convenient angle of the QCX’s display, I designed bracket to tilt up the LCD at an angle of 40 degrees. This gives a nice viewing angle when the QCX is standing e.g. on a table surface. The display’s contacts need to be longer than in the original version; if you built your QCX according to the manual, buy another set of pins- and receptacles and connect it with short leads. This allows to return to the original mounting position if necessary. The brackets fit the existing holes for the display. Before mounting, drill M3 threads into the brackets, so you can use the original nylon M3 screws that came with the kit. The original nylon hex-spacers, (12,5mm long) are not needed with the brackets, but keep them safe, as they might be useful for mounting the acrylic front-plate, that I designed as a kind of housing for the QCX. **Acrylic housing, for cutting and engraving on a laser cutting device:** You may find a vector based cutting- and engraving sketch in my files, that includes the cutting path for a bottom- and a front shield. Mount the bottom shield with 5mm spacers, and the front shield with 12.5mm spacers. (the ones, that became useless when you mount the display brackets !) The cutting paths are designed for use with a QCX with my 40 degree display brackets. And of course you should not forget to change the engraving to your personal hamradio call and the band the ccx was built for. You may open the file with any typical vector design software. **Finally: The buttons:** Find enclosed a .stl-file for buttons that fit between the original print-mounted pushbuttons and the acrylic front sheet. It is good practice to print 2 or even 4 of them in one pass on your 3D printer. (Printing them one by one may result in chaos, as the small part does not allow tone layer to cool down sufficiently before the next layer is being printed.) **Have fun, if you have too, i’de like to get your feedback !** **73 de OE1WBS, Wolfgang**
With this file you will be able to print QCX Transceiver Lasercut Housing by OE1WBS with your 3D printer. Click on the button and save the file on your computer to work, edit or customize your design. You can also find more 3D designs for printers on QCX Transceiver Lasercut Housing by OE1WBS.