QIDI X-Max Dial Indicator Carriage and Bed Leveling Script
prusaprinters
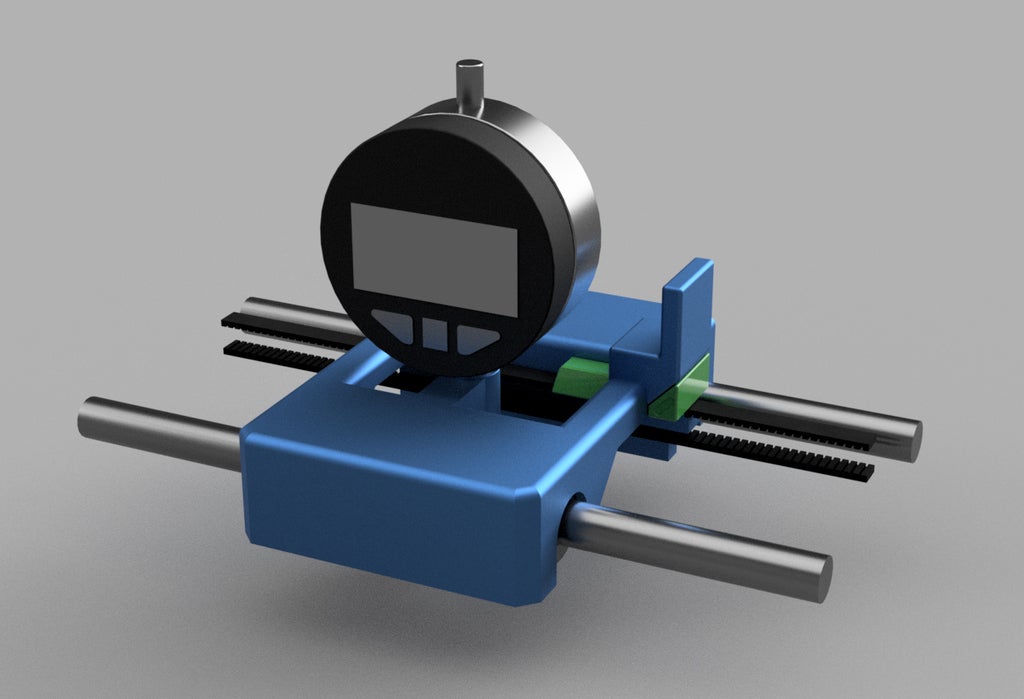
<p><strong>Update March 7, 2021</strong></p><p>Do you suspect your bed is not very flat? The only way to know for sure is to remove the bed and have it checked externally. But you can still check how flat the bed is relative to the gantry and extruder which is where it really matters.</p><p>I've made a new special bed flatness test program you can use with this carriage and a dial indicator. It starts with the same bed leveling program described below and once that is done it checks the distance on a 30 spots in a grid pattern; 6 columns and 5 rows. It automatically moves to the next spot every 7 seconds. It has been adjusted so you can check directly on the bed without a bed sticker or glass, it avoids the screw holes. If you want to try it this is the file to print (right click “save as”):</p><p><a href="https://www.minux.se/humebeam/qidi-xmax-hercules-dial-bed-flatness-check.gcode">qidi-xmax-hercules-dial-bed-flatness-check.gcode</a></p><p><strong>About</strong></p><p>This is a dial indicator carriage and bed leveling script based on the Hercules design. There weren't enough space in the original Hercules carriage for a dial indicator holder so I decided to make this separate carriage for a dial indicator.</p><p>The Hercules carriage is very easy to remove. Just unscrew the parts cooling fan duct from below if you have one installed and remove the belt peg and just pull out the carriage. You can then set aside the whole carriage, you don't even have to unplug the ribbon cable. Then insert this dial indicator carriage and secure with the same belt peg. If you're using the stock QIDI extruder carriage you can use this instead.</p><p><strong>BOM - Bill of Materials</strong></p><p>All you need is a good quality dial indicator:</p><figure class="table" style="width:100%;"><table style="background-color:#40C8E818;border-style:ridge;"><tbody><tr><td style="border-bottom-color:rgb(242, 242, 242);border-bottom-width:1px;padding:0px 0px 0px 1rem;"><strong>Digital Dial Indicator</strong></td><td style="text-align:center;"><a href="https://s.click.aliexpress.com/e/_Alycwi"><strong>AliExpress</strong></a></td><td style="text-align:center;"><a href="https://s.click.aliexpress.com/e/_9xSols"><strong>AliExpress</strong></a></td></tr></tbody></table></figure><p>It is also compatible with Pogo - The Bed Leveling Stick which is my print-in-place dial indicator. It can be used to level the bed as well.</p><p><strong>Why?</strong></p><p>Using a highly accurate Dial Indicator / Dial Gauge you can achieve a perfect bed level and no longer have to rely on the (and relative between each screw) resistance of a leveling paper against the bed surface, which can be tricky. I recommend you use silicone bed columns for a more stable bed level.</p><p>The best part is once you have calibrated your setup, you know how to adjust your bed leveling screws for the perfect distance between the bed and the nozzle. For instance, with my Digital Gauge the perfect bed distance between my glass bed and dial is 16.60 mm. Therefore I adjust each screw until the dial displays 16.60 mm. If I would level the bed in two months or one year it would still be 16.60 mm. If you print different material just change a positive or negative Z offset in the slicer for each material.</p><p><strong>How to use</strong></p><p>Step 1: Print the carriage and belt peg.</p><p>Step 2: Remove the Hercules carriage and install this bed leveling carriage. Copy the bed leveling script (.gcode) to the USB stick and print it and the special leveling program will run (right click “save as”):</p><p><a href="https://www.minux.se/humebeam/qidi-xmax-hercules-dial-bed-leveling-script.gcode">qidi-xmax-hercules-dial-bed-leveling-script.gcode</a></p><p>Notice! The first time you print the leveling program, run it without the dial indicator inserted to make sure it runs fine and stops above each bed leveling screw. Adjust the X and Y values in the script if you need to, each machine is different but it should be fine for most.</p><p>Step 3: Insert the dial and print the gcode again. Take notice of the mm distance from the dial to the bed for the first bed leveling screw. You can rotate the dial to get a better view if you like, it will not impact its reading. It will automatically move to the second bed leveling screw after 15 seconds.</p><p>Step 4: Adjust the second bed leveling screw below the bed to match the first screw's value. It will automatically move to the third bed leveling screw after 15 seconds.</p><p>Step 5: Adjust the third bed leveling screw below the bed to match the first screw's value.</p><p>Step 6: After another 15 seconds the bed will lower and the program is complete.</p><p>Step 7: Done. Your bed is now perfectly level.</p><p><i><strong>Warning! Do NOT attempt to use the normal bed leveling with the dial mounted, it will hit the frame and likely break!</strong></i></p><h3>Print Settings</h3><p><strong>Printer:</strong></p><p>QIDI Tech X-Max</p><p><strong>Rafts:</strong></p><p>No</p><p><strong>Supports:</strong></p><p>Yes</p><p><strong>Resolution:</strong></p><p>0.2 mm</p><p><strong>Infill:</strong></p><p>25</p><p><strong>Filament:</strong> Prusament ASA Jet Black</p><p><strong>Notes:</strong></p><p>Print all parts in 0.2 mm layer height using a 0.4 mm nozzle.</p><p>The whole carriage prints in one piece with supports only needed in a few spots:</p><ul><li>Above the arches over the rods</li><li>The belt fastener Print the carriage with supports for angles above 52 degrees only and no supports will be placed below the carriage where the bearings hold it in place and it will be perfectly even.</li></ul>
With this file you will be able to print QIDI X-Max Dial Indicator Carriage and Bed Leveling Script with your 3D printer. Click on the button and save the file on your computer to work, edit or customize your design. You can also find more 3D designs for printers on QIDI X-Max Dial Indicator Carriage and Bed Leveling Script.