QIDI X-Plus X-Max Extruder Fan Upgrade
thingiverse
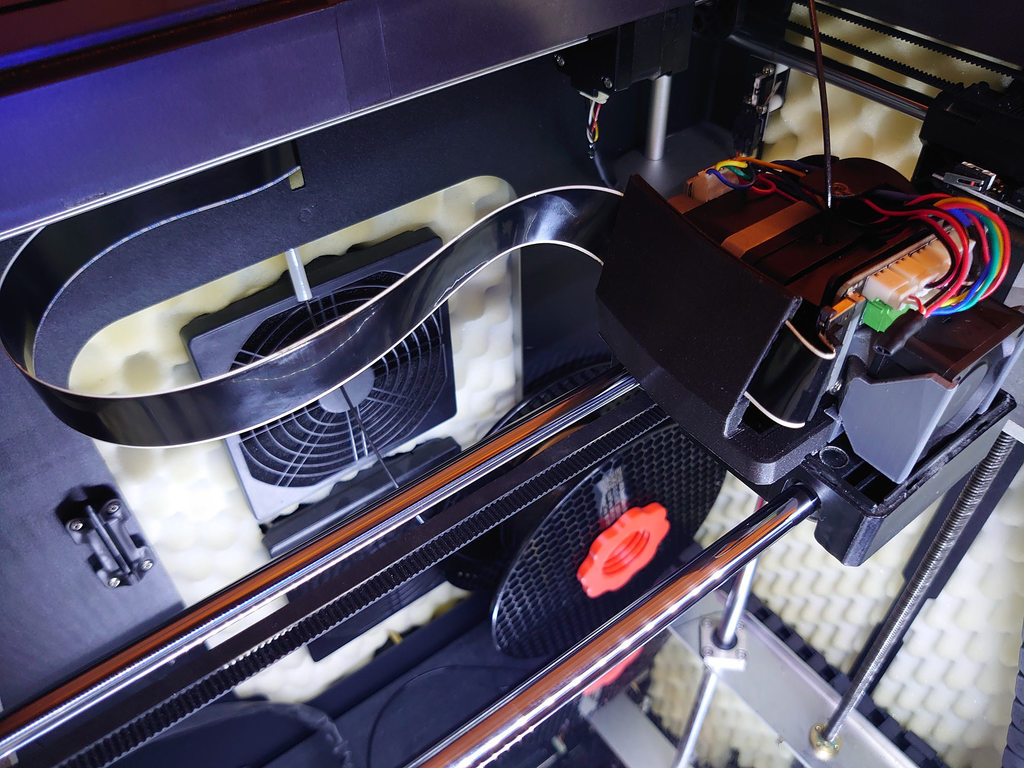
<b>Update December 29, 2020</b> Ribbon Cable Holder angled towards extruder to keep the cable from dipping down. You may have experienced that over time the cable will dip down using the earlier version, this angled design will prevent that. To upgrade, you only have to reprint this part, the other parts are unchanged: qidi-xplus-xmax-extruder-fan-duct-404020-part-2-ribbon-cable-holder-1.1.stl <b>About</b> This is an alternative to my QIDI X-Plus X-Max Advanced Extruder Cover: https://www.thingiverse.com/thing:4607027 It has similar functions and features an upgraded 40 mm fan, a fan duct and a ribbon cable holder. The reason I wanted to offer this alternative is that the space is quite limited under the Advanced Extruder Cover, meaning it's a bit difficult to remove and install it should you need to do some maintenance on the extruder. The main objective is to improve the limited extruder cooling of the stock extruder and lower the noise level. The stock fan is small and noisy and the air isn't directed very good (at all really). The fan duct in this design makes sure the air goes where it is supposed to, limiting the risk of heat creep and other issues related to extruder cooling. <b>BOM - Bill of Materials</b> <a href="https://s.click.aliexpress.com/e/_ACAhGq" target="_parent">Gdstime 40mm 24V Ball Bearing 40x40x20mm fan</a> The fan already come with a JST-XH connector so it will fit the printer. It is possible you need to re-pin the connector though as it's possible polarity is reversed but usually it is not needed. <b>Installation</b> First of all, make sure you have a replacement fan handy (see BOM above for inexpensive and ready to use options). Otherwise, I recommend the Sunon Maglev MF40202V2-1000U-A99 which is a 24V 40x40x20 mm fan that is inexpensive and moves a lot more air (7.70 vs 4.68 CFM) than stock and is considerably quieter (21 dB(A) vs 36.8 dB(A)), it's perfect for the application. If you want an even quieter fan you can use a Noctua A4x20 (FLX) with the included low-noise adapter NA-RC12. It's a 12V fan but using the low noise adapter it will effectively bring down the voltage from the printer to the fan so it can be used without issues. You can also use a buck converter. If you have a JST crimping tool you can cut off the connector from the new fan and crimp on a JST-XH connector on it. Make sure polarity is correct, the red wire goes where the red wire on the original fan connector goes. Take a look at the stock 30 mm fan if you're unsure. <b>When the connector is connected to the PCB, the red wire should be on the right side looking in front of the PCB if the extruder was mounted in the printer.</b>. I have also attached a picture of this. If you're using another fan make and model, make sure you check the polarity so it isn't reversed. If you don't have crimping tool you can just cut off the connector from the original fan and solder/splice it on. Print the 3 (4) parts. If you use the parts cooling fan, skip printing of Part 4. This design has the following parts: Part 1 - "Fan Duct" with friction fit for 40x40x20 mm fan Part 2 - "Ribbon Cable Holder", interlocks with Part 1. Part 3 - "Limit Plate" for the parts cooling fan. Part 4 - "Limit Plate Distances" if you don't use a parts cooling fan. First, remove the extruder cover, it is mounted with a single screw on top. Unplug the ribbon cable from the extruder and dismount the extruder, it is mounted with two screws from below. Dismount the small extruder fan and distances. Next, remove the two screws holding the parts cooling fan on the right hand side (aka blower fan/turbo fan/radial fan). Mount the Part 3, "Limit Plate" on top of the parts cooling fan, notice that one arm is longer than the other (goes top left). If you don't use the parts cooling fan, use the printed distances in place of the fan and find 2 x 20 mm M3 screws to mount the limit switch plate and distances. The reason we need a limit switch plate is that normally the extruder cover triggers the micro switch when homing so we need a replacement else the printer won't function correctly. Next, find 2 x 15 mm M3 screws. Insert the screws into Part 1 - "Fan Duct" and then place it over Part 2 - "Ribbon Cable Holder". It's possible you could use the screws that the original 30 mm fan was mounted with but I haven't tested (they could be too long). Next, mount the fan duct and ribbon cable where the original 30 mm fan and distances were mounted. The end of the ribbon cable holder should rest on the extruder carriage, there is a slot. Mount the extruder using the two screws from below. Insert the new fan, it is a friction fit so no screws are needed. The sticker of the fan should face the extruder. Route the ribbon cable over the holder and then insert it into the PCB, not the other way around. All done. You may have to do a quick level of the bed depening on how hard the extruder screws were screwed in before/after. <b>Donations</b> All my designs are free, they're developed and tested in my spare time and most have source files available for easy editing. If you enjoy this or any of my other designs, a small donation is not needed but welcome. Thanks! :) <a href="https://paypal.me/humebeamengineering"><img src="https://www.paypalobjects.com/webstatic/mktg/logo/pp_cc_mark_111x69.jpg" border="0" alt="PayPal Me"></img></a>
With this file you will be able to print QIDI X-Plus X-Max Extruder Fan Upgrade with your 3D printer. Click on the button and save the file on your computer to work, edit or customize your design. You can also find more 3D designs for printers on QIDI X-Plus X-Max Extruder Fan Upgrade.