QU-BD Extruder Modifications
thingiverse
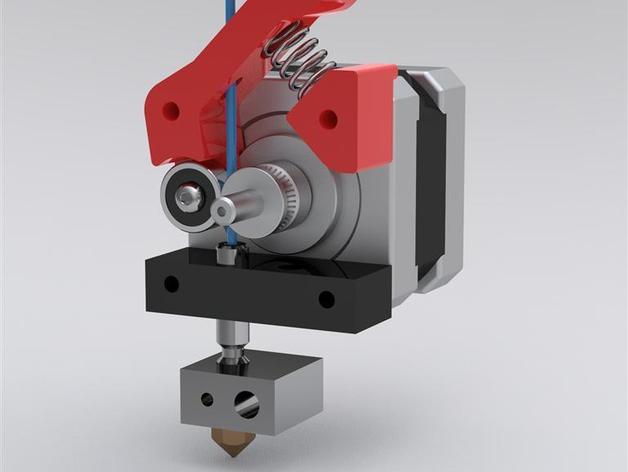
My QU-BD extruder was stopping a lot so I made some modifications. The primary problem was the way they push the filament against the drive gear with a set screw. I switched to a spring loaded idler pulley. This will work with the stock QU-BD drive gear, but I switched to an MK7 style drive gear. The extruder is super reliable now. There are two versions of the parts to allow you run the filament through the right side or left side. You need a 4mm I.D. x 13mm O.D x 5mm thk bearing (624), a button head 4mm x 10 screw, a 4mm washer and a spring. I used a 3/8" x 1-1/8" x 0.047 spring from a Home Depot assortment pack. The other parts are available a lot of places, but I bought mine at McMaster Carr. It all fits within the width of the motor, so two can be run side by side. I have a wiki page of all the things I did to tune up my QU-BD extruder here... http://www.buildlog.net/wiki/doku.php?id=ord_bot:qu-bd_extruder_improvements Instructions Select the version you need depending on what side of the shaft you run your filament through. Print the parts. Use a 3mm drill to clean out the holes. Assembly the lever, bearing, washer and screw. You should be able to "self tap" the screw into the lever. Assemble everything on the extruder except the lever. There is a little bump on the spring block that points towards the motor. This prevents it from rotating. Install the lever with the spring. Hold the spring compressed while installing the screw that goes through the fan, heatsink and lever into the motor. Make sure you don't over-tighten the screw and lock the lever in place. Inspiration came from this thing http://www.thingiverse.com/thing:15718
With this file you will be able to print QU-BD Extruder Modifications with your 3D printer. Click on the button and save the file on your computer to work, edit or customize your design. You can also find more 3D designs for printers on QU-BD Extruder Modifications.