QU-BD TwoUp Upgrade
thingiverse
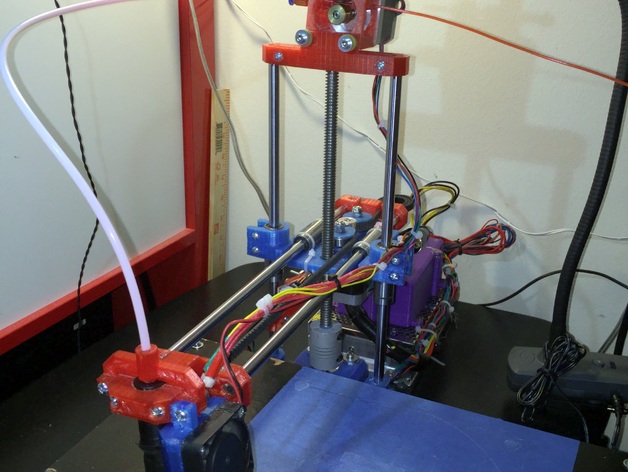
This is a budget-friendly upgrade for the QU-BD. I'm remixing my first attempt http://www.thingiverse.com/thing:1101105 and adapting it from http://www.thingiverse.com/thing:1058861 and http://www.thingiverse.com/thing:177256 to use most of the electronics and hardware from the QU-BD 1/2Up. I'm using some extra parts like nuts and bolts #6 from my local store, and an Anubis or E3D v6 Bowden, which keeps the inversion to a minimum. This means you don't need to order any M2, 3, 4 or 5 screws online, which are hard to find and expensive. I've coded all the files from scratch in OpenScad using original images as reference. I'll eventually post everything so anyone can use these files as they want. ------------------------- PART LIST ------------------------- 1) Machine screws round head #6-32 3/4" and 1", about $2. 2) Pneumatic Coupling Coupler Fitting, bearings 608zz, Endstop Mechanical Limit Switch W/ LED and wire, Nylon Plastic Zip Trim Wrap from eBay or similar sites, around $11. 3) Filament for printed parts, used PLA with layer 2.00 and 30% infill, about $6. 4) Most of the original QU-BD 2Up hardware, only two chassis parts - top bed and filament-spool holder base. ------------------------ TEST AND UPDATES ------------------------ 1) Printed all parts with minor issues, no support needed. 2) First test to put everything together and check design weaknesses: https://youtu.be/DG5nCwstxoA 3) 2nd Test: https://youtu.be/zQsfm_l_3WI (01/14/16) - checked belts. 4) 3rd Test: https://youtu.be/fliewcvI1NI (01/14/16) - tested End-Stops. 5) Z_base_end, x_axis_end, printer_head and printer_head_support are fixed. Rest looks fine for now. 6) 1st Running Test: SUCCESS!!! It's alive!!! 7) Videos available here: https://www.youtube.com/playlist?list=PLp69TlCBx-zILPCqnHWXA330q658VN0Fz ------------------------- UPDATES ---------------------------- 12/28/15 - Fixed z_motor_base and x_motor_base. Added printer_head_support, test_base, base_short and z_top_bowden_extruder_base. 01/17/16 - Fixed x_axis_end and y_base_end. Added printer_head_ubis and printer_head_ubis_support to use QU-BD One/Two-Up anUbis hotend in bowden configuration. 02/06/16 - New Bowden base. -------------------------- PARTS TO FIX ---------------------- 1) Z-Axis end stop. 2) z_top_bowden_extruder_base - make it a handle to carry the printer. -------------------------- PENDING ---------------------------- 1) Improve the base. 2) Add a power switch to the PSU. 3) Make one version of yz_carriage and x_motor_base using LM8UU (24mm) bearings. Print Settings Printer: QU-BD TwoUp and M3D Rafts: No Supports: No Resolution: 0.3 Infill: 40%
With this file you will be able to print QU-BD TwoUp Upgrade with your 3D printer. Click on the button and save the file on your computer to work, edit or customize your design. You can also find more 3D designs for printers on QU-BD TwoUp Upgrade.