Quad Track - Tiny Servo Driven FPV RC Tank - Tiny Trak
thingiverse
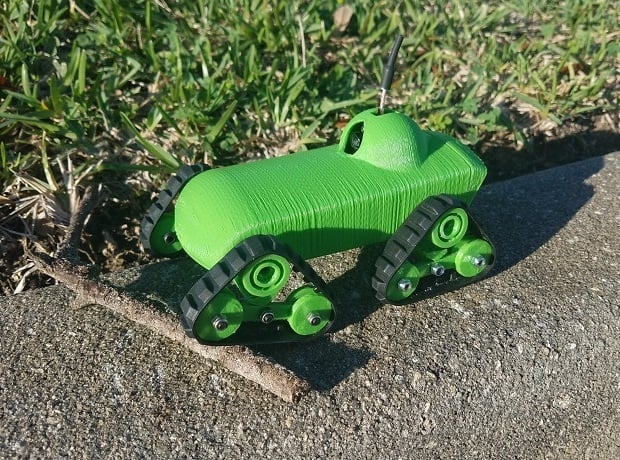
This teeny Tiny Quad Tank rolls on Lego tracks pushed by servos. It pivots via skid steer. The tracks can tilt 30 degrees up and down for tackling obstacles. See the third design - a turret tank - here: https://www.thingiverse.com/thing:3481012 To build you'll need: -Four Lego tracks (Lego Part: x939 or 43903 - www.bricklink.com for best prices) -Four servos (continuous [FS90R] or modify a regular one – Search "FliteTest 360 Degree Servo Mod" on YouTube) -Receiver of your choice (the smaller the better) -Mini FPV camera AIO (I used this one: AKK BA2 5.8Ghz 200mW FPV Transmitter Raceband 600TVL 1/4 Cmos Mini FPV Micro AIO Camera (https://www.akktek.com/akk-ba2.html) -5v pololu step up/down regulator -1s batteries (I used tattu 800mah); There is space enough inside for a 2s Battery if you so desired. -Twelve M3-0.5 x 14mm socket cap screws/bolts (or similar) – you could use M3x12mm, but the 14mm are better. -Twelve M3-0.5 Nylon lock nuts Quick Test video: https://www.youtube.com/watch?v=pfvYdi5RJv0 This is my second designed Tiny Trak (See the original at https://www.thingiverse.com/thing:2977620) A Note on Printing: All parts can be printed WITHOUT SUPPORTS. These files were designed with integrated supports. There may be some tabs to cut out (See Assembly Instructions). Print: -One Body (has integrated supports) -One Body Tail (Optional) -One Chassis -Four Lower Suspensions (has integrated supports) -Four Transverse Levers -Four driven wheels (four of both Driven Wheel A & B) -Sixteen Bogey Wheels (Non-drive) Assembly: 1. Print all required parts. 2. Cut/remove the print tabs from the “Body” and “Lower Suspension” prints. 3. Ensure the “Body” and “Chassis” click together and have a good fit. 4. Install continuous servos into “Chassis.” Consider cutting down the wires and soldering the leads together to save on space. 5. Prepare the drive and lower assembly parts. 6. Super Glue (CA Glue) the “Driven Wheel A & B” Parts together. 7. Install the driven wheels onto the servos. 8. Install the “Transverse Lever” onto the “Lower Suspension.” 9. With the Chassis flipped over, glue the lower suspension assembly to the chassis. 10. Attach the Body onto the Chassis. 11. Install LEGO Tracks. 12. Bind your radio and get moving. 13. If using FPV, you can print the Camera Pod if you wish or just use foam to prop it up in the cavity. 14. Enjoy
With this file you will be able to print Quad Track - Tiny Servo Driven FPV RC Tank - Tiny Trak with your 3D printer. Click on the button and save the file on your computer to work, edit or customize your design. You can also find more 3D designs for printers on Quad Track - Tiny Servo Driven FPV RC Tank - Tiny Trak.