Quick Backlash Calibration Method
thingiverse
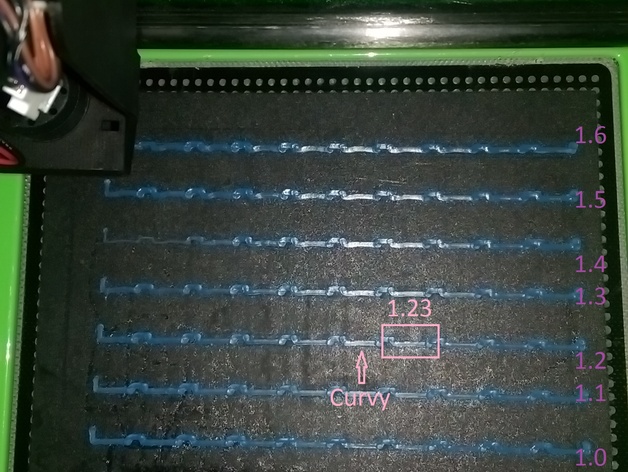
You should probably check out version 2 instead: http://www.thingiverse.com/thing:2040624 This is a set of prints that can quickly determine your printer's backlash settings. I designed it specifically for the M3D Micro, but there's no reason why it shouldn't work on other Cartesian printers too. This is by far the quickest method I've seen for calibrating backlash, as it produces empirical results in one go instead of using trial and error. If you own an M3D Micro, I recommend using the G-code files I have prepared. If you own another printer, you may need to slice the files yourself. Disclaimer: For my own printer, I'm fully satisfied with the precision of this method. Others might find that it only brings them close enough for further tweaking with other methods. And others again might find that results produced with this method are too far off to be useful. Make sure your spool location doesn't affect the movement of the print head at all (This last warning probably only applies to the M3D Micro as it is very sensitive). Print Settings: Printer: M3D Micro Rafts: No Supports: No Resolution: 0.350 mm Infill: None Notes: The files require specific slicing settings, as most slicers tend to ignore features that are as flat and slim as these. For this reason, I recommend using the G-code files that have been modified and tested with both the official M3D software and M3D Fio/Octoprint. Turn 90 degrees in the slicer when making the Y-files if you choose to slice an STL file yourself. Post-Printing How to measure Very important notice: In order for this print to work, your print bed must be very precisely calibrated. Otherwise, the print will come off the bed. My preferred calibration method for the print bed is: http://www.thingiverse.com/groups/m3d-the-micro-3d-printer/topic:5062 But print bed calibration is very individual from one type of printer to another, so calibrate the way you prefer. Adjusting the Y-axis: In your printer software, set Y-backlash to 0 before printing. Print one of the G-code files that has a Y in the name. Most M3D Micro printers will need the QuickBacklash_Y_0.70-1.69 file. If all of the samples are curvy, try the QuickBacklash_Y_0.00-0.99 instead. Watch the print start and remove the extra filament that is extruded in the beginning. It's just to prime the nozzle. The included files will make 100 samples. You have to study these samples very carefully. You have to find the sample with the highest possible value that doesn't curve. We're talking about a curve that only moves 0.01 mm to the side. It sounds impossible to spot, but it's actually doable. I recommend having a ruler in one hand and a flashlight in the other. I never remove my build platform, but if I did, I'd probably use a magnifying glass. When you've located the correct sample, calculate the backlash value using the chart/picture above. The 0.7 file will begin at 0.70 mm in the corner marked with a blob. The 0.0 file will start at 0.00 mm. I think it's a good idea to make three prints and take the average value spotted for each. If one of them is way off, disregard it and make another. If you're unsure, choose the lower value. Enter the value you found in your printer software. Adjusting the X-axis: Similar to the process for the Y-axis. But most M3D Micro printers will need the QuickBacklash_X_0.00-0.99 file. If all the samples are flat, try the QuickBacklash_X_0.70-1.69 file instead. How I Designed This Designed in OpenSCAD. Sliced in Slic3r and finally the G-code was tweaked in Notepad to work with the Micro's native software.
With this file you will be able to print Quick Backlash Calibration Method with your 3D printer. Click on the button and save the file on your computer to work, edit or customize your design. You can also find more 3D designs for printers on Quick Backlash Calibration Method.