Quick Backlash Calibration V.2
thingiverse
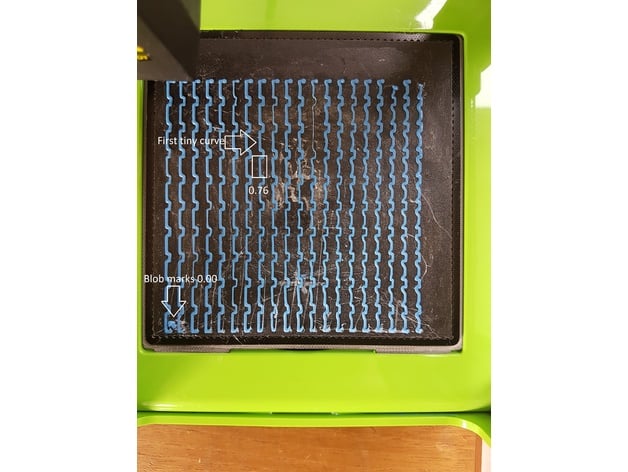
Introduction. Quickly get a good backlash calibration on your 3D printer using this method. Zero out the backlash compensation in the software, then print the objects and read the correct value to enter as your new backlash compensation. You're done! The files were created for the M3D Micro but should work for all Cartesian-type printers. Delta printers won't work with these files. Instructions. Before starting this process, make sure your print bed is spotless and perfectly calibrated. Print just a single layer, covering the entire surface exactly right. Find more information about bed leveling below. Set backlash compensation to zero before printing the first sample, noting the old values in case you need them later. Watch as the print begins and remove excess filament extruded initially - it's just for nozzle priming. The included files produce 200 samples; study these carefully. Identify the highest possible value without any curvature, considering only a curve that shifts 0.01 mm to one side. It may seem impossible, but with a ruler in one hand and a flashlight in the other, you can do it. Alternatively, use a magnifying glass or take a high-quality picture for closer inspection. Once you've located the correct sample, calculate the backlash value using the chart above. Consider making three prints and averaging the values found each time; if one value seems off, disregard it and print again. If unsure, choose the lower value. Repeat this process for the other axis and enter your findings in your printer software. Post an "I made one" with a photo to help others understand how to read the results. A customizer is included so you can modify line width and layer height to suit your slicer and printer. More Knowledge. Bed Levelling. Automatic calibration methods like "Recalibrate Drive System" or "Run complete bed calibration" are generally preferred. However, these methods are sensitive to disturbance; avoid walking near the printer while it's running unless on a concrete floor. If the automatic method isn't sufficient, AidanHorton's manual method for fine-tuning the bed level is recommended: http://www.thingiverse.com/groups/m3d-the-micro-3D-printer/topic:5062 Where Do I Adjust It? This article provides clear screenshots on adjusting backlash in the M3D software: https://printm3d.com/solutions/article.php?id=234 Before using Quick Backlash Calibration, set your values to zero. What Is Backlash Anyway? A simplified illustration explains the issue well. The calibration aims to understand how much the first cog moves when direction changes, measured in hundreds of millimeters. Here's an example: https://edinburghhacklab.com/wp-content/uploads/2013/04/backlash.gif There are more gears and belts involved than just one gear connection; however, this illustration effectively conveys the problem. Version 2? Compared to version 1, version 2 includes double the number of samples for reduced complexity when starting with this method. It also has improved tolerance towards poor bed leveling. If you're having success with version 1, there's no need to switch to version 2. Version 1 is available here: http://www.thingiverse.com/thing:1435828
With this file you will be able to print Quick Backlash Calibration V.2 with your 3D printer. Click on the button and save the file on your computer to work, edit or customize your design. You can also find more 3D designs for printers on Quick Backlash Calibration V.2.