Quick Release E3D Fan Duct for Dibond Mendel90
thingiverse
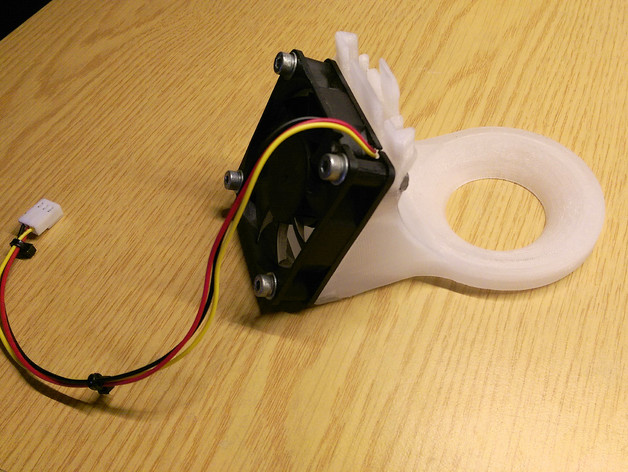
A fan duct for cooling prints which can be used instead of the standard fan duct when upgrading from the J Head to an E3D hot end (in my case a v6) on a dibond NopHead Mendel90. It uses the same 60mm fan as supplied by NopHead. This is the second version of this duct and incorporates a quick release mechanism as well as more flexible height adjustment (a common request I got on the original one here: http://www.thingiverse.com/thing:491316 ) I have marked it as a work in progress because even though it works great I have had issues with the release lever snapping off (ABS can be very brittle). I need to do a test print in Bridge (Nylon) to see if this solves the problem. You can repair the lever by using acetone as a glue but I have found even with the lever snapped off it still works great as it stays in place with friction (depending on your tolerances you might want add a bit of tape over the top to make it push in tighter). NOTE: This will not fit a Sturdy Mendel90 it only fits a Dibond Mendel90. If anyone modifies it to fit please let me know and I'll include a link :) Build Instructions Both the fan and bracket can be printed without supports depending on what settings and slicer you use. In fact I suggest you avoid supports as they will be a pain to remove. I recommend using ABS or Nylon as PLA will melt this close to the extruder but any alternative high temp material should be good. The standard 60mm fan supplied by NopHead can be used but I used shorter bolts to stop it fouling with the belt. Also I used the standard nylock nuts on the bottom but regular nuts on the top again to allow more space for the belt. The alternative (as suggested by daichiasuka in the comments on the previous fan duct) is you could flip the bolts around and recess the heads instead of the nuts, obviously this isn't as cosmetically pleasing but that may not matter depending on if you have a show printer or not :) Usage Instructions The bracket part slides down from the top over the two bolts which held the previous fan duct on the X carriage. You will need to slacken the bolts off far enough to get the bracket past the motor PCB bracket. With the bracket at the midpoint of its height adjustment you should tighten the bolts. Once thats done slide the fan duct up and into the bracket from the bottom until its fully inserted. The release lever should then hold it in place. You can then adjust the height to suit. When you want to release the fan duct, disconnect it, gently press on the release lever and pull it downwards.
With this file you will be able to print Quick Release E3D Fan Duct for Dibond Mendel90 with your 3D printer. Click on the button and save the file on your computer to work, edit or customize your design. You can also find more 3D designs for printers on Quick Release E3D Fan Duct for Dibond Mendel90.