R_E_R_F Anycubic photon mono 4k
thingiverse
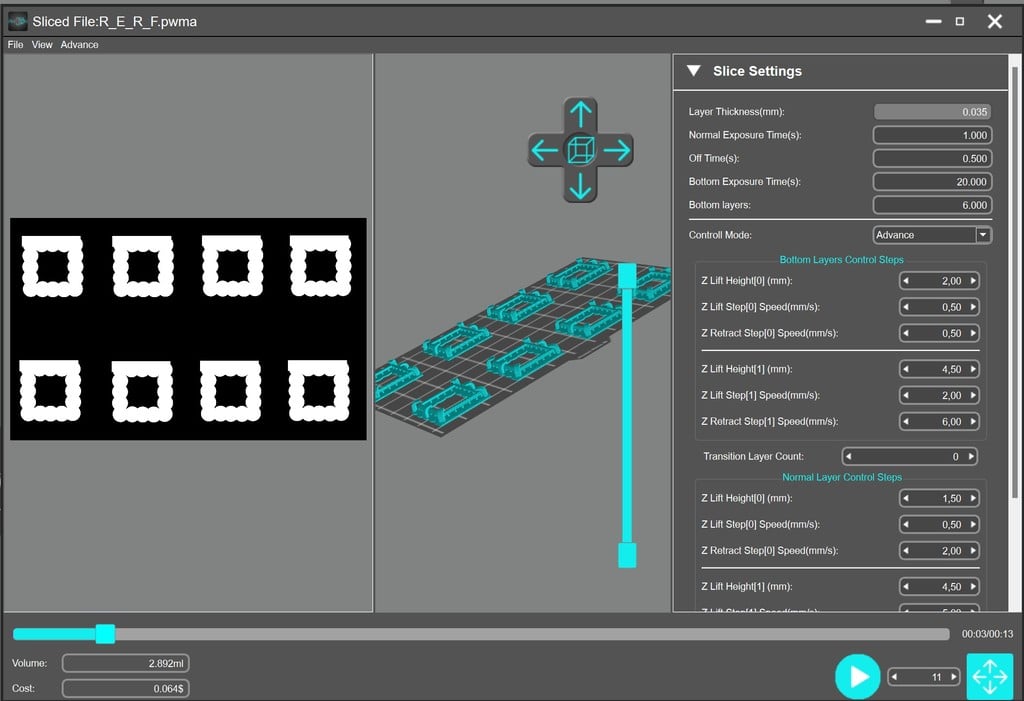
Deutsch: Das ist ein RERF Test für den Anycubic Photon Mono 4k in Anlehnung an den von Denis Wang erstellten RERF Test ( https://youtu.be/15k69E_--2M ) . Leider hat sich nach dem Firmwareupdate (https://www.anycubic.com/pages/photon-mono-4k-firmware-upgrade) PM4K_F014.bin | PM4K_V_202.bin die Ausrichtung und Reihenfolge des Tests geändert, weshalb die originale Testdatei nicht mehr verwendet werden kann. Die neue Ausrichtung ist in dem kurzen Videoclip zu sehen https://youtu.be/qQ54jJYs9uA - Darum habe ich eine neue Testdatei erstellt. ( R_E_R_F.pwma ) - Ein Scene File für das Programm PhotonWorkshopV2.1.29RC7 ist ebenfalls dabei. - Die .stl Datei kann natürlich in jedem Slicer geladen werden. Benutze aber nur den Photon Workshop, kann also nicht sagen ob mit einem anderen Slicer der RERF Test korrekt erstellt wird (da der Test durch den Dateinamen vom Drucker erkannt und gestartet wird, gehe ich aber davon aus. Wird die Datei umbenannt Bsp. R_E_R_F_new.pwma funktioiert es nicht!) . Wie wird die Belichtungszeit errechnet und wie kann sie verändert werden? : - Die "normal Exposure Time" gibt die Dauer des am kürzesten belichteten Teils (1) an - Jedes weitere Teil wird um 0.25 Sekunden länger belichtet - Teil (8) wird somit 2.75 Sekunden belichtet - Um dies zu verändern, einfach die Datei R_E_R_F.pwma in Photon Workshop öffnen, die "normal Exposure time" verändern (Bsp. 2 Sekunden) jetzt wird jedes weitere Teil inkremental 0.25 Sekunden länger belichtet -> Teil(8) somit 3.75 Sekunden. Zur Durchführung: 1. Tank und buildplate entfernen 2. R_E_R_F.pwma auf USB Stick kopieren und starten 3. Bitte überprüfen, ob das Programm korrekt geladen und in der Reihenfolge wie im Video Clip (NICHT DAS von Denis Wang) zu sehen ausgeführt wird. Wenn ja kann das Programm abgebrochen werden. 4. Tank und buildplate einsetzen, resin einfüllen. 5. Druck starten & Kaffee machen 6. Buildplate und Modelle reinigen (MODELLE NICHT ENTFERNEN!) 7. Wenn alles korrekt lief, gibt es einige Modelle bei denen das Rechteck sich von den unteren Pins gelöst hat (hier war die Belichungszeit zu gering) und durch die Fangarme gehalten wird. Das Bauteil was bei aufsteigender Belichtungszeit korrekt gedruckt wird, ist dann die korrekte Belichtungszeit. Ggf. das Video nochmal anschauen um bei der Reihenfolge keinen Fehler zu machen. Bsp Teil (4) sieht gut aus: 1 Sekunde für Teil(1) 1.25 Sekunden für Teil(2) 1.5 Sekunden für Teil(3) 1.75 Sekunden für Teil(4) -> 1.75 Sekunden ist die Belichtungszeit Vielen Dank für´s lesen English: This is a RERF test for the Anycubic Photon Mono 4k based on the RERF test created by Denis Wang (https://youtu.be/15k69E_--2M). Unfortunately, after the firmware update (https://www.anycubic.com/pages/photon-mono-4k-firmware-upgrade) PM4K_F014.bin | PM4K_V_202.bin changed the alignment and order of the test, which is why the original test file can no longer be used. The new orientation can be seen in the short video clip https://youtu.be/qQ54jJYs9uA - That's why I created a new test file. ( R_E_R_F.pwma ) - A scene file for the program PhotonWorkshopV2.1.29RC7 is also included. - The .stl file can of course be loaded in any slicer. But I only use the Photon Workshop, so I can't say whether the RERF test is created correctly with another slicer (since the test is recognized and started by the printer by the file name, I assume so. If the file is renamed, e.g. R_E_R_F_new. pwma doesn't work!) . How is the exposure time calculated and how can it be changed? : - The "normal exposure time" indicates the duration of the shortest exposed part (1). - Each additional part is exposed 0.25 seconds longer - Part (8) is thus exposed for 2.75 seconds - To change this, simply open the file R_E_R_F.pwma in Photon Workshop, change the "normal exposure time" (e.g. 2 seconds) now each additional part is exposed incrementally 0.25 seconds longer -> part(8) thus 3.75 seconds. To carry out: 1. Remove tank and buildplate 2. Copy R_E_R_F.pwma to USB stick and start 3. Please check if the program loads correctly and runs in the order shown in the video clip (NOT Denis Wang's). If so, the program can be aborted. 4. Insert tank and buildplate, fill in resin. 5. Start printing & make coffee 6. Clean buildplate and models (DO NOT REMOVE MODELS!) 7. If everything went correctly, there are some models where the rectangle has detached from the lower pins (here the exposure time was too short) and is held by the tentacles. The component that is printed correctly with increasing exposure time is then the correct exposure time. If necessary, watch the video again to avoid making a mistake in the order. E.g. part (4) looks good: 1 second for part(1) 1.25 seconds for part(2) 1.5 seconds for part(3) 1.75 seconds for part(4) -> 1.75 seconds is the exposure time Thank you for reading
With this file you will be able to print R_E_R_F Anycubic photon mono 4k with your 3D printer. Click on the button and save the file on your computer to work, edit or customize your design. You can also find more 3D designs for printers on R_E_R_F Anycubic photon mono 4k.
