R. Maker - Mark I
prusaprinters
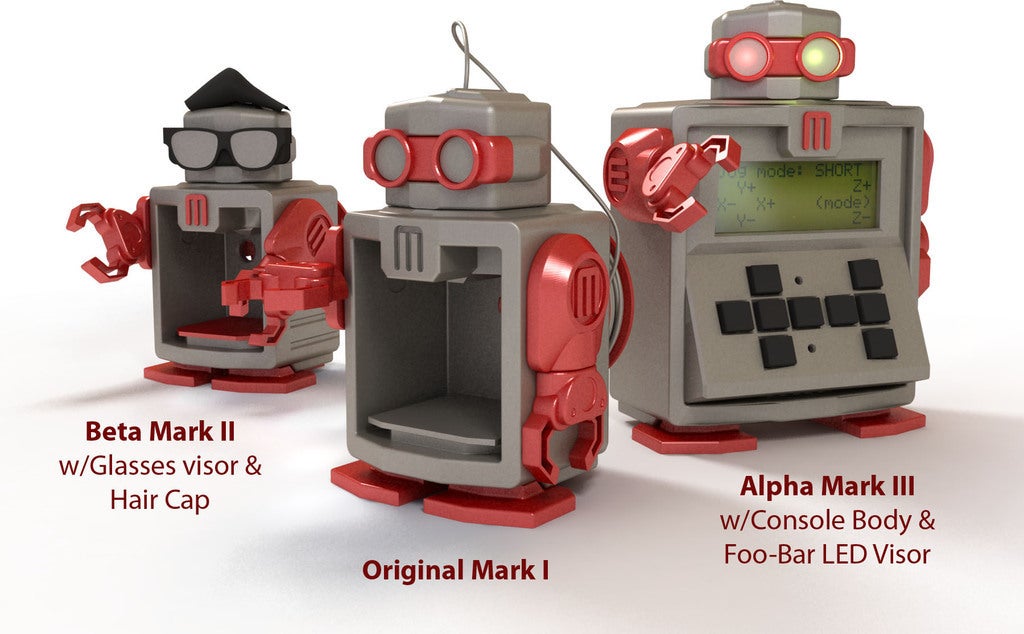
<p>My new YouTube Channel: <a href="https://www.youtube.com/channel/UCnnw56J_TeOsF4M_F5pPPJQ">https://www.youtube.com/channel/UCnnw56J\_TeOsF4M\_F5pPPJQ</a></p> <p>This is my submission to the MakerBot Robot Mascot Challenge!</p> <p>A few comments:</p> <p>Although I am no stranger to 3D modeling, this is my very first model intended to be 3D printed. I do not own a 3D printer of any sort and I have never 3D printed anything. That being said, I tried my best to research good design practices for FDM printing and I sure hope I did all-right!</p> <p>Anyhoo, this little guy is customizable by having different parts printed in different colors. Also, he was designed to be able to be personalized by the producer being able to place his or her own model in the body to add personal flair. The feet articulate as do the head, arms and claws. Everything should snap together. The spool on his back is Mr. Maker's fuel supply! Take some 1.75mm filament and wind it on the spool (you may have to warm it to be more pliant) then thread the end through the top of his head.</p> <p>Now he's ready to go!</p> <p>I designed this in about 10 hours with Autodesk Inventor 2012.</p> <p>(Many thanks to "techknight" for the advice on re-orienting the models in ReplicatorG!)</p> <p>Also, I would LOVE to know how well this prints. I tried very hard to be mindful of the vertical slopes and tolerances but this being my first design for print, I don't really know for sure. If anybody prints this, I would GREATLY appreciate it if you could explain any issues. THANKS! :)</p> <p>UPDATE!<br/> I'm working on the Mark II version as well as an Experimental Mark III body that acts as a stylish enclosure for the Gen 4 electronics guts. I don't own the parts so it's a lot of guesswork at the moment...Along with a new segmented head so it can be wired up with lights or cameras or whatever you can fit in there! (The FOO and BAR lights on the console for example!)</p> <p>The Mark II I'll be uploading soon. Unfortunately not soon enough for the contest, but it was always my goal to create a neat little gizmo that was hackable and modular for ultimate customization!</p> <p>More to come!</p> <p>Update: Name Change! As a nod to robotic lore, this little guy will now be known as R. Maker!</p> <h3>Print instructions</h3><p>Unassociated tags: makerbot challenge, mr maker, r maker</p> <h3>Category: Other Summary</h3> <p>My new YouTube Channel: <a href="https://www.youtube.com/channel/UCnnw56J_TeOsF4M_F5pPPJQ">https://www.youtube.com/channel/UCnnw56J\_TeOsF4M\_F5pPPJQ</a></p> <p>This is my submission to the MakerBot Robot Mascot Challenge!</p> <p>A few comments:</p> <p>Although I am no stranger to 3D modeling, this is my very first model intended to be 3D printed. I do not own a 3D printer of any sort and I have never 3D printed anything. That being said, I tried my best to research good design practices for FDM printing and I sure hope I did all-right!</p> <p>Anyhoo, this little guy is customizable by having different parts printed in different colors. Also, he was designed to be able to be personalized by the producer being able to place his or her own model in the body to add personal flair. The feet articulate as do the head, arms and claws. Everything should snap together. The spool on his back is Mr. Maker's fuel supply! Take some 1.75mm filament and wind it on the spool (you may have to warm it to be more pliant) then thread the end through the top of his head.</p> <p>Now he's ready to go!</p> <p>I designed this in about 10 hours with Autodesk Inventor 2012.</p> <p>(Many thanks to "techknight" for the advice on re-orienting the models in ReplicatorG!)</p> <p>Also, I would LOVE to know how well this prints. I tried very hard to be mindful of the vertical slopes and tolerances but this being my first design for print, I don't really know for sure. If anybody prints this, I would GREATLY appreciate it if you could explain any issues. THANKS! :)</p> <p>UPDATE!<br/> I'm working on the Mark II version as well as an Experimental Mark III body that acts as a stylish enclosure for the Gen 4 electronics guts. I don't own the parts so it's a lot of guesswork at the moment...Along with a new segmented head so it can be wired up with lights or cameras or whatever you can fit in there! (The FOO and BAR lights on the console for example!)</p> <p>The Mark II I'll be uploading soon. Unfortunately not soon enough for the contest, but it was always my goal to create a neat little gizmo that was hackable and modular for ultimate customization!</p> <p>More to come!</p> <p>Update: Name Change! As a nod to robotic lore, this little guy will now be known as R. Maker!</p> <h3> Instructions</h3> <p>Print 2 of the Arm Pegs, Eyes, Shoulders, Shoulder Pegs and Claws. Snap together!</p>
With this file you will be able to print R. Maker - Mark I with your 3D printer. Click on the button and save the file on your computer to work, edit or customize your design. You can also find more 3D designs for printers on R. Maker - Mark I.