Rack Mount Enclosure Accessories for MK3S + MMU2
prusaprinters
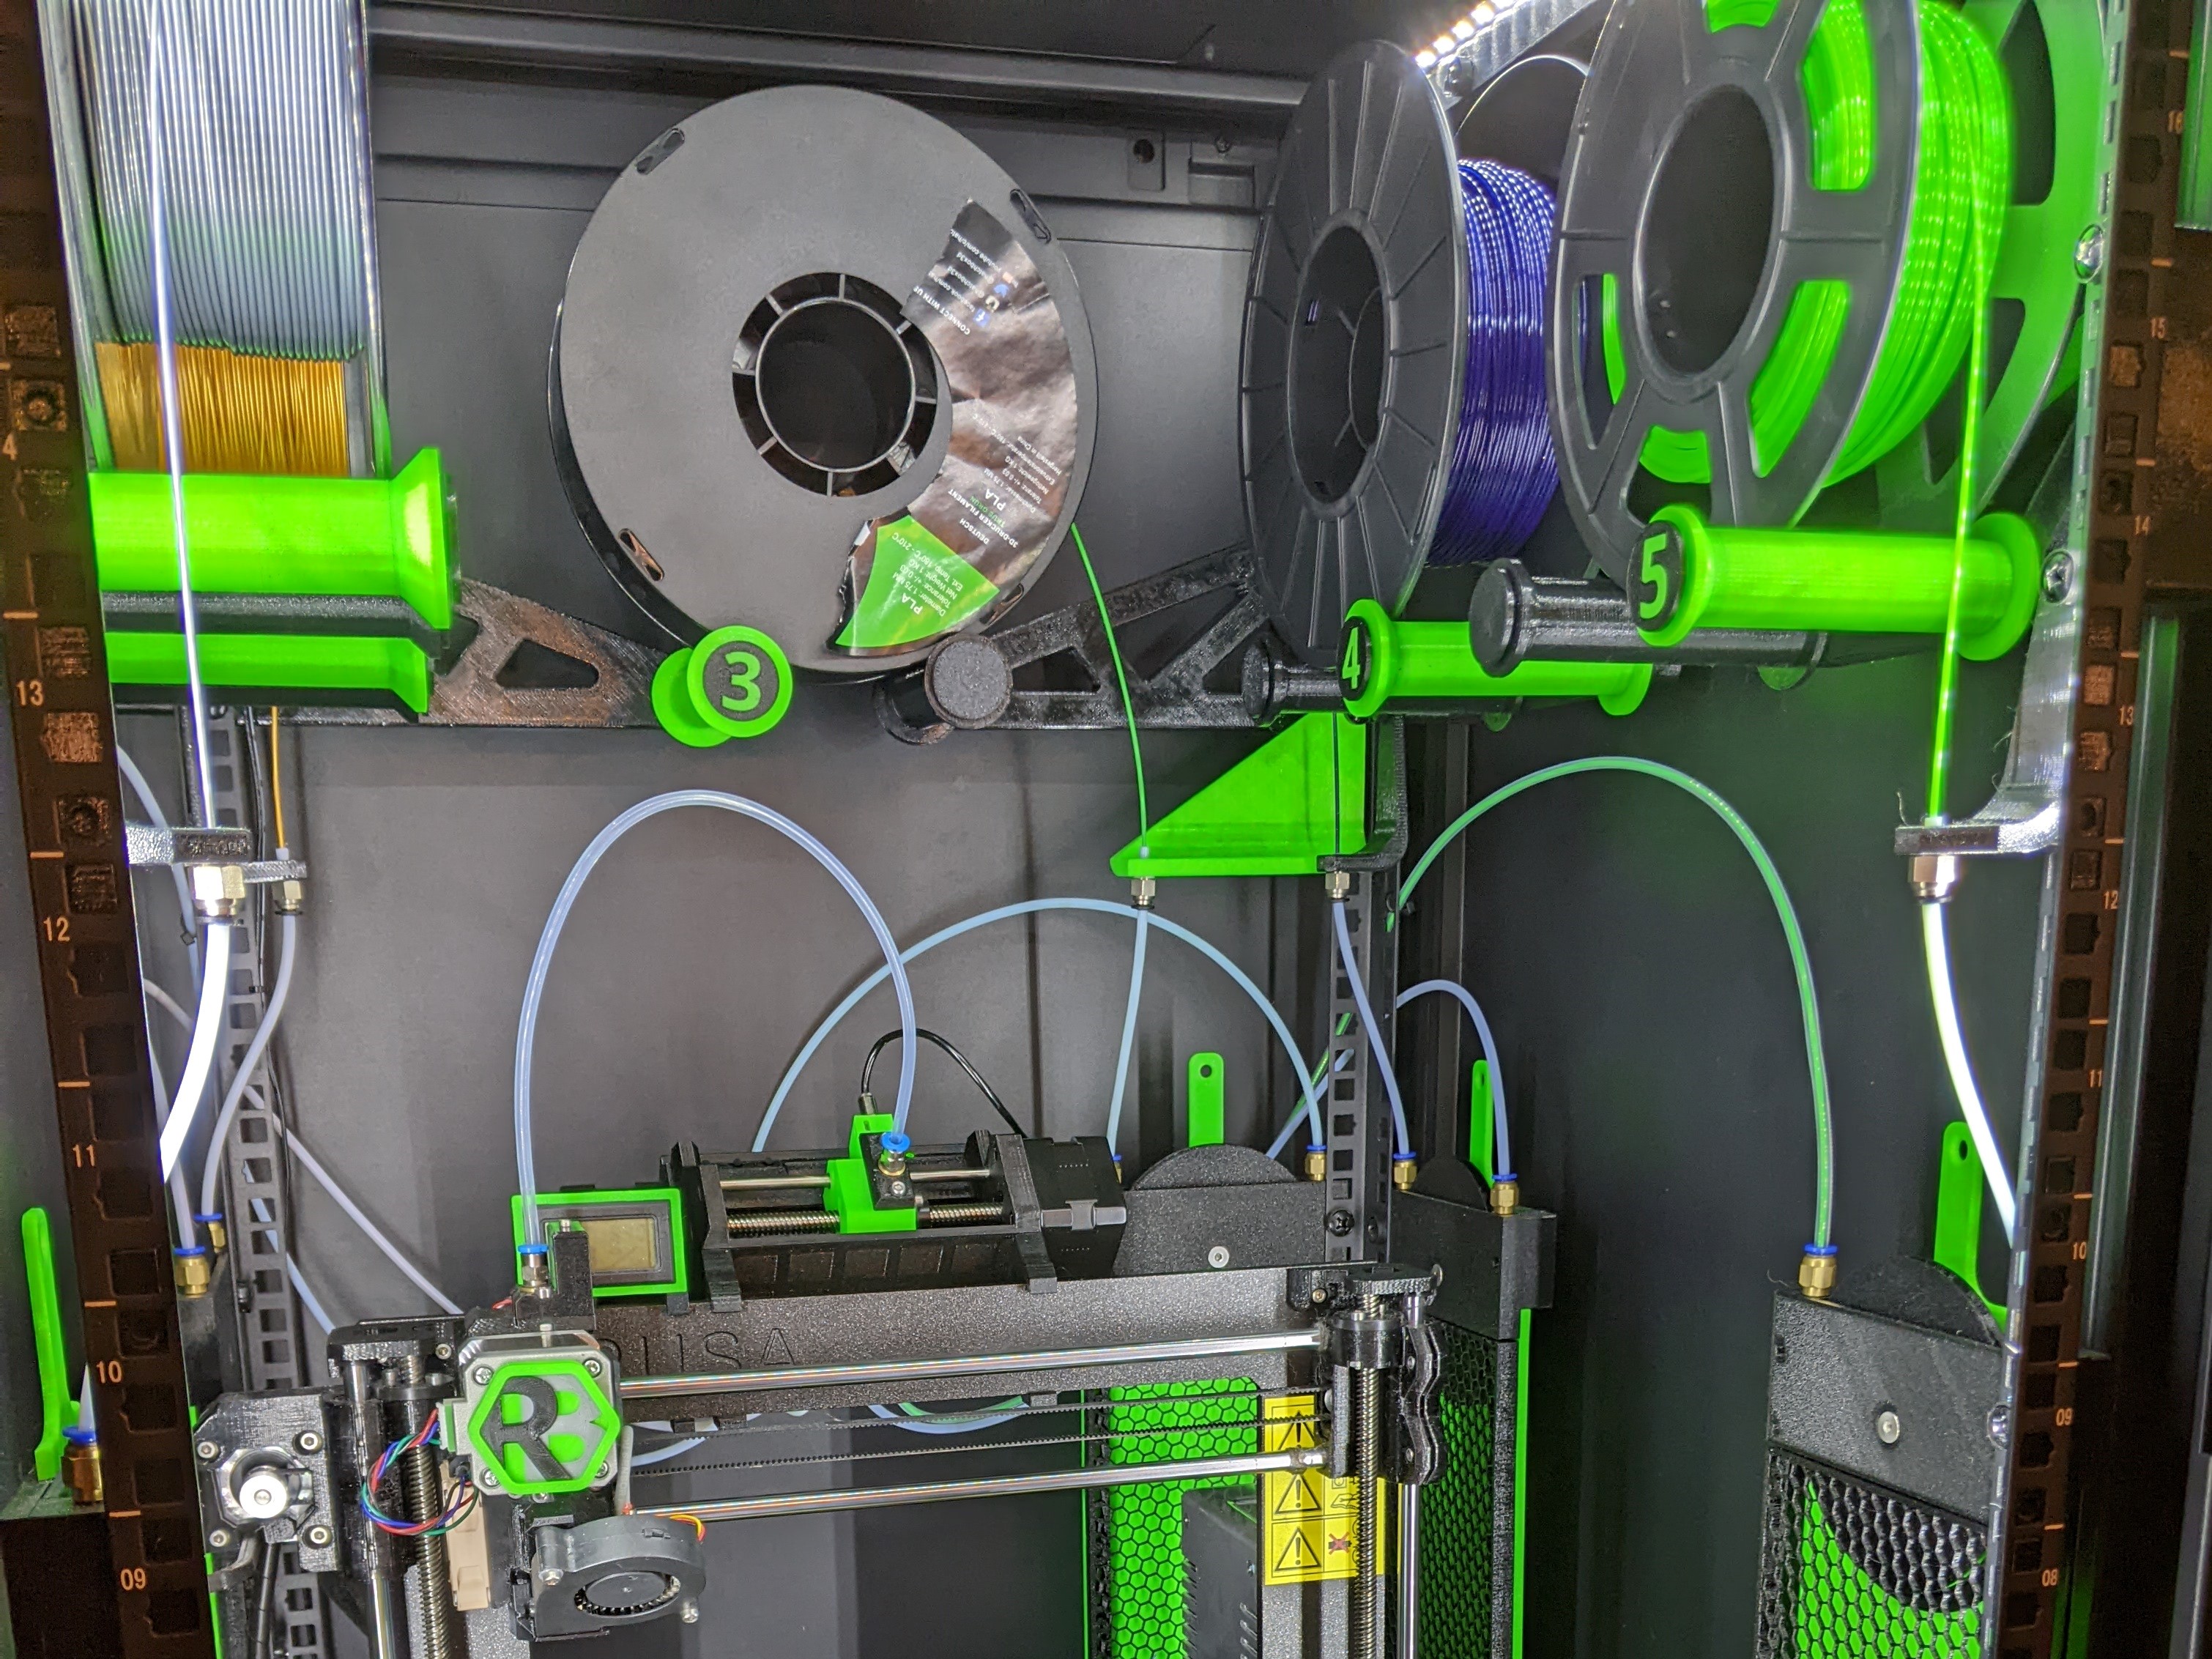
<p>In Fall of 2019 I decided I wanted a metal case to enclose my Prusa MK3S + MMU2S. Mostly for safety reasons and piece of mind. I found the <a href="https://navepoint.com/navepoint-18u-600mm-depth-networking-cabinet-performance-series/">NavePoint 18U 600mm Depth Networking Cabinet</a> and it seemed like a reasonably priced option that would fit the MK3 nicely with plenty of room for spools, access to the MMU unit and <a href="https://www.thingiverse.com/thing:3373895">retract banks</a>(These are really cool if you haven't seen them before). Navepoint also makes a shorter version that still fits the MK3<br><a href="https://navepoint.com/navepoint-15u-600mm-depth-networking-cabinet-performance-series/">NavePoint 15U 600mm Depth Networking Cabinet</a>.</p><p>I set about designing some components to mount the spools and other components, and seal up the case. Here is the results of my efforts. I am now finally getting around to posting this after sitting on it for a year. Enjoy.</p><p>I know I shouldn't have my power supply mounted in the case but I haven't gotten around to moving to the exterior. I think the cables should be long enough to fit out the bottom slot in the case and allow the power supply to mount on the back of the case.</p><p><i>Additional Components I used:</i></p><ul><li>9x1 disc magnets for various attachments</li><li>5mm Wide 1mm Thick adhesive backed weather striping to seal around side panels.</li><li>Smoke Detector (the one I bought wirelessly connects to rest of the smoke detectors in my house and is mounted with some super glued 9x1mm disc magnets)</li><li><a href="https://www.amazon.com/gp/product/B00MHLIFO8/ref=ppx\_yo\_dt\_b\_search\_asin\_title?ie=UTF8&psc=1">LED Strip Lights</a> with adhesive back</li><li>LED Cord Extension used to allow the dimmer to be mounted up front</li><li>Temp & Humidity Sensor for reference</li><li>M3 x 12mm flathead self tapping screws</li></ul><h3>Print instructions</h3><p><strong>Resolution:</strong></p><p>0.2mm</p><p><strong>Filament:</strong> PETG</p><p><strong>Notes:</strong><br>Everything was printed in PETG. No guarantees with PLA, might need to watch out for some of the press fits.</p><p>I recommend printing the Filament_Guide.stl from the retract bank, see link retract bank files below, in PLA or another stiff material in a contrasting color.</p><p>See Component Descriptions section below for part specific instructions.</p><h5>Dual Roller Spool Holders (the best ones yet, updated Dec. 12th, 2021)</h5><p>I made these filament holders to resolve the issues mentioned below with the Bearing Spool Holders, i.e. unwinding to much. They work flawlessly. This is the same concept as below except the spool sits on top of two rollers. They use the rods and bearings from the MMU2 spool holders. I also included a filament guide which uses a <a href="https://www.amazon.com/gp/product/B01KHN1HWY/ref=ppx_yo_dt_b_search_asin_title?ie=UTF8&psc=1">through bore fitting</a>.</p><p><strong>Bearing Spool Holders</strong><br>Three variations of a 2U cantilever spool holder. This version reuses the aluminum shaft and bearings from the MMU2 desktop spool holders so the spool support rotates freely. Two holders are mounted on each side and one is mounted in the center back of the server rack. The arms are attached to the rack using the provided M6 screws</p><p>These work pretty well, They provide every little rolling resistance when the MMU pulls the filament. However, sometimes they work to well as the spools can sometimes spin multiple times if they are full and not balanced. Every once and a while couple extra loops of filament can come off the spool if it is very full. However it has never caused an issues with printing. I would like to figure out a method to prevent this possibly by making the input Teflon tubes longer or some kind of bar across the top to prevent filament coming off the spool.</p><p>Numbers caps are provided as a .3mf file for easy MMU printing.</p><p><i>Print Settings:</i><br>Arms should be printed with 3 perimeters</p><p><i>Print Quantities:</i><br>2 Regular, 2 Mirrored, 1 Extended</p><p><strong>Static Spool Holders</strong><br>Three variations of a 2U cantilever spool holder. Two holders are mounted on each side and one is mounted in the center back of a server rack. The arms are attached to the rack using the provided M6 screws.</p><p><i>Print Settings:</i><br>Arms should be printed with 3 perimeters</p><p><i>Print Quantities:</i><br>2 Regular, 2 Mirrored, 1 Extended, 5 Rollers, 5 Retainers, and 1 Bearing Press Tool (to help pressing in one of the bearings.</p><p>UPDATE 2022/02/27: Added bolts for the threaded holes. The cap bolt is to add the label caps to the form the bearing spool holders, the cap glues or presses in place. The shoulder bolt is to add accessories like a filament guide.</p><p><strong>Retract Banks</strong><br>There are five retract banks for the five spool holders. I used <a href="/TNDave">TNDave</a>'s <a href="https://www.thingiverse.com/thing:3373895">Prusa MMU2 Filament Retract Bank</a> with the addition of custom filament bank guides printed in four parts, inspired by <a href="https://www.thingiverse.com/thing:3467069">Prusa MMU2 Filament Retract Bank Guide</a>.</p><p>The guides are designed to be screwed together with the M3 x 12mm flathead self tapping screws recommended by TNDave.</p><p>The retract bank assemblies are attached to the rack mount bars using the provided M6 screws.</p><p><i>Print Settings:</i><br>Fronts: 5 perimeters, 0 top layers, 0 bottom layers, 10% Hex infill<br>Front Extension: Supports<br>Backs: 3 perimeter<br>Back Extension: Supports<br>.3mf file included using the above settings</p><p><i>Print Quantities:</i><br>1 each of the four guide parts for each retract bank, 1 set of TNDave's retract bank parts for each retract bank, see TNDave's PDF</p><p>I recommend printing the Filament Guide in PLA or another stiff material in a contrasting color.</p><p><strong>Side Grill Covers</strong><br>These are snap fit plugs or covers for the grills in the side of the server rack. They are ment to be snapped in and left in place.</p><p><strong>Door Handle</strong><br>I added a handle to the case for easy opening and closing. The door normally only stays shut when you lock the door so I added a 9x1 disc magnet to the top and bottom of the door and it works perfectly. There is even a place to store the key.</p><p>A spacer is used under the pall on the inside of the locking mechanism to accommodate the thickness of the door handle.</p><p><strong>LED Strip Holders</strong><br>Included are 3 sets of LED strip mounts. Four horizontal along the top sides, two horizontal along the top front, and 4 vertical along the front sides. They mount to the existing rack mount bars pointing to the center of the build plate. The tenon is used to connect two section together for alignment purposes.</p><p>The dimming dial/controller is mounted to the lower front of the vertical rack bar for easy access.</p><p>The LED holders can be attached to the rack using the provided M6 screws, the vertical members snap fit pretty well.</p><p><strong>Gauge Holder</strong><br>I thought I would mount a humidity and temp sensor near the action so the gauge holder does this by clipping to the top of the printer frame. It avoids hitting the print head when it is at the top of Z travel.</p><p><strong>Top Grill Covers with Butterfly Vent</strong><br>These are covers for the top grills were you would normally mount the exhaust fans. They are attached with 9x1 disc magnets.</p><p><strong>Front Grill Covers</strong><br>These cover the front grills on the top and bottom of the case. They are designed to embed 9x1 Disc Magnets and slid up and down to allow air flow into the vents as needed. They have a couple stop pegs that insert into the grill slots allowing for positive open and close stops.</p><p><strong>Camera Clips</strong><br>I mounted three webcams on the case: one to look down form above at the print bed, one on the X-Axis Motor to look at the print bed and nozzle form the side, and one to look at the printers screen to be viewed remotely.</p><p>I have included the mounts here simple as reference along with clips to clip the wires to the glass door.</p><p><strong>Encouragement</strong><br>If you like what I'm doing consider buying me a coffee:</p><p><img src="https://cdn.buymeacoffee.com/buttons/bmc-new-btn-logo.svg" alt="Buy me a coffee"><a href="https://www.buymeacoffee.com/sj5pEfMZq">Buy me a coffee</a></p>
With this file you will be able to print Rack Mount Enclosure Accessories for MK3S + MMU2 with your 3D printer. Click on the button and save the file on your computer to work, edit or customize your design. You can also find more 3D designs for printers on Rack Mount Enclosure Accessories for MK3S + MMU2.