Railcore II Kinematic Bed Mounting
thingiverse
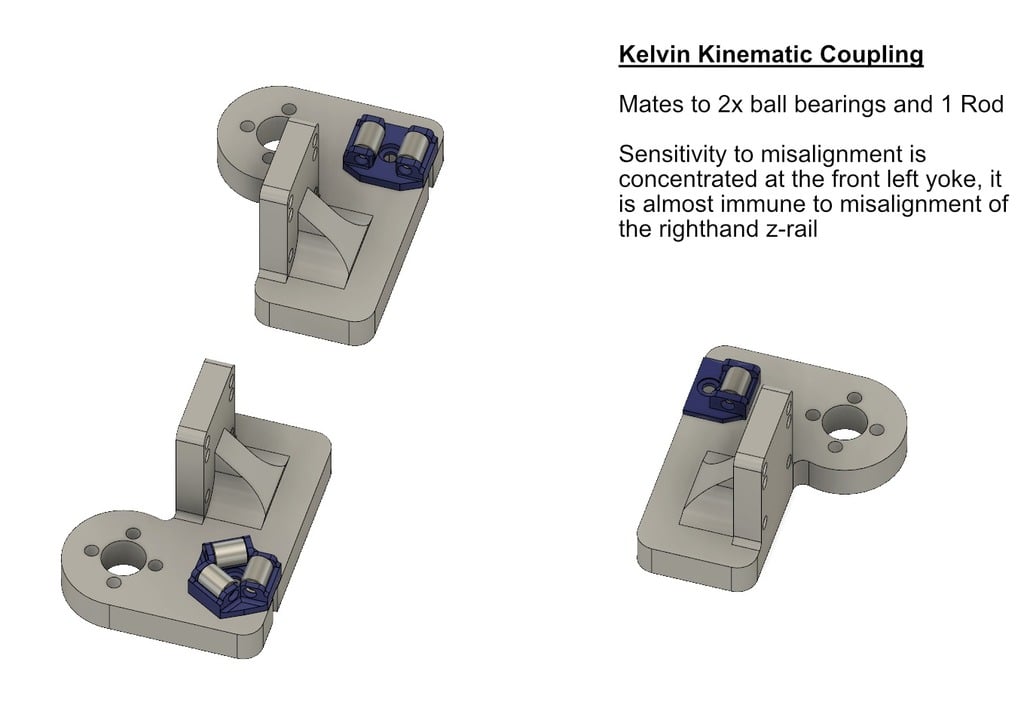
########## (Update July 12th 2019) I've updated this to include pre-tension using springs stretched between the heads of screws on the platform-side and the yoke-side of the mount. The new files are prefixed MK2. The ball mount is different for the left and right sides, to accommodate the cables for the heated bed on the right side. The choice of spring will be quire forgiving, but I used one of these on each left-hand mount: https://www.mcmaster.com/9044K194 And two of these on the right hand mount: https://www.mcmaster.com/9044K178 I included holes in the ball mounts, to allow you to thread long M3 screws through to stiffen the plastic. This seems to work quite well, but you can probably get by without them. The photos and renderings, should make it obvious how to put this together. Post in the comments or message me if you have any questions. ########### I created this kinematic coupling system to overcome the risk of z-axis binding on the Railcore printer. BOM (for Maxwell configuration with spring pretension): The printed parts 3x M3x30mm screws for the yoke mounts 7x M3x ~16mm for the spring mounts 6x M3 nuts & optional washers 3x 8mm Steel ball bearings (Amazon link below) 6x 8mm long, 6mm OD M3 threaded sleeve rods (Amazon link below) 2x McMaster Carr Spring 9044K194 2x McMaster Carr Spring 9044K178 Optional stiffening screws: 2x M3x40 For right-hand bed mount 4x M3x25 For left-hand bed mounts The kinematic coupling avoids over constraint of the bed and allows the z-axis to move freely regardless of any misalignment in the z-rails. Using the Kelvin kinematic coupling arrangement allows the majority of positional control to come from the front left rail, which is easiest to align. The back left rail will have reduced effect on bed position, and the right hand rail will have almost no impact on the bed position, other than keeping it level. It is also possible to use the same parts to generate a Maxwell coupling, which will average out the alignments of each rail. I don't see much benefit from that in this application, unless vibration from the printer being passed through to the bed proves to be a problem. The Kelvin configuration might be more susceptible to hard accelerations in the y-axis, compared to the Maxwell. (This is actually a modified version of the Kelvin coupling, since I have use two crossed cylinders for the single point contact position, rather than a ball and a flat. This has no effect on the functionality, but allows us to use only two types of component.) This is a work in progress, I've run several prints without problems, but my Railcore is new so I don't have much before and after data, and I'd really appreciate feedback. A word of warning, with the current design, the bed is just resting on the mounts, a significant lateral force could knock the bed off, and cause damage. Take extra care when removing prints, or working on the printer. I suggest lifting the bed off and resting it in the bottom of the printer when not in use. You'll also need to reduce you max z-height by ~10mm. Also note, the upper mounts will be at bed temperature, so it is probably best to go straight for ABS or PC. All parts print without supports, in the orientations shown in the screen shot. If this proves to be effective, the next step will be to add floating pre-tensioning screws to keep it in place. The Fusion 360 file is a mess but I've added it. The diagrams show how it goes together, the rods can be screwed in, the balls just pop-fit for me. Parts: Uxcell a16050300ux0563 M3 304 Stainless Steel Threaded Sleeve Rod Bar Stud Round Connector Nuts 10pcs https://www.amazon.com/dp/B01HSTUZW8/ref=cm_sw_r_cp_apa_i_AwRgDbDY8JVKA 100 8Mm Chrome Steel Bearing Balls https://www.amazon.com/dp/B008M3584K/ref=cm_sw_r_cp_apa_i_LiVgDbXHMNW6C Reading on kinematic couplings: https://en.wikipedia.org/wiki/Kinematic_coupling https://www.precisionballs.com/KINEMATIC_ENCYCLOPEDIA.php#k1
With this file you will be able to print Railcore II Kinematic Bed Mounting with your 3D printer. Click on the button and save the file on your computer to work, edit or customize your design. You can also find more 3D designs for printers on Railcore II Kinematic Bed Mounting.