Railgun - Oculus Quest 2 Rifle Stock
thingiverse
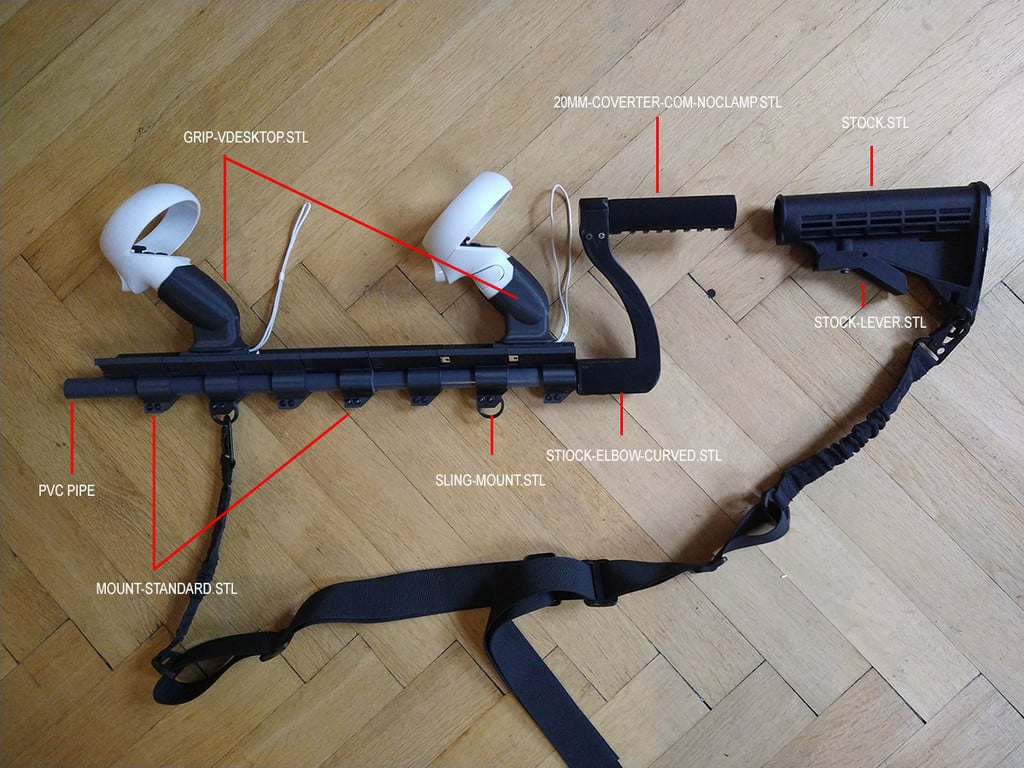
This is my take on the various "tube" grips for the quest 2 (protube, noobtube etc.). I wanted to do something that had two detachable grips to allow using the bolt action rifles in Pavlov or Contractors. __Note:__ This is a simplified updated version that is mostly compatible with the old version (with a couple of minor exceptions described below in a section called "Migration from v1" ### Design Goals * Grips should attach securely but be easy to detach/re-attach while in VR. * Grips should be movable along a rail to support shorter or longer in-game weapons. * Grips should automatically locate onto into rail. * Design should be easily extended or modified. To achieve these goals there are two main components; a rail and a grip attachment. These two parts lock together in two ways to achieve the attach/detach mechanics: 1. Strong magnets in grips and rail to snap grips into place. 2. Teeth that mechanically locks the parts together when pulled towards the body, but releases when pushed away.  ##TLDR Instructions todo:  The following parts are required to be printed for the standard/recommended configuration: - Right hand grip: grip-native.stl x1 - Left hand grip: (mirrored in slicer) grip-native.stl x1 - Mounts: mount-standard.stl x6 (approx. or as many or few as you want) - Mount Magnets: magnet-tray-*.stl x12 (converts smaller magnets to 60mm x 13.5mm x 5mm - if you already have this size no trays are needed) - Stock elbow: stock-elbow-curved.stl x1 - Stock/pipe mount: 20mm-converter-com-noclamp.stl x1 - Stock: stock.stl x1 (+ various addons swivel, butt pad, lever) __Non printed parts:__ - 20mm x 1m pipe (PVC/wood/aluminium) cut to desired length (suggested 0.5m). 1x - M3 ~20mm bolts. ~x25. - Normal wood screws (needed for 20mm convertor + stock-elbow) x2 - Bar magnets 2x per grip and 2x per mount (see magnet section below). __Assembly__ 1. Insert magnets into mounts and grips. 2. Attach all mounts to pipe, including a sling mount half way along the rail length. 3. Cut off any excess pipe. 3. Attach stock elbow and convertor to pipe. 4. Attach stock to convertor. 5. insert quest grips into grip cups. 6. Attach sling. ## Details ### Grips The grip was designed so that the pointer would be pointing directly forward when in the quest 2 native menu. But it turns out: - Virtual Desktop offsets both pointers by 5 degrees. - Oculus Link offsets one pointer by 5 degrees. - Pavlov shack is basically OK, but a bit weird. Some smgs are completely off axis. - Pavlov PCVR requires the controllers be pointed upwards quite substantially. The grip-native.stl version has the grips pointed directly forward. I will also add an offset version to improve the PCVR experience. Grip requires two bar magnets (59mm x ~9.5mm)  There are small caps to keep the magnets in place. ### Mount  Mounts are used to connect the grip to the pipe. They house two (or more) magnets to assist guiding the grip into the locked position, and are designed so that when the grip is attached it should not accidentally detach. These are designed to "tile" along the tube. This should be printed with holes for the magnets pointing up (pipe clamp down). The magnets should push into the end and then be more or less locked in place. It's a tight fit though. Sometimes I just cut the top lip off the hole to let the magnets slide in more easily. I might remove the lip in a later version. Magnets smaller than 60mm x 13.5mm x 5mm require a "magnet-tray" (see below).  ### M4 Stock  | File | Notes |-----------------------------------------|-------------------------------- | stock.stl | main part of stock. Takes a long time to print. | stock-lever.stl | Used for adjustment. Requires a long screw and spring. | stock-swivel.stl | One option for sling attachment. | stock-butt-plate.stl | Can be printed in TPU for a soft pad (needs glue). | 20mm-converter-com-noclamp.stl | Same as ^ but using normal wood screws to attach to the tube instead of a clamp. (allow stock to be shorter). | stock-elbow-curved.stl | Riser for stock that allows the grip to be as far back as possible. The stock is a slightly modified version of this: https://grabcad.com/library/telescopic-stock--1 A commercial stock (e.g. airsoft) should also fit onto the "buffer tube" since it's a standard size (e.g. https://www.aliexpress.com/item/4000706619259.html) For printing this should be printable with the base directly on the build plate (the origins are a bit wonky but you can use e.g. the cura tool to align the flat face with the build plate).I printed without supports. Some bits get a bit messy but it's fine overall. Assembling the stock takes some fiddling and extra parts like springs and bolts. If you can't be bothered, just put some ducktape around the tube and make it push fit instead of adjustable. ### Magnets The best magnets to use are __60mm x 10mm x 4mm__ bar magnets since they're cheap and easily available. Although all the ones I've got are more like 59mm long so I tend to refer to them as 59mm magnets in this document. e.g. - https://www.aliexpress.com/item/1005001620148662.html - https://www.aliexpress.com/item/32955256839.html However the mounts were originally design for slightly larger 60mm x 13.5mm x 5mm magnets. As a result in the mount you can use either a smaller or larger one, but in the grip you can only use the smaller one. There are also other adapters for different smaller magnets, but they are not as strong and do not work as well. | File | Notes |---------------------------------------|----------------------------------------- | magnet-tray-59mm-bar.stl | allows 59mm long bar magnets to be used. | magnet-tray-10mm.stl | allows 10mm x 10mm x 4mm magnets to be used. | magnet-tray-10mm-round.stl | allows 10mm x 10mm x 3mm round magnets to be used. ### Bolts/Screws - M3 bolts are used and the most common length is around 20mm. - 3mm wood screws (2) - The stock elbow and stock convertor just screw into the pipe with normal screws as this allowed the design to be more easily printable. ### Pipe I am using a 20mm high pressure PVC pipe as they are lightweight and strong. A 20mm wood/aluminium/stainless steel etc. pipe should be fine too but are heavier. ### Sling A sling is pretty much required as it allows the frame to be dropped when using different two handed weapons e.g. pistols, grenades. Any random cheap rifle sling (e.g. used for airsoft) should work. e.g. - https://smile.amazon.de/-/en/gp/product/B083NKW292 ### Migration from v1 all parts from the previous version are compatible. The only real difference is that the grips have been simplified into a single part and given tigher tollerances to the rail. ## Alternative configuration __"The stock bumps into my headset in games like Arizona Sunshine"__ Use the elbow.stl instead of the stock-elbow-curved.stl to move grips higher.  ## Known Issues - Adjustable contact between grip and insert are not super grippy. I just used a makeshift washer made from ducktape to increase the grip. Maybe a rubber or TPU washer would be better. - Mount "locating pins" (pins/holes on front/back of mount to allow them to be tiled together) are a bit tight. You can just cut them off if they don't fit properly (or drill them out slightly). - Rear most mounting point has a sharp corner that is annoying. Consider making a half-size version that rounds corners. ## Changelog - 12-05-2021 - Simplify project with new version. Revert to WIP as I continue to improve for PCVR. - 09-05-2021 - Added lower tolerante insert and an additional magnet tray. - 16-02-2021 - Added chunkier pistol grip alternative to the original grip cup. - 21-02-2021 - Added alternative stock riser (stock-elbow-curved.stl) to allow rear grip to be closer to shoulder. Also a more compact 20mm converter for an adjustable stock that screws directly to the tube. Both changes intended to allow the read hand to be further back improving weapon placement in-game.
With this file you will be able to print Railgun - Oculus Quest 2 Rifle Stock with your 3D printer. Click on the button and save the file on your computer to work, edit or customize your design. You can also find more 3D designs for printers on Railgun - Oculus Quest 2 Rifle Stock.