Rain gauge / meter
thingiverse
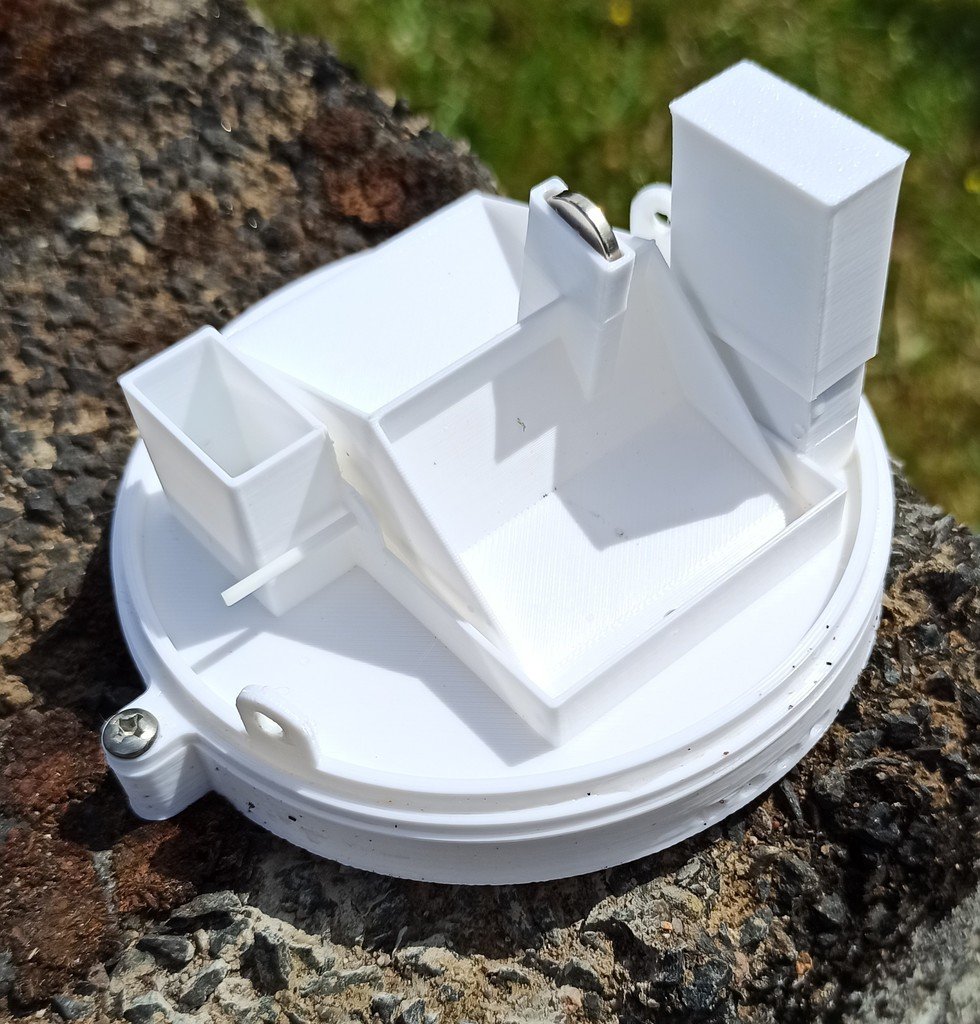
This is a remix of TomasRudh 's very good rainmeter. I have modified the design in the following ways: - Added a sensor slot to fit the Sonoff SNZB-04 door sensor (removed from it's original case). You can now use either the Aqara or the Sonoff zigbee door sensors to make this rain gauge. - Added a cover for the Sonoff snzb-04 sensor slot (raingauge_snzb-04_sensor_slot_cover.stl) as the sensor has been removed from it's original case. - Modified the screw hole sizes so I could use the stainless steel screws I already had. - Created a fence post / wall bracket to mount the rain gauge on (raingauge_fence_post_bracket.stl). - Created a base to mount the rain gauge on a solid base (raingauge_solid_base_bracket.stl). It allows the water from the tipping bucket /cradle to flow out to the side. The funnel and cradle are as per TomasRudh 's original. I just carefully drilled out the two holes in the side of the funnel a bit to fit my screws. I also used the same 12mm x 2mm neodymium magnet. ASSEMBLY - remove the Sonoff snzb-04 sensor from it's case and pair it with your Zigbee bridge. Ensure it is working before mounting in the rain gauge. - Put the snzb-04 sensor in the slot with the curved inner base with the battery downwards and facing inwards. This positions it correctly so the magnet activates the reed switch. There is a recess in the bottom so the pairing button doesn't get pressed. - Place the snzb-04 cover over the sensor and push down so you get a snug fit. - To make the cradle pivot pin / hinge use a length of filament just shorter than the inner diameter of the base. To straighten it use the heated print bed, when a print has just finished, and gently press the outer side of the bowed filament against the bed until the full length is on the bed then gently roll it until it is straight. Allow it to cool before moving. I used ASA filament and had a bed temperature of 110 so be careful not to burn yourself. - Put the cradle in place with the magnet slot towards the sensor. Put the straight length of filament through the pivot / hinge holes. Check for any friction when pivoting and clean / drill out the pivot / hinge holes if needed. - Put the 12mm x 2mm neodymium magnet in the slot and check it triggers the sensor when the cradle is rocked in both directions. I then secured the magnet with a drop of super glue. - Mount the rain gauge on your bracket of choice and secure the funnel in place. - Wait for it to rain :( I have made two of these using the Sonoff SNZB-04 door sensor and both seem to be working fine for the last couple of weeks. I calibrated them as per TomasRudh's instructions using a syringe to slowly drip the water into the funnel. I ended up with a lot more tips per volume and it worked out to be 0.22mm per tip. The speed of dripping made a big difference. As I don't use Home Assistant I created a Node-Red flow to capture and display the readings. I also use Grafana to display detailed graphs of the data stored in a database. Happy rain watching!
With this file you will be able to print Rain gauge / meter with your 3D printer. Click on the button and save the file on your computer to work, edit or customize your design. You can also find more 3D designs for printers on Rain gauge / meter.