Raise 3D N2/N2+ model fan ducts
thingiverse
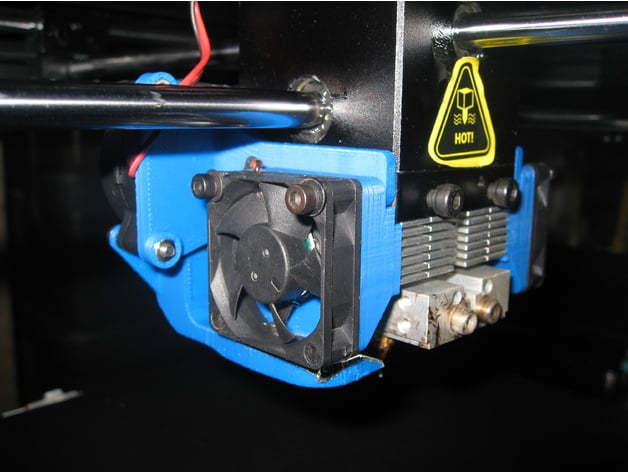
For those with a Raise 3D N2 or N2+ printer, this mod will improve your model cooling and allow you to control the model cooling fan from ideaMaker slicer software and from the printer's front panel (under Tune). In addition to printing some of the models provided (based on single or dual extruder needs), you will also need a 40x40x20 12V blower fan for each nozzle (many available on Amazon), qty 2 M3x20 bolts and qty 2 M3 nuts for each nozzle duct. Currently, only one of the software controlled fan output headers (2nd connector from the left) is active on the extruder breakout board, so only 1 fan can be connected to this 12V output connector without a splitter cable. I am hoping Raise 3D enables the 1st fan output connector on the breakout board soon so both nozzles can have their own cooling fan power connector. Print Settings Printer: Raise 3D N2+ Rafts: Yes Supports: Yes Resolution: .15 mm Infill: 30% Notes: Print ducts out of a high temperature material like ABS or PC. I also glued some aluminum foil to the top surface of my ABS duct that faces the heater block (mine are not insulated) to help reflect heat away from the duct and prevent distortion when printing with ABS or similar temp materials. You may want to remove the duct(s) if not needed when printing with very high temp material. When printing ducts, I oriented them with the nozzles pointing upward and used pillar style supports inside the large end of the duct, under the mounting ears and for the overhang of the 90 degree nozzle. Be sure to leave space between support pillars inside the duct so you can remove with a needle nose pliers later. For the brackets, place the blower fan mounting surface towards the build plate-no supports needed. For hot end fan duct, place fan mounting surface toward build plate-no supports needed. Post-Printing Support removal and assembly info Removed supports from nozzle with a needle nose pliers. Works well but be careful as the duct walls are thin and fragile. Use purple stick glue to apply aluminum foil (shiny side up) to the top surface of the duct that sits below the heater block to minimize distortion of the ducts due to heat from the heater block. Install one or both ducts as needed but beware that only 1 12V connector on the breakout board is available so only 1 fan can be powered without a splitter cable at this time. Installation of these fans and ducts does not require any permanent modification to your printer. You will replace the stock hot end fan ducts with one of those available with this mod.
With this file you will be able to print Raise 3D N2/N2+ model fan ducts with your 3D printer. Click on the button and save the file on your computer to work, edit or customize your design. You can also find more 3D designs for printers on Raise 3D N2/N2+ model fan ducts.