Ram and Bear Automated Infinite Queue Printing Extruder Attachment for Automatic Print Removal Small Scale Manufacturing
thingiverse
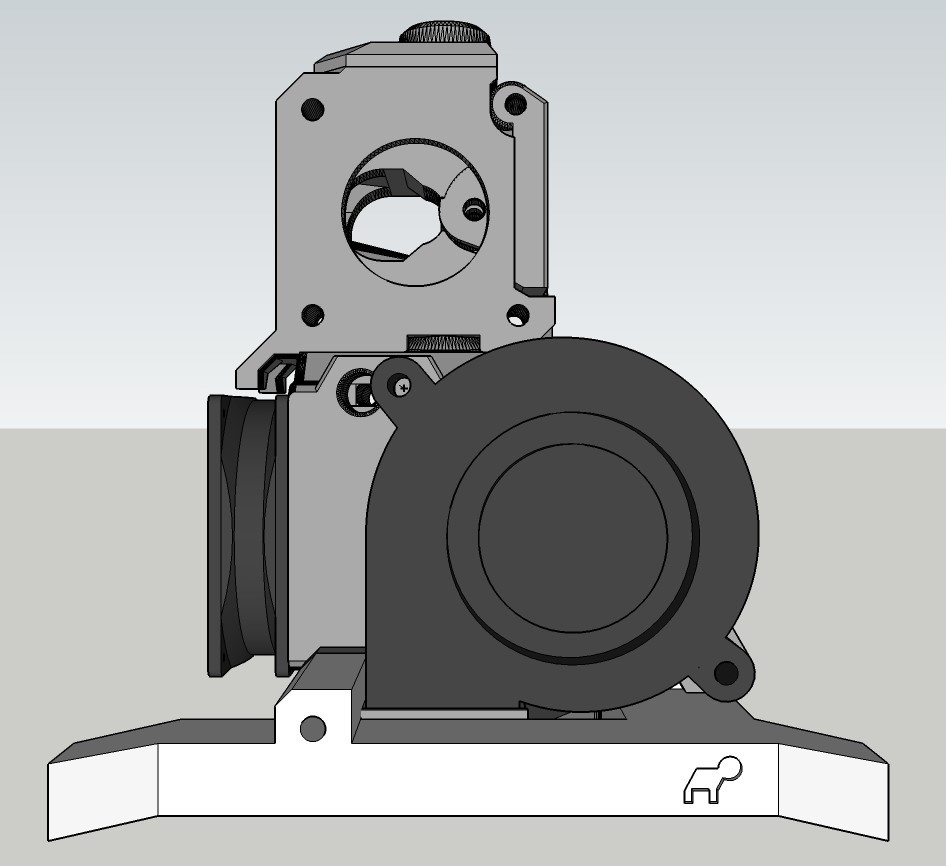
The **Ram and Bear** is designed to push items off the print bed like a bulldozer that mounts to the lower portion of the Bear Exxa on the 2020 Prusa i3 MK3S. The Ram and Bear is focused to encourage the experimentation, education, research, and development of automated and or queued small scale production using widely available 3D printers. It is specifically focused to fit the new Bear Extruder 1.0 and adapted machines within the RepRap, Maker, and 3D printing community. I know the underlying theory regarding how to edit the G-code, but I needed something to 'Ram' the print off the bed into a parts collection bin. Using the extruder hot end, fan shroud, and other fragile/hot items is not advisable and or possible due to how some extruder/hot ends are designed. The Ram can be easily added or removed from the machine, adding adaptability, and flexibility to 3D printing platforms. **Three straight versions are available (with built in overhang support):** -Compact, 71mm wide -Wide 20mm wider than compact on either side, total of 114mm -Wide 40mm wider than compact on either side, total of 156mm **Three horned versions are available (with built in overhang support):** -Compact, Horned, 84mm wide -Wide 20mm wider than compact on either side, Horned, total of 134mm -Wide 40mm wider than compact on either side, Horned, total of 174mm I recommend the horned version as it collects small parts towards the centre, while the straight version may be better for pushing larger items directly forward without possibly modifying their travel path as they leave the machine. The Ram requires longer hardware to mount; holes can be modified for diameter with a hand drill if needed (currently 3mm diameter). *A Word Regarding Clearance* The Ram rides approximately 4.26mm above the tip of the hot end to reduce the probability of collisions during printing and generously accommodate nozzles up to 1mm using 0.5-1mm layer heights for rapid small scale manufacturing. Clearance will vary with different hot ends, how far the nozzle is screwed in, and other factors; be mindful. Reasonably, the height of most prints will be higher than this value. *Safety* Please do not break your extruder and or carriage mount during testing/operation! The wider you go, the more likely it becomes. Additionally, pushing larger/many items off the bed at once may strain the smooth rods and structure of a printer if you make unwise decisions. Small prints with very low bed contact surface area are strongly recommended for testing and production to avoid potentially damaging your machine. Be aware that stringing will likely occur during testing and must be reduced to a minimum or avoided entirely by cleverly editing your G-code/temps. Keeping the bed as clean as possible is absolutely key to both part quality and safely operating your machine (EG: fire prevention and avoiding cyanide production from burning plastic on the hot end). *Collaboration* Please share your processes, code, and collaborate if you come up with a method that's reliable, produces high quality units, minimizes/avoids stringing, and maintains a clean, adhesion friendly, safe print bed in the comments. *Background* I produce small bushings for vintage sports cars and developed this to help avoid contact with the 3D printer after being sensitized to the chemicals involved in the 3D printing process; formaldehyde and other unpleasant toxins. The goal is to ultimately get the printer to print one or a small group of units, push it/them off into a parts collection bin, and print subsequent units reliably. This involves editing the start and end of G-code script, looping/sequencing prints, visiting the machine to occasionally spray the bed with hair spray to maintain adhesion, and other innovative solutions to achieve cyclical production. **Inspiration Video/s:** *Application:* Automatic 3D Print Removal Using G-Code: https://www.youtube.com/watch?v=avlengYsJdw How to Infinite Loop a 3D Printing - Automatic Print Removal using G-Codes: https://www.youtube.com/watch?v=cuSGl17JGNA *Theoretical:* Automatic Infinite 3D Printing: Democratize Manufacturing - Conveyor Belt 3D Printer - Mk. IV: https://www.youtube.com/watch?v=E_RvnqVHbnA **G-CODE SAMPLES** This mod requires basic G-code manipulation and experimentation to employ. Use a plain text/code editor (not rich text). The samples below are presented in coordination with the application based YouTube videos. Be aware that the z variable heights to lift the gantry, for example, to clear the printed unit must be changed to fit your specific print's dimensions. The same logic applies to where and how the hot end homes during movements, and so on. These are presented to simply get you going, not necessarily as a universal solution to automated, infinite, or queued printing. Octoprint and other have potential queue abilities, however, for me running off an SD card is optimal. **G-CODE EXAMPLE 1 (to be added, manually, to the end of the G-code file):** G1 X105 Y195 Z50 F3000 ; Move Gantry Up and Back G1 X105 Y195 Z1 F3000 ; Lower Gantry G1 X105 Y1 Z1 F2400 ; Remove Print G1 X105 Y30 Z1 F8000 ; Shake it out G1 X105 Y1 Z1 F8000 ; Shake it out G1 X105 Y30 Z1 F8000 ; Shake it out ;M106 S0 ; fan off (commented out) ;M104 S0 ; turn off extruder ;M140 S0 ; turn off bed ;M84 ; disable motors *Note*: This text accompanies the 'Automatic 3D Print Removal using G-code' video by MAKE ANYTHING on YouTube. Please check out his video of attempting get a printer to clear the bed automatically using the G-code above as it will be helpful. **G-CODE EXAMPLE 2 (to be added, manually, to the end of the G-Code file):** G1 X105 Y195 Z50 F3000 ; Move Gantry Up and Back G1 X105 Y195 Z1 F3000 ; Lower Gantry G1 X105 Y1 Z1 F2400 ; Remove Print G1 X105 Y30 Z1 F8000 ; Shake it out G1 X105 Y1 Z1 F8000 ; Shake it out G1 X105 Y30 Z1 F8000 ; Shake it out M99 ; LOOP PROCESS *Note*: This is my modified test code inspired by the above, incorporating an M99 command, to loop the print with no end. I would simply leave it to print, wait until print (x) is finished upon returning, and likely stop/reset the printer when I was keen to shutdown. **G-CODE EXAMPLE 3** This exercise begins by testing G-code moves required to successfully eject the print. Please note that the code sets the print head to the rear corner of the print bed (Y changed to 220 for safety reasons). *Part 1: TESTING G-CODE MOVES* Filename: 'ejectmove.gcode' G28 ; home G90 ; Absolute positioning G0 X0 Y220 Z15 ; set print head in the corner M0 ; wait user push button G0 X94 F8000 ; move x G0 Z4 ; move z down G0 Y0 ; move y (eject parts) G0 Z30 ; move z up G0 X0 Y220 Z15 ; come back to corner Send 'ejectmove.gcode' to printer, will home and move as programmed (hopefully); prompt click to resume, place part on hotbed in position, click to resume to test ejection. Adjust code and positions as necessary to perfect movement. *Part 2: IMPLEMENTATION OF REFINED G-CODE MOVES* *ACTION:* -Generate G-code for desired part in Cura or similar slicer. -Delete the start script 'junk' to the line that reads 'G92 E0'. -At the top of the plain text G-code file write: ; Beginning of the loop M104 S195 ; hot end temp, PLA M190 S50 ; bed temp, PLA M104 S195 ; hot end temp and wait, PLA M190 S50 ; bed temp and wait, PLA G28 ; home M420 S2 ; restore mesh leveling if exists, do manually first. (optional) *ACTION: Search file for 'Layer 1' and add the following after the 'Layer 1' text label* M140 S50 ; set bed temp M104 S190 ; set lower hot end temp *ACTION: Go to end of G-code file, delete everything below "G91 relative positioning" line just above the END tag and add the following.* G0 X0 Y225 Z15 ; stand by position (corner) M104 S175 ; hot end standby temperature M190 R40 ; wait for bed to cool down to 40C ; EJECTION PROCEDURE (From Part 1) G0 X94 F8000 ; move x G0 Z4 ; move z down G0 Y0 ; move y (eject parts) G0 Z30 ; move z up G0 X0 Y220 Z15 ; come back to corner M84 X Y E ; disable all steppers except z M82 ; absolute extrusion mode ; END.... or issue a M99 ; LOOP PROCESS You can now copy and paste the entire G-code text at the bottom after ; END text tag to print the second and consecutive units for a certain number of operations. Alternatively, you can simply issue a M99 loop process command to minimize file size for infinite printing processes. *Note*: This text accompanies the 'How to infinite loop a 3D printing - Automatic print removal using G-codes' by DISPLAYDASH TECHNOPARTS on YouTube. Please check out his video of attempting get a printer to clear the bed automatically using the G-code above as it will also be helpful. **MY CONCEPTING SPACE** (1) Printing multiple (2-12) small objects at once before a push: Arrange 6-12 items on the bed to fit the width of your RAM, delete all models except the one/s in the front row, slice with a carefully placed skirt to ensure the extruder is primed and the skirt will be pushed off first by units behind it. Add the other models back in adjusting distances for the skirted front object/s, delete the ones you skirted, slice without skirt, merge the two files into one print, then employ the RAM/eject code from the examples above to Ram prints off the bed, and loop process with M99. This may prevent dirtying up the bed and increase operational safety, especially if the model with brim is in the front centre of the push space. I'll add ideas as I test in the future and feel free to collaborate in the comments.
With this file you will be able to print Ram and Bear Automated Infinite Queue Printing Extruder Attachment for Automatic Print Removal Small Scale Manufacturing with your 3D printer. Click on the button and save the file on your computer to work, edit or customize your design. You can also find more 3D designs for printers on Ram and Bear Automated Infinite Queue Printing Extruder Attachment for Automatic Print Removal Small Scale Manufacturing.