RAMPS 1.4 Board Cooling Fan Mount
thingiverse
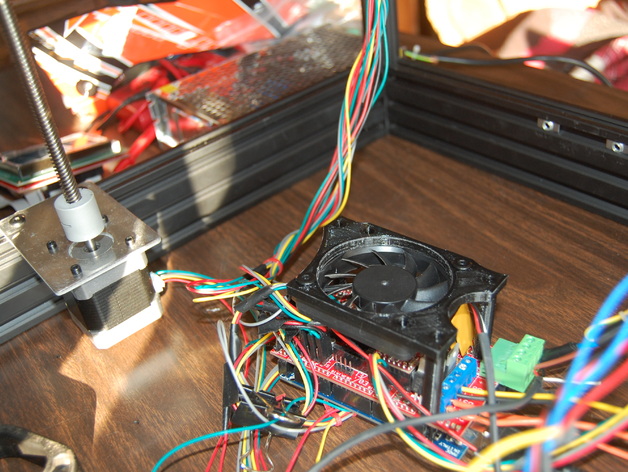
I didn't really like all the fan mount designs out there so I came up with my own. It's designed to fit a 60mm fan but the center hole is easily adjustable. Before this fan I was having problems with the RAMPS board overheating but now that is a thing of the past. I've ran about 20 hours worth of printing on it with no problems yet whereas problems would arise within about 15 minutes before. Print Settings Printer: Cobblebot Basic Rafts: No Supports: No Resolution: .2mm Infill: 10% Notes: This part doesn't need to be particularly strong or pretty so .2mm and 10% are just fine. Post-Printing Required Steps Parts: 2 (or 4 if you're ambitious) - M5x18 cap head bolts 3 - 20mm pieces of 1.75 or 3mm plastic 1.) To get the fan mounted to the frame just use the cap head bolts to screw the mount into the fan. I had to do some threading of the fan holes to get the bolts to fit. 2.) Take the 3 pieces of plastic and hot glue them into the bottoms of the three legs on the mount, creating little feet. Leave about half (10mm) sticking out...these pieces stick into the top of the ramps board, keeping the mount in place. 3.) Wire up your 12v fan directly to the power source on the RAMPS board (or wherever you like) so as soon as the power is flicked on, the fan is too. How I Designed This I used Autodesk Inventor for the design work. Let me know if you need the files in a different format and I can post it.
With this file you will be able to print RAMPS 1.4 Board Cooling Fan Mount with your 3D printer. Click on the button and save the file on your computer to work, edit or customize your design. You can also find more 3D designs for printers on RAMPS 1.4 Board Cooling Fan Mount.