Rapman 3.1 Dual Head Conversion to RAMPS 1.4 Marlin
thingiverse
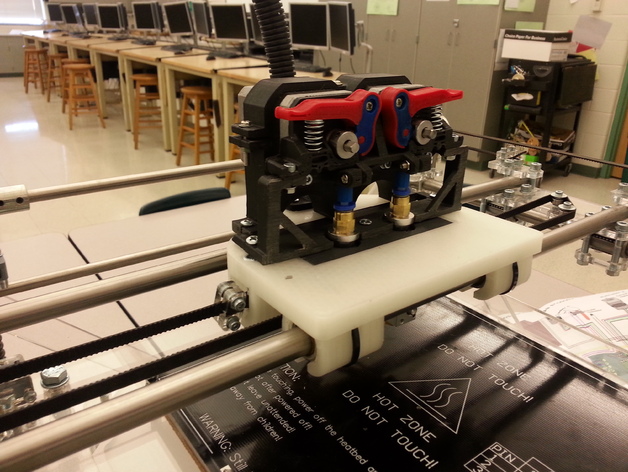
My Rapman printer was dying so I used the Arduino and RAMPS 1.4 setup to convert the machine. I also swapped out the extruders using stephenmhall Bowden Dual Head Extruder mount and arms along with my own parts found here. I've been running it for over 100 hours with a few minor tweaks. I did insert 2 small copper tubes in Stephen's extruder frame to avoid wear. All parts here are up-to-date. Printer now uses 1.75mm filament, larger print area due to closer extruders, heated bed eliminates the need for a PLA raft when extruding ABS plastic with a coat of ABS juice on a sand blasted glass bed. I have also included a few other files, like a case to hold the display screen that clamps to the Rapman base, the Arduino Mega board base, and cover. Here is a link to my webpage with all things 3D printing, including the Marlin firmware files for this RapMan configuration:http://www.cdschools.org/site/default.aspx?PageID=17142 Here is a video of the final modifications:https://youtu.be/UxYKBzaQWxc Instructions My Rapman Electronics were burning up with the mini display screen burning in. I came across Stephen's dual extruder design and decided to give it a try. With the purchase of an Aurduino Mega board and Ramps 1.4 with an LCD display from Ebay, Marlin firmware, Slic3r, and a redesign of the extruders to accept 1.75 filament, we are printing again in my classroom in true 2-colors. Something the original circuitry couldn't handle. Some notes: The main X-carriage is printed in PLA to resist warping. All other parts are printed in ABS (many printed on the original printer before dissection :-) All parts are oriented correctly for printing, except the XCarriage. That will need to be flipped 180 degrees and printed upside down. The plan requires you to remove cutouts for the 30mm fans on the extruder mount. You will also need to cut away the section on the extruder clamps. This redesign mean no need for printing with supports. You will also need to drill some pilot holes for the sheet metal screws in some instances in assembly after determining exact placement of parts. Most sheet metal screws used are #6-1/2" or 3/4". The idler bearing holes on the X axis will need to be slotted to allow the belt to be adjusted to avoid hitting the extruder mounts, which are further forward than the originals. You may also need to raise the Z endstop if you modify your table with a heated bed. To be able to adjust the heights of the extruders easily, I created 2 "nozzles" that fasten into Stephen's extruder plate that are bored to the size of the tubing fastened to the extruders. The tubing has been cut a few millimeters short to allow them to slide up and down into the nozzles when adjusting the extruder heights.
With this file you will be able to print Rapman 3.1 Dual Head Conversion to RAMPS 1.4 Marlin with your 3D printer. Click on the button and save the file on your computer to work, edit or customize your design. You can also find more 3D designs for printers on Rapman 3.1 Dual Head Conversion to RAMPS 1.4 Marlin.