Rasberry Pi Zero Ender 3 camera mount
thingiverse
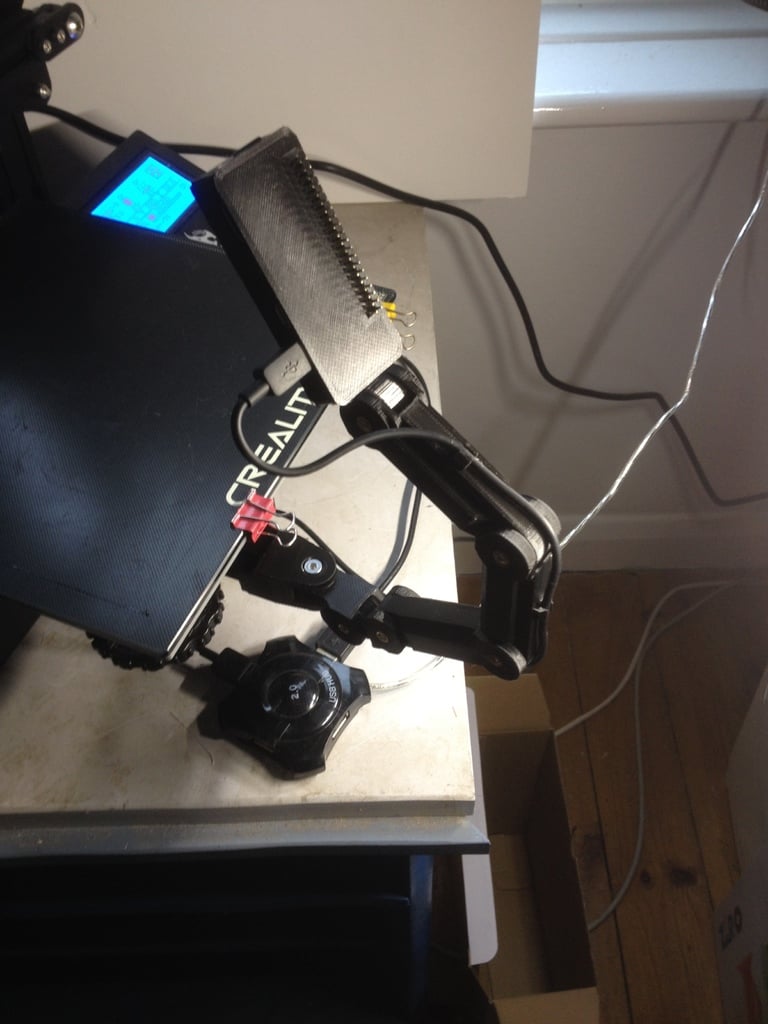
This is a top-notch Ender 3 bed-mount designed specifically for a camera-enabled Raspberry Pi Zero (or W). The mount attaches below the heated bed's adjustment datum, keeping it from warping due to heat and preventing vibrations that affect print quality. I use Octoprint to capture time-lapse videos of my prints, but to achieve perfect results, I need the camera mounted firmly on the Ender 3 bed. If the camera is not attached in this way, the print bed and print will shift around the viewpoint, ruining the timelapse. To minimize moving mass and offload processing from my aging PI 3 server, I chose a Pi Zero. This full kit includes all necessary printable parts for the Ender 3, but you'll need two or more long arms depending on your preferred mounting style. I've modified the design to accept sleek countersunk screws and brass hot press inserts (as shown in the picture above), giving it a professional finish without any sharp edges or protruding nuts or bolts. The camera case has been redesigned to accommodate a mounting lug for the arm, as well as a hole for the Pi Zero with GPIO pins. The original design was intended for a Pi without GPIO headers. I've also moved the camera hole to fit a micro camera on a 40mm cable, which folds over onto the back of the Pi board. To secure it in place, I used Kapton tape. If your Pi Zero doesn't have a header, you can use the original case design's backplate instead. An alternate camera case front is included that matches the original design with my mounting lug. This one has a shorter cable and comes on a carrier PCB that my camera does not have. The bed clamp is attached using two screws with captive nuts. I used cap heads, but you can also use countersunk screws for this part since they won't be visible. If you don't like the look of countersunk screw-heads, you can easily countersink them using a tool or press them into the clamp with a hot soldering iron. Here's what you'll need: - A Raspberry Pi Zero (W) with WiFi to keep cable count down - A Pi zero camera: https://www.amazon.co.uk/gp/product/B0769KS7C7 - An assortment of cheap Chinese brass threaded inserts (M4 x 6mm long): https://www.amazon.co.uk/gp/product/B07QR6GVFJ - Stainless steel M4 x 20mm hex socket cap countersunk screws and two nuts: https://www.amazon.co.uk/gp/product/B07919Z9SL
With this file you will be able to print Rasberry Pi Zero Ender 3 camera mount with your 3D printer. Click on the button and save the file on your computer to work, edit or customize your design. You can also find more 3D designs for printers on Rasberry Pi Zero Ender 3 camera mount.