Raspberry Pi 12v Media Centre
prusaprinters
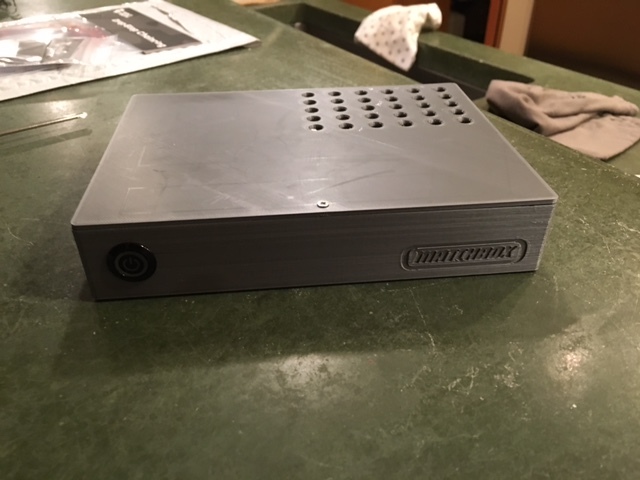
<p>This case will hold a raspberry pi 3 and a 2.5 HDD. Using it I created 12v powered Media centre with LibreElec running KODI so that I could watch TV-shows or movies in my RV without having to bring disks with me or have access to streaming services.</p> <p>I load the HD up with my ripped DVD's and then just take it with me.</p> <h3> Print Settings</h3> <p><strong>Printer Brand:</strong></p> <p>Prusa</p> <p><strong>Printer:</strong></p> <p>Prusa Mk2</p> <p><strong>Rafts:</strong></p> <p>No</p> <p><strong>Supports:</strong></p> <p>No</p> <p><strong>Resolution:</strong></p> <p>15</p> <p><strong>Infill:</strong></p> <p>15</p> <p><strong>Notes:</strong></p> <p>List of parts required to make this whole thing work (i.e. how to build another one)</p> <p>• Raspberry Pi 3 - https://www.amazon.com/Raspberry-Model-A1-2GHz-64-bit-quad-core/dp/B01CD5VC92/ref=sr\_1\_2?s=pc&ie=UTF8&qid=1493653657&sr=1-2&keywords=raspberry+pi+3<br/> • Rpi heat sink - https://www.amazon.com/gp/product/B0159SSK54/ref=oh\_aui\_detailpage\_o07\_s00?ie=UTF8&psc=1<br/> • Samsung Micro SD - https://www.amazon.com/gp/product/B00WR4IJBE/ref=oh\_aui\_search\_detailpage?ie=UTF8&psc=1<br/> • Tivo Slide Remote - https://www.amazon.com/gp/product/B00NGXPVLQ/ref=oh\_aui\_detailpage\_o06\_s00?ie=UTF8&psc=1<br/> • 2.5 HDD - https://www.amazon.com/gp/product/B01C4W2P18/ref=oh\_aui\_detailpage\_o07\_s00?ie=UTF8&psc=1<br/> • USB to 2.5" HDD Cable -https://www.amazon.com/gp/product/B00HJZJI84/ref=oh\_aui\_detailpage\_o07\_s00?ie=UTF8&psc=1<br/> • USB Power Insert Cable - https://www.amazon.com/gp/product/B00D84L5IQ/ref=oh\_aui\_detailpage\_o08\_s00?ie=UTF8&psc=1<br/> • RPI Power Board and button - <a href="https://www.msldigital.com/collections/all-products/products/remotepi-board-for-pi-3">https://www.msldigital.com/collections/all-products/products/remotepi-board-for-pi-3</a> buy the version with the outboard power button only<br/> • 12v to 5v converter - https://www.amazon.com/gp/product/B00J3MHT1E/ref=oh\_aui\_detailpage\_o01\_s00?ie=UTF8&psc=1<br/> • USB Right Angle Cable: https://www.amazon.com/gp/product/B00W9BAAXK/ref=oh\_aui\_search\_detailpage?ie=UTF8&psc=1<br/> • Power Jack (m/f) whatever size works for you case is sized for this: https://www.amazon.com/gp/product/B00EQ1UWX4/ref=oh\_aui\_detailpage\_o00\_s00?ie=UTF8&psc=1<br/> • Male jack that works with the usb power insert cable (can't recall what size this is)<br/> • Random wire<br/> • Screws (1 2.5x6 for the lid, 3x 2.5x10mm with nuts for the pi mounting, 1x 2.5x?? For the corner with the RemotePi on it, 4x 3x8 for HDD, and 2x 3x10 with nuts for the power supply)<br/> • Case</p> <ol> <li>Assemble an internal power system where the output of the transformer splits to the Pi (solder on power leads to the remote board) and the harddisk (you'll need to get a barrel connector for the power inserter, ensure that the outer sleeve is ground and the inner (tip) is +5). You may find the need to shave a bit off some of the cables to fit it against the power supply with a hobby knife</li> <li>Setup LibreElec on an SD Card (Follow directions from their site)</li> <li>Get the hardware MPEG decoder licenses and install</li> <li>Assemble and boot the pi, leave HDD off right now</li> <li>While that's installing put your media on the drive (recommend movies under \movies and tv under \tv)</li> <li>Follow the directions for the RemotePi power board for LibreElec, make sure you follow both the steps for the autostart.sh and the shutdown script</li> <li>Add the commands this command to Autostart to have the HD idle aggressively: </li> <li>hdparm -B 127 -S 10 /dev/sda1</li> <li>Add this command to shutdown to spin down the hard disk: </li> <li>hdparm -y /dev/sda</li> <li>Plug the Hard disk in and boot again, add the directories to the library as the correct type, and let it get all the information</li> </ol> Category: Electronics
With this file you will be able to print Raspberry Pi 12v Media Centre with your 3D printer. Click on the button and save the file on your computer to work, edit or customize your design. You can also find more 3D designs for printers on Raspberry Pi 12v Media Centre.