Raspberry Pi 4 1U rack-mount bracket
thingiverse
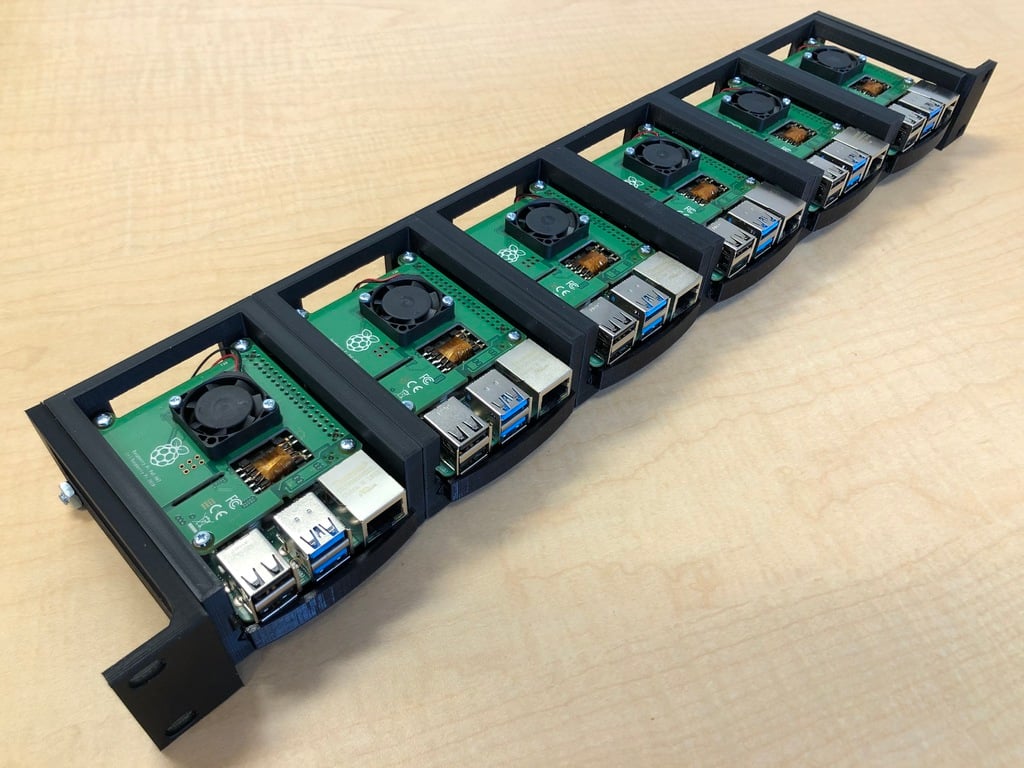
A Mounting Bracket for Raspberry Pi 4 Units in a Standard Server Rack. This design allows for six RPi 4 units, utilizing Power Over Ethernet (PoE), to fit within a 1U space, creating a simple and organized cluster solution. I employ the official PoE hat released by the Raspberry Pi Foundation, which typically sells for $20. This is an adaptation of a 2U bracket that I previously developed: * [Raspberry Pi 4 2U Rack-Mount Bracket](https://www.thingiverse.com/thing:4078710) It shares the same tray design, enabling easy transfer of units between these two mounts. This design accommodates six units in 1U, while the other fits twelve (or thirteen) within a 2U space. The 1U version allows for incremental building, but I personally prefer the 2U design and recommend it over two 1U racks if you require more than six units. Here are all the necessary components for a complete six-Pi cluster: To Print: * Six frame parts * Six tray parts * A pair of ear parts (both ears in a single file) Other Hardware: * Two threaded rods, cut to 17.625 inches. I suggest purchasing a 36-inch rod, which is sufficient for two finished parts. Cut it with a hacksaw or a Dremel tool equipped with a cutoff wheel. Use #10 size in the USA; M5 would be a suitable metric alternative (you will need to modify the OpenSCAD files and adjust the hole sizes). * Four hex nuts that fit the threaded rods * Twenty-four machine screws of size M2.5 x 12 (four for each Pi). I obtained a pack of one hundred for approximately $10 from Amazon. The remaining hardware, including spacers and screws, is included with the PoE hat. You will have four extra screws from each PoE hat kit that you replace with the M2.5 x 12 screws listed above. Finally, a PoE switch and suitable Ethernet cables for each Pi are required. The OpenSCAD source files are provided to facilitate customization. The most common adjustments you may want to make using the OpenSCAD files are: * Modifying the size of the threaded rods that hold it all together or changing the size of the bolts used to mount it to a standard 19-inch rack. * Adjusting the fit of the tray where it slides into the frame. The fit may vary slightly depending on the printer and material used (I use PLA). * Modifying the setback, which is how far the frame is pushed back into the rack (or equivalently, how far the ears stick out in front of the rest of the frame). The setback provides space so that the nuts at the ends of the support rods do not interfere with the cage nuts on the rack.
With this file you will be able to print Raspberry Pi 4 1U rack-mount bracket with your 3D printer. Click on the button and save the file on your computer to work, edit or customize your design. You can also find more 3D designs for printers on Raspberry Pi 4 1U rack-mount bracket.