Raspberry Pi 4 Argon One V2 Custom Base
thingiverse
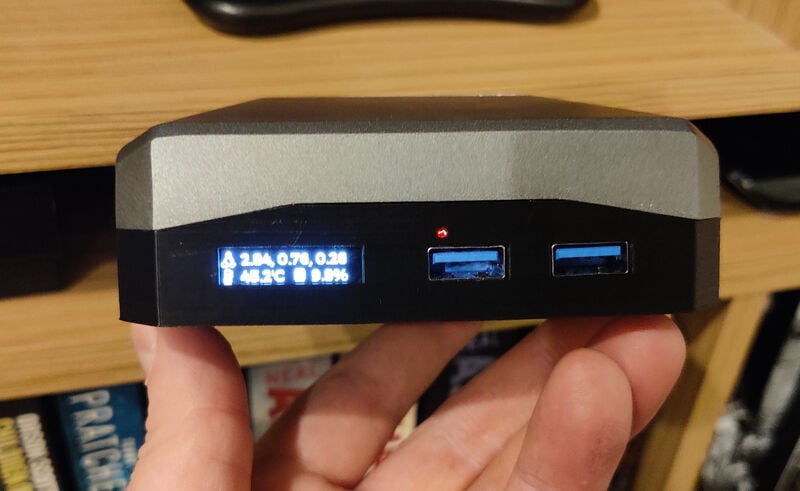
Raspberry Pi 4 Argon One V2 Custom Base This is an alternative base for the Argon One v2 Raspberry Pi 4 case. You can buy the Argon One M.2 Version, where you can put an M.2 SSD in the base, however you don't get front facing USB ports or a status screen. This is a modification (which I've remixed) to the case, where you provide a small USB hub (square with ports at both sides), 42mm M.2. SATA SDD, M.2. SATA caddy / adaptor and a 128x32 OLED I2C display. SHOPPING LIST M2 SATA SSD Caddy: https://www.amazon.co.uk/dp/B08GRBFZLY/ref=cm_sw_em_r_mt_dp_W1QFQEKEF9H6VHW5G4W4?_encoding=UTF8&psc=1 M.2 SATA 512GB (Or whatever size): https://www.amazon.co.uk/gp/product/B07MSQMGLT/ref=ppx_yo_dt_b_asin_title_o04_s00?ie=UTF8&psc=1 USB 3 4 Port Both Side Hub: https://www.amazon.co.uk/gp/product/B01N0BFBUD/ref=ppx_yo_dt_b_asin_image_o05_s00?ie=UTF8&th=1 I2C 0.96-inch OLED Display SSD1306 128x32: https://www.amazon.co.uk/dp/B079H2C7WH/ref=cm_sw_em_r_mt_dp_404VRBDTTWN7H13Z530X?_encoding=UTF8&psc=1 Jumper Wires: https://www.ebay.co.uk/itm/262202710636?_trkparms=ispr%3D1&hash=item3d0c7fda6c:g:M~8AAOSwnyVg6SBm&amdata=enc%3AAQAGAAACkPYe5NmHp%252B2JMhMi7yxGiTJkPrKr5t53CooMSQt2orsStdebXPz4ZTXCT8FI9kPBh6CwK0qj7rZ8X4IEl78LKv4VRhWmfl3nWArFvVOazdq3Y84Ql%252BM7yDO45%252BIFRtv3M6jmSQ83dqs4gfSNEmP2mQOCzwamQFdWLvNe%252BLVU%252FPDD2JJx0GGt4A9T6oaOGD2dYdUThY%252BmThnmewGqiurRgTWMOKPrdDwfOtaGWqemDCLNVKdFobaib2DjqImyGz7IKXoQqZo%252BwJVstt1TWCxtOIgA5j3MrASRbFyWg8QsVrrF%252F7xnehFUiAyxEdm5J87lGjPNcBcDr5LlC9DI63S6Px1Plmnm9DvLkLWympuGhj7AfxZ53iDWFeKrbzpAbbjW9Wuf8bKIltrCZmq%252BmKRy8khf4fuxxtdsTbVtO6AX2AmNcS7QIl3JO%252BR1Ntu1CQcEB%252FZNQC0E1m1lzFdgBHvvAPz5BeeNj5Uqs%252Bhz0JUL7L3NBEWkFce9nTNwGoZ65vLbJCy%252FE9xg%252Fw5yqAl99mFA91XptRYh5CZoarMden2XvMV%252BYfmC33e%252FUHwkfzdPr32nWunfuhXiu6VKQ9kv6bHxE5BU9kqsbHVSKLr%252BcjJimCtiMbKCJeny4yxgK2RSwIbu2UaSWdKPBGNdaaLoZy39pGS3hPOzisdlvvKIK4D6HoPV9DNkQjT3mHxb9ARA1p2himpY9YGJmetEz44Z%252Bm8URBBLqp9CtKzA3fJ86h642llcYRPcQy31Ae1HwomE0PruVGnXRLRqo%252BWq6QaXuicTYhfCyh5KrKCYFP1KoSw%252FTza5PKHnCmkEpJVItnE%252B23YB7kASfOM49MInHEo0GoTAmsaN8kS%252BdvOMzZMwOFVdE6Ok%7Cclp%3A2334524%7Ctkp%3ABFBM6Luq7alf Argon ONE V2 Raspberry Pi 4 Case: https://thepihut.com/products/argon-one-raspberry-pi-4-case?variant=31245160349758 Argon ONE Power Supply (IMPORTANT): https://thepihut.com/products/argon-one-raspberry-pi-4-power-supply-5-25v-3-5a ALTERNATIVE FOR CONNECTING SSD TO PI (tidier back): USB Bridge (3D Printed Shroud STL File Included): https://geekworm.com/products/usb3-0-connector USB 3.0 Adaptor Coupling Connector: https://www.amazon.co.uk/dp/B012G8K08U/ref=cm_sw_em_r_mt_dp_9H5DST2GV5ZKRFTPSFQE?_encoding=UTF8&psc=1 SPECIAL NOTES This is to easy print, but a pain in the arse to put together (YOU HAVE BEEN WARNED). The hardest part is the little screen and getting the jumper wires connected properly. It's a tight fit and the jumper wires that connect to the GPIO extender of the Argon one case protrude.... So I basically created my own jumper wire female connector by snipping them down and with the tiniest bit of solder made the conductor. I also cut off the male jumper connectors from the screen and soldered the wires directly to it. Also.... Annoyingly, but not a big issue - when I designed the case, I got the screen orientation wrong. The wires are to the left when looking at the front of the screen, not the right (which would make the screen upside down)... So I just flipped the output in the python code. I've provided all scripts and instructions for getting the OLED display working and the link to getting the Argon fan (variable RPM based on temperature) working. NOTE A couple of photos where you can see the components (USB hub, M.2. SSD) are from a different build (this one: https://www.thingiverse.com/thing:5158664), but it shows you the layout - it's the same. ----------------------------------------------------------------- EDIT: (15/12/2021) IMPORTANT - Go for a different m.2 SATA to USB 3 adaptor chipset to the one listed if I was you... The first build worked flawlessly, the second build... Lots of issue with JMicron chipset. Forums suggest power draw inconsistencies. EDIT (18/12/2021) - OK, you can possibly ignore the statement above. Yes, you do need a a decent power supply, and yes, there are known issues with the JMicron chipset, but I managed it once without issue so why not again with the same components? I believe the actual issue is with regards to heat! The SSD controller sits directly under the CPU of the raspberry pi and it gets hot! So... I'm gonna add some more ventilation to the base and upload a new version. EDIT (20/12/2021) - Extra ventilation solves the issue. I've added 3 more STL files which are optional: 1. Base with extra ventilation 2. Base with 40mm Fan Hole + Base Extension to hold fan (if including SSD) 3. Base with 40mm Fan Hole and Placement (if not including SSD) Since I already printed out my base and have the components hot glued inside, I elected to cut a 40mm hole to fit a 40x10mm Noctua fan and print a base extension to hold the fan, rather than print an entirely new base. I have however, provided a new base with the fan hole if you want to add a fan with the base extension and a new base with a fan hole + placement if you're not wanting to use an internal SSD (so the fan is inside and no base extension is required). How do you power the fan do you ask? Either, route wires to attach to the GPIO, or (which is what I've done) - Found an old USB wire, cut the end off and wire the live and ground wires to the fan and then plug the USB into the spare USB port of the USB hub - Provides a nice 5v.
With this file you will be able to print Raspberry Pi 4 Argon One V2 Custom Base with your 3D printer. Click on the button and save the file on your computer to work, edit or customize your design. You can also find more 3D designs for printers on Raspberry Pi 4 Argon One V2 Custom Base.