Raspberry Pi 4 Computer and Screen Case
thingiverse
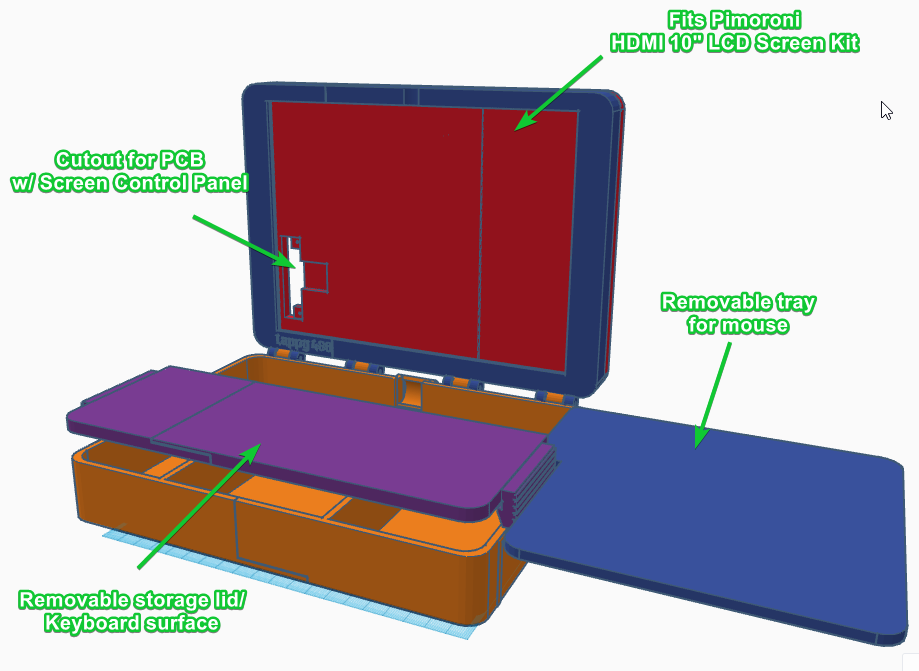
BASIC DESCRIPTION I built this case to keep a 10" pimaroni HDMI screen and my raspberry pi 4 together in a nice little case and also hold a battery and keyboard. The base acts as a tray to place the rpi4, a folding keyboard, and a battery bank. (Specifics linked below if you'd like to use the same). The lid is a container for the screen and pcb that controls the screen can be screwed into the cutout on the top with 2mm screws. This part of the case is fastened together on the top by 4 M3 screws. The hinge for the lid are fastened by 2 more M3*25 screws, and two M2*25 screws and a nut for each. The PCB for the screen was attached via two small laptop screws of about 2mm wide and 3-4 mm long. No soldering required!! SETTING EXPECTATIONS This is a FDM 3D printed case with many parts (especially if you have a small printer). FDM 3D prints especially have some defects that can sometimes be eliminated through careful fine-tuning of settings - sometimes we just have to live with things not being perfect. That being said, I've included pics of my original print here. You'll see it's far from perfect. Some warping, some joints between parts are very visible. I'm also not an expert 3D printer either (just a hobbist with a more get it done than perfection approach). That being said, if you want this project to come out closer to perfect (like what Tinkercad shows) and you don't want the aggravation of reprinting parts and tweaking settings endlessly, it might be prudent to just spend the extra money and get this printed at a professional print shop. CUSTOMIZATION In the images, you'll see I have customized mine with the raspberry pi logo and some retro text which is throwback reference to Homestar Runner. If you don't like it or want to do something different, check out my Tinkercad files! I designed it completely using this web app. Just click the part that is customized and "Ungroup" you'll get the part without the customization. Tinkercad Design Small Printer: https://www.tinkercad.com/things/dXkhfC0Lj2E Tinkercad Design Large Printer: https://www.tinkercad.com/things/j9R8QS7o7UR CAN YOU PRINT IT? I am not so blessed to have a large printer and this design was not large enough for me to print every part without slicing and gluing. So... If you have a smaller print bed like me (Ender 3 w/ 220mm x 220mm x 250mm) then download the files which are labeled "small." Listed below are the maximum sizes for each dimension so you'll know if it'll fit. Print Size for Smaller Printers: Width: 177 mm Length: 185 mm Height: 44 mm If you have a large print bed, here are the dimensions of the piece. I have also included parts labeled "large" that you can download and build without any glue! Lucky you!! Listed below are the maximum sizes for each dimension so you'll know if it'll fit. Print Size for Large Printers: Width: 246 mm Length: 185 mm Height: 44 mm PRINT SETTINGS I may have overfilled it when I printed, but I wanted to make sure it was relatively study being a case I will be taking with me from place to place, especially the parts which would support my keyboard and mouse. Feel free to experiment. Part: Lid top Detail: 0.12 Infill: 30% Supports: Yes Part: Lid bottom Detail: 0.12 Infill: 30% Supports: Yes Part: Base Detail: 0.12 Infill: 30% Supports: Yes Part: Keyboard Tray Detail: 0.12 Infill: 40% Supports: Yes Part: Mouse Tray Detail: 0.12 Infill: 40% Supports: No WHAT'S INSIDE? - Raspberry Pi 4 Computer (Raspberry Pi 3 will also fit) - Pimoroni HDMI 10" LCD Screen Kit (https://shop.pimoroni.com/?q=10%22+screen) - Folding Keyboard like this one (https://www.amazon.com/gp/product/B07VWQBT3V/) - Battery Bank like this one (https://www.ebay.com/itm/224002397532?hash=item342795555c:g:XsIAAOSwE25etDvw) - Video cable like this one (for Rpi 4)(https://www.amazon.com/gp/product/B00A830AWW/) - Monitor power cable (I used the one included with the power bank) - Rpi 4 power cable (https://www.amazon.com/gp/product/B08W2129Z8/) - A power brick for recharging your battery bank (https://www.amazon.com/Adaptive-Charging-Charger-Compatible-S21Ultra/dp/B08YZ7L7QS/) - M3*25 Screws x2 and M3 nuts (outside two hinges) - M2*25 Screws x2 and M2 nuts (center two hinges) - Laptop Screws x2 (Screw in the monitor PCB board) - M3*8 Screws x4 (Top assembly) - A set of hex wrenches and a very small Phillips screwdriver for assembly - Superglue if you have a small printer...
With this file you will be able to print Raspberry Pi 4 Computer and Screen Case with your 3D printer. Click on the button and save the file on your computer to work, edit or customize your design. You can also find more 3D designs for printers on Raspberry Pi 4 Computer and Screen Case.