Raspberry Pi 4 PC Case
prusaprinters
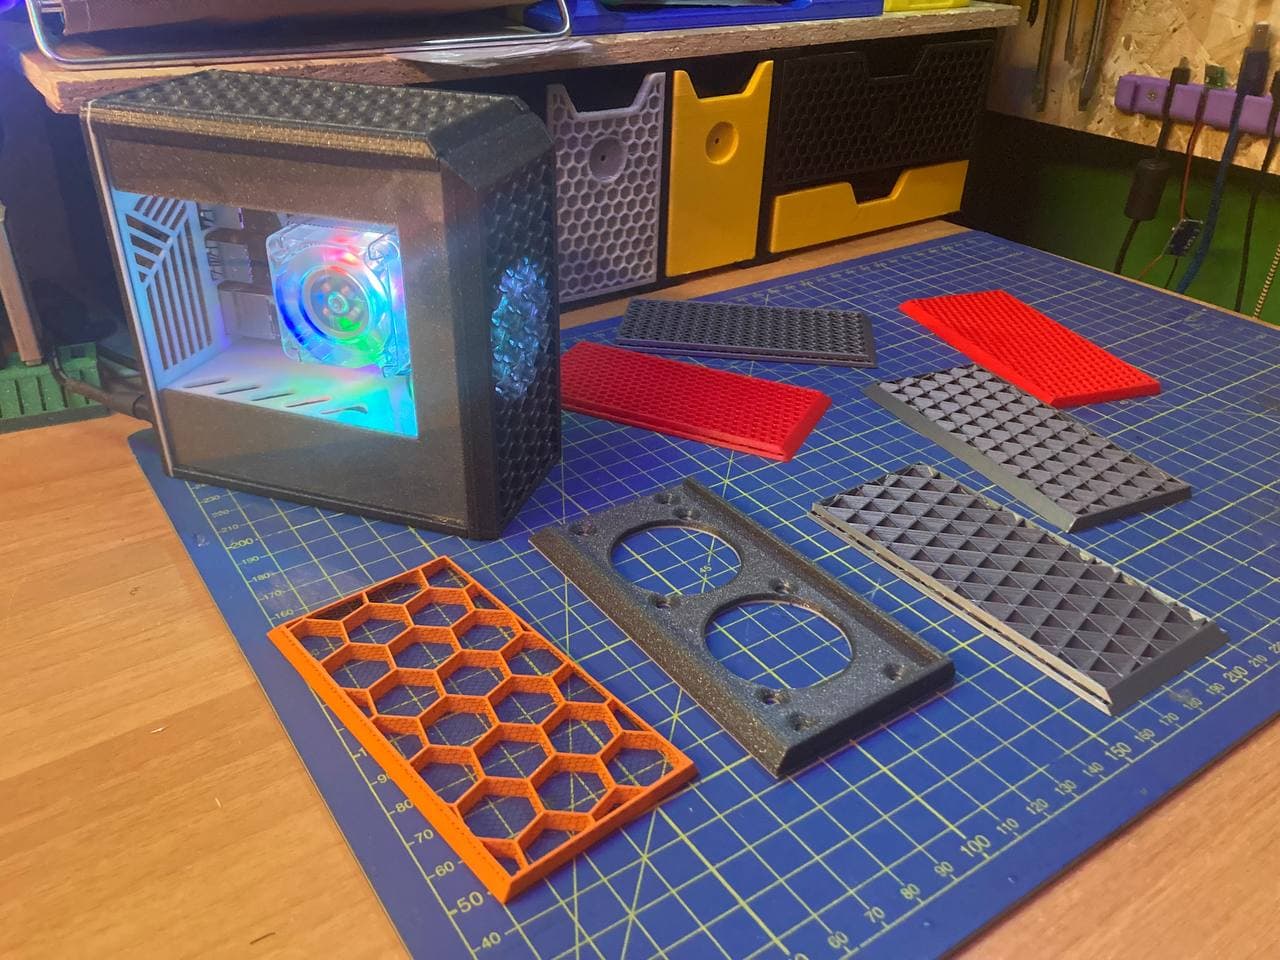
<h3>If there are any errors or you have requests for special changes to design, please let me know in the comments.</h3><p> </p><p>All pieces are support free!</p><p>Let's start with the list of parts you will need to complete the project:</p><ol><li>3D printed parts (See instructions on how to print "INSERT" files).</li><li>Raspberry PI 4</li><li><a href="https://www.amazon.it/gp/product/B071ZRXKJY/ref=ppx_yo_dt_b_asin_title_o02_s00?ie=UTF8&psc=1">Stepdown DC-DC LM2596S USB</a></li><li><a href="https://www.amazon.it/gp/product/B087ZKBF9R/ref=ppx_yo_dt_b_search_asin_title?ie=UTF8&psc=1">Micro HDMI to HDMI female adapter left 19 cm</a></li><li>Heat dissipation system of your choice, i suggest you <a href="https://www.amazon.it/gp/product/B07ZV1LLWK/ref=ppx_yo_dt_b_search_asin_title?ie=UTF8&psc=1">Low profile CPU cooler</a>. The only one that does not fit is the <a href="https://www.amazon.it/GeeekPi-Ventola-Raffreddamento-Raspberry-dissipatore/dp/B07V35SXMC">Tower Cooler</a></li><li><a href="https://www.amazon.it/gp/product/B082XLTWYN/ref=ppx_yo_dt_b_search_asin_title?ie=UTF8&psc=1">2 x 5V 40x40x10 mm fan</a></li><li>12V 1.5A Power Adapter (Surely you will have one at home to collect dust).</li><li>5pz M3x10mm countersunk screw</li><li>6pz M3x16mm countersunk screw</li><li>Some wires and dupont female connector</li><li>One piece of plexiglass 110x110x2 mm (NO lasercut required) </li></ol><p>With this case I was able to achieve this results by performing<a href="https://core-electronics.com.au/tutorials/stress-testing-your-raspberry-pi.html"> this</a> Stress Test:</p><figure class="table"><table style="border-style:solid;"><tbody><tr><td style="border-color:#000000;border-style:solid;text-align:center;"><strong>CPU SPEED</strong></td><td style="border-color:#000000;border-style:solid;text-align:center;"><strong>TYPE TEST</strong></td><td style="border-color:#000000;border-style:solid;text-align:center;"><strong>FAN VOLTAGE</strong></td><td style="border-color:#000000;border-style:solid;text-align:center;"><strong>FAN VOLTAGE</strong></td></tr><tr><td style="border-color:#000000;border-style:solid;text-align:center;"> </td><td style="border-color:#000000;border-style:solid;text-align:center;"> </td><td style="border-color:#000000;border-style:solid;text-align:center;"><strong>5V</strong></td><td style="border-color:#000000;border-style:solid;text-align:center;"><strong>3.3V</strong></td></tr><tr><td style="border-color:#000000;border-style:solid;text-align:center;"><strong>STOCK</strong></td><td style="border-color:#000000;border-style:solid;text-align:center;"><i>STRESS</i></td><td style="border-color:#000000;border-style:solid;text-align:center;">37°</td><td style="border-color:#000000;border-style:solid;text-align:center;">42°</td></tr><tr><td style="border-color:#000000;border-style:solid;text-align:center;"> </td><td style="border-color:#000000;border-style:solid;text-align:center;"><i>CPU BURN</i></td><td style="border-color:#000000;border-style:solid;text-align:center;">40°</td><td style="border-color:#000000;border-style:solid;text-align:center;">46°</td></tr><tr><td style="border-color:#000000;border-style:solid;text-align:center;"> </td><td style="border-color:#000000;border-style:solid;text-align:center;"> </td><td style="border-color:#000000;border-style:solid;text-align:center;"> </td><td style="border-color:#000000;border-style:solid;text-align:center;"> </td></tr><tr><td style="border-color:#000000;border-style:solid;text-align:center;"><strong>2 GHZ</strong></td><td style="border-color:#000000;border-style:solid;text-align:center;"><i>STRESS</i></td><td style="border-color:#000000;border-style:solid;text-align:center;">46°</td><td style="border-color:#000000;border-style:solid;text-align:center;">53°</td></tr><tr><td style="border-color:#000000;border-style:solid;text-align:center;"> </td><td style="border-color:#000000;border-style:solid;text-align:center;"><i>CPU BURN</i></td><td style="border-color:#000000;border-style:solid;text-align:center;">56°</td><td style="border-color:#000000;border-style:solid;text-align:center;">64°</td></tr></tbody></table></figure><p>Below is a video explaining how to assemble it</p><figure class="media"><oembed url="https://youtu.be/DGN87SRX9AA"></oembed></figure><p> </p><p> </p><p> </p><h4>How to print “FRONT INSERT” and “TOP INSERT” files:</h4><p>Simply by removing the number of top and bottom layers from your slicer and setting the right filling percentage, you will get the necessary pieces with the right properties.</p><figure class="image image-style-align-center image_resized" style="width:95.52%;"><img src="https://media.prusaprinters.org/media/prints/133152/rich_content/3be6f0eb-e396-4e37-89ab-dddd10a75053/inserti-slicer.jpg#%7B%22uuid%22%3A%22ec0d61d9-612a-48ef-ad69-e66c159cf5fc%22%2C%22w%22%3A918%2C%22h%22%3A492%7D"></figure><p> </p><figure class="image image-style-align-center image_resized" style="width:92.8%;"><img src="https://media.prusaprinters.org/media/prints/133152/rich_content/1b85018f-b60c-4858-86c4-5f19646a1212/inserti-notopbottom.jpg#%7B%22uuid%22%3A%22d47c95e0-95c6-4633-83a3-8a6d1bc70f91%22%2C%22w%22%3A598%2C%22h%22%3A476%7D"></figure><figure class="image image-style-align-center image_resized" style="width:91.96%;"><img src="https://media.prusaprinters.org/media/prints/133152/rich_content/aa754770-ba28-4301-a20b-c956f0002c09/insert-base.jpeg#%7B%22uuid%22%3A%22ae3bffd4-67f3-4991-acc0-bc6ff84adbaf%22%2C%22w%22%3A4032%2C%22h%22%3A3024%7D"></figure><p> </p><p>Playing with density, fill patterns and color, you can customize your case and get results like these:</p><figure class="image image-style-align-center image_resized" style="width:89.66%;"><img src="https://media.prusaprinters.org/media/prints/133152/rich_content/05948482-63d2-4dc5-91ce-67370bc5f28a/insert-color.jpeg#%7B%22uuid%22%3A%2232191521-cc39-4dba-9e42-0903a381be2c%22%2C%22w%22%3A2937%2C%22h%22%3A2741%7D"></figure><figure class="image image-style-align-center image_resized" style="width:89.13%;"><img src="https://media.prusaprinters.org/media/prints/133152/rich_content/074556f5-88a8-4784-99b8-c5f15ff391eb/insert-mesh.jpeg#%7B%22uuid%22%3A%2205b8bd7d-4835-456b-b9ca-36990a0452d2%22%2C%22w%22%3A2031%2C%22h%22%3A3476%7D"></figure><p> </p>
With this file you will be able to print Raspberry Pi 4 PC Case with your 3D printer. Click on the button and save the file on your computer to work, edit or customize your design. You can also find more 3D designs for printers on Raspberry Pi 4 PC Case.