Raspberry Pi 4B Package + Fisheye Camera Holder of Astropi/Octopi For Anycubic i3 Mega/ Mega S/X
thingiverse
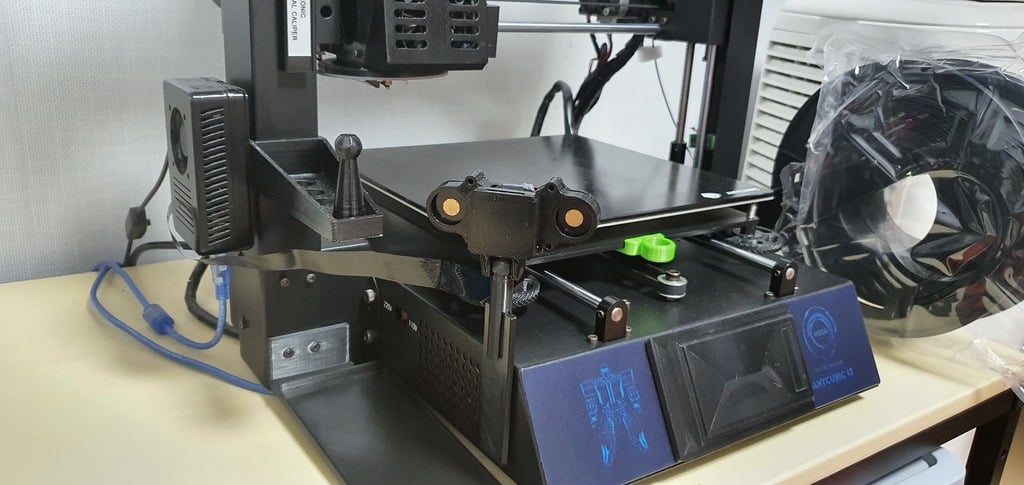
Please join us in our Facebook group for our assistance: https://www.facebook.com/groups/1475376915974525 https://youtu.be/h8BbYVH7xX4 Please, don't forget to post your Make. I would like to see how good you have done! You can control your 3D printer remotely anywhere you are; whether you are using internet via WiFi within or in different WiFi range or mobile cellular data. I have made this complete All-in-one package for Raspberry Pi 2/3/3b & 4b for Astrobox(Astroprint) or Octopi (Octoprint). This package contains of detailed instruction how to set up from the beginning to the end. It also contains of Raspberry pi parts, such as box, Sphere Rod, Attaching Plate and so on which all I have designed by myself. It is designed for Raspberry Pi Fisheye Camera or regular camera. All you need to do is to attach the Attaching Plate with Sphere Rod to the either front side of the 3D printer and level its height and width shown in the photos and video, then you are easy way to go! Please download 'Step-1 Raspberry Pi 4B & STL Print File.rar' & Step-2 Octopi, & Astropi Setup Package.rar Please, use the folder 'New' for Sphere Rod & Attaching Plate. If you just prefer to use only Raspian OS on Raspberry device for other purpose like games and others, download 'Raspberry Pi OS Setup.rar' -------------------------------------------------------------- #Purchase:# Raspberry Pi 4b complete set. https://www.aliexpress.com/item/4000244917268.html?spm=a2g0s.8937460.0.0.afc02e0e0OHXwm Fisheye Cam(Auto) https://www.aliexpress.com/item/32831783732.html?spm=a2g0s.9042311.0.0.5a2d4c4dH0JOwM Purchase 15-Pin Ribbon Flex CSI Cable for lenghty size(30 or 50cm) https://www.aliexpress.com/item/32955287044.html?spm=a2g0s.9042311.0.0.2f474c4dQJRSIN 5V 3A USB Adapter with ON/OFF Switch: https://a.aliexpress.com/_dWHzypz or https://a.aliexpress.com/_BfATxsPv -------------------------------------------------------------- #How to set up Astropi or Astrobox:# Step 1: Download here at the end of the page. You will see a zipped file. https://www.astroprint.com/download-3d-printer-software Step 2: Flash the img. file through Ether or Raspberry Pi Imager software: https://www.raspberrypi.org/downloads/ Step 3: Connect your Astroprint box via HDMI or through Mini Raspberry LCD display (Please follow the instruction of how to enable it through different folder). Boot your Raspberry Pi and type these: Username: pi Pass: raspberry then type this 'Sudo raspi-config' Select No.2 Network Options > N1 Hostname > write your own hostname or hit OK to leave it default. To connect your WiFi router to your Raspberry device at home, Select No.2 > N2 Wifi...' & enter SSID & Password manually. Select No.2 Network Options > 'N3 Network interface names Enable/Disable predictable network interface names'> hit 'Yes' For enabling SSH(Remote command line access): Select P2 SSH > Enable (Optional)For enabling Camera: Select No.5 > P1 Camera> Enable. Finally 'Sudo reboot' Step 4:Boot your Windows and go to WiFi search list, where you will see your Astrobox name. Please, Connect it. Now add this link in your browser http://10.10.0.1 OR Go to the Network icon in the desktop, where you will see your Astrobox WiFi, which you can double-click. Then, follow the instruction and link your Astrobox WiFi connection to your WiFi Router. Finally, Disconnect your Astrobox WiFi in the WiFi Search list and connect to your WiFi router. ========================== Please,Watch this video for setting up your Astrobox. to look for your IP, go to Network folder & you will see the network device. Click it, then you will be referred to its page for setup. https://www.youtube.com/watch?v=Q_-8ET1IjIU&feature=emb_title You can also link your Octoprint to Astroprint dashboard by installing Astroprint plugin through Octoprint. For this one, you need to have Octoprint image file flashed onto your memory. ###Astopi Update### In oder to update your Astropi, please set the time manuelly as it has no auto-sync of time. Here how it is: boot the Raspberry Astroprint and type ' sudo date -s "time" ' For example: "sudo date -s 2020-05-04 22:44" Next, you can update internally or go straight directly into Astroprint dashboard in website with your IP and finally hit update there. ==============================That's it, enjoy==================== #Raspberry Configuration# ----------------------------------------------- Connect your Astroprint box via HDMI & type or through Mini Raspberry LCD display (Please follow the instruction of how to enable it through different folder. Username & Password for Raspberry: Username: pi Pass: raspberry To enter Raspberry Configuration: Type 'Sudo raspi-config' ========================== ****LCD setup:**** ----------- Open Terminal 1) 'sudo git clone https://github.com/goodtft/LCD-show' 2) 'cd LCD-show' 3) '1s' 4) 'chmod +x LCD35-show' 5) './LCD35-show' ****Toggle between HDMI & Mini Raspberry LCD display:**** ---------------------------------- Please open Terminal: To HDMI: 1) 'cd LCD-show/' 2) './LCD-hdmi' To TFT LCD display: 1) 'cd LCD-show/' 2) './LCD35-show' But first, you need to install driver for TFT LCD display & do the orientation: For Display Orientation: 1)Driver installation: 'Sudo rm -rf LCD-show' 2) 'git clone https://github.com/goodtft/LCD-show.git' 3) 'chmod -r 755 LCD-show' 4) 'cd LCD-show/' 5) 'sudo ./LCD35-show 90' (90,180,270 degree orientation) Or For convenient way(after Driver installation), 1) 'cd LCD-show/' 2) 'sudo ./rotate.sh 90' (90,180,270 degree orientation) =================================================== ****Mouse Speed:**** ------------- Type these: 1) Sudo nano /boot/cmdline.txt now go to the end of the context & type this: 'usbhid.mousepoll=1' (you can type either 0 or 1 for speed level) 2)next hit 'Ctrl+x', then hit 'Y' & 'Enter' 3)Finally 'Sudo reboot' =================================================== For complete upgrade set for your Anycubic i3 Mega/Mega S: https://www.thingiverse.com/thing:3673994 Anycubic i3 Mega/Mega S fuse holder(Only for motherboard damaged fuse!!!) https://www.thingiverse.com/thing:3657209
With this file you will be able to print Raspberry Pi 4B Package + Fisheye Camera Holder of Astropi/Octopi For Anycubic i3 Mega/ Mega S/X with your 3D printer. Click on the button and save the file on your computer to work, edit or customize your design. You can also find more 3D designs for printers on Raspberry Pi 4B Package + Fisheye Camera Holder of Astropi/Octopi For Anycubic i3 Mega/ Mega S/X.