Raspberry Pi 7 Inch Touchscreen display case swing out arm mount for 2020 (with STP files)
prusaprinters
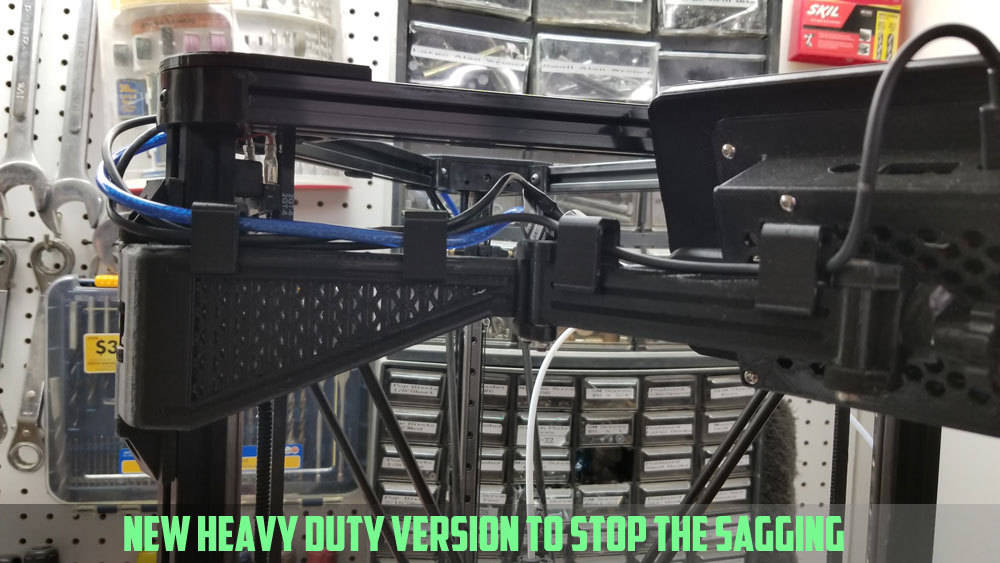
<p>Update Feb 19, 2019 - STEP files are now uploaded (all objects in one file).</p> <p>There was a problem reported with the following files when sliced in S3D (see comments). The files had problems that caused slicing to fail or unexpected internal structures which were not optimal:</p> <ul> <li>"V17-2020-Mountv5C.stl" - replaced with "V17-2020-Mountv6B-fixed2.stl" </li> </ul> <ul> <li>"V17F3-Kossel-150mm-ARM-HD-no-holes.stl" - replaced with "V17F4-Kossel-150mm-ARM-HD-no-holes-fixed.stl"</li> </ul> <ul> <li>"V17F3-Cartesian-150mm-ARM-HD-no-holes.stl" - replaced with "V17F4-Cartesian-150mm-ARM-HD-no-holes-fixed.stl"</li> </ul> <ul> <li><p>"rpi-case-door" - replaced with two versions:<br/> "rpi-case-door-v6-square-holes.stl" (same as the original but should be fixed)<br/> "rpi-case-door-v6-chamf-holes.stl" (has rounded holes which should require fewer supports) Thanks to Jimbob_McCoi for pointing this out.</p> <p>Update 9-28-2018 - I reprinted this in ABS and it is much stronger in the heat of the garage. Also designed a caseback to use a 40mm fan - to use it, the following are needed. The spacer is designed so the cover could print flat, and it is placed between the fan and cover.</p> <p>V16F3-Updated_cover-fan-spacer.stl<br/> V16F-Updated_cover-with-40mm-fan.stl</p> <p>Update 4-15-2018 - I am done with the tweaks unless somebody reports a problem, this should be the final design. There are a few minor issues which I think should be resolved mostly, they are:</p> </li> <li><p>long arms not closing flat, I think this is fixed and they should close now.</p> </li> <li><p>knob spun free with a hex head screw, this is also fixed, but it requires a good bit of torque to get the knob tight enough to hold the screen. I used a pliers for the final torque, using a cap screw and just tightening with a Allen key may be a better solution. Good luck, let me know what you think.</p> <p>First, this is at your own risk deal, I am not sure how well the arm will support the Pi and touchscreen (or whatever else). I may find that my whole rig has come crashing down due to a broken part in this arrangement. Just putting that out there first since it is a possibility that this is not up to the task.</p> <p>This has gone though several iterations due to problems with the initial design I was not happy with, but these files should work now - though I don't guarantee you won't need a file to get things to fit correctly. I have updated almost every file at least once, but if you see a problem drop a comment or message me and I will try and get it fixed. There are a number of files included, to hopefully give folks a number of options. The first few iterations of the arm used a smaller mounting and I found that the arm was sagging when printed with PLA so I am dropping that design from the files, but if there is any interest in the slimmer design, I can post it as a remix (it may work for something lighter than the Pi + 7" screen). Best to print this in ABS if possible.</p> <p>This was designed for my AnyCubic Kossel Plus (Linear Rails version) but I would expect it will work with most other types of Deltas and Cartesian printers. On the Deltas I have made a 150mm arm that has a bend and a stop block so it will stop flat across the front. On Cartesians I have included a straight 150mm bar. The arms integrate a cable management system using clips which is optional. There are several arms included, to hopefully cover several situations. I found that printing the larger arm with the holes in it was a bit of a pain since the small edges curled just enough to catch the nozzle when it traversed, and pulling the part off the bed. I made another without the holes which may be easier to print, but left the models with the holes for anyone who likes that look.</p> <p>For cable management beyond the arm mount, the following clips work really well for 2020 extrusions:</p> <p>Delta 3D Printer Cable Clip by Joegatling<br/> <a href="https://www.thingiverse.com/thing:2000596">http://www.thingiverse.com/thing:2000596</a></p> <p>That's about it. I may add a fan to the back cover for the Pi one day.</p> <p>============================================================<br/> Attributions and thanks:</p> <p>This is a re-mix of the following parts:</p> <p>VESA Monitor Arm by Stunner2211 (<a href="https://www.thingiverse.com/thing:2700618">https://www.thingiverse.com/thing:2700618</a>) which I have scaled down and modified to accommodate some m4 nuts and bolts.</p> <p>Support 2020 by wbanw (<a href="https://www.thingiverse.com/thing:2759856">https://www.thingiverse.com/thing:2759856</a>) which I edited to work with the scaled down VESA arm.</p> <p>Raspberry Pi 7 Inch Touchscreen display case by luc_e (<a href="https://www.thingiverse.com/thing:1585924">https://www.thingiverse.com/thing:1585924</a>) which I modified the back plate on, and strengthened the SD card hatch latch.</p> <p>============================================================</p> <p>This works with the Raspberry Pi (Official) 7" touchscreen, just like the case would - nothing is really changed with that. You will also need the following files from the Raspberry Pi 7 Inch Touchscreen display case by luc_e (<a href="https://www.thingiverse.com/thing:1585924">https://www.thingiverse.com/thing:1585924</a>) - these or the equivalent split versions he included:</p> <p>Raspi7inch_Case_SD_Access<br/> -or-<br/> Raspi7inch_Case<br/> and:<br/> Raspi7inch_Front (or one of the modded versions of the case front)</p> <p>============================================================</p> <p>The arm uses the following hardware:</p> <p>M4 x 35mm cap head screws (need 5 of these)<br/> M4 x 40mm hex head screw (need just one of these for the knob - note it is a HEX HEAD, you could use cap head screws if you want but the knob will not index with the screw)<br/> M4 nylon lock nuts (about a half dozen will do)<br/> M4 washers (about 14 of these)<br/> M4 x 12mm (2 needed - may need shorter sized bolts, or whatever is suitable for your 2020 extrusions)<br/> M4 T-nuts (2 to mount the arm to the 2020 extrusions)</p> <p>Also required for the case is any M3 hardware you would normally need for the 7" Pi Case (which is eight M3x8mm or M3x6mm screws I believe)</p> <p>============================================================</p> <p>Assembly notes:</p> <p>Tools:</p> </li> <li><p>5/32" drill bit and a drill or equivalent for cleaning up the holes<em> file to clean up some of the flat areas of the parts.</em> Gorilla Glue or similar which will help to get the washers installed.* 6oz of patience and or one bottle of Bayou Bootlegger Hard Root Beer I used washers between the plastic arms and the mounting parts, to avoid having plastic on plastic. It would be best to use a washer on both ends of the arms if possible. I also used 2 washers for the interface between the knob and the case back. I would recommend using washers anywhere there would be plastic on plastic contact for a moving surface if possible. I glued the washers in beforehand, using some small screws as clamps to hold them until they dry (see the pics), that helps to keep 'em in place during installation. The cap head M4 screws should recess into the parts, so I would recommend using them for everything but the knob which will need a hex head (though you could use a cap head there also, but the knob will not work by hand).</p> <p>I needed to drill out the through holes just a bit for better clearance, my printer was not fully dialed in when I printed these either so my prints did not come out clean. I considered making the through holes larger in the design, but decided that drilling would be better since it cleans them up as well. Let the drill do the work to get the holes straight.</p> <p>============================================================</p> <p>Couple notes on printing, I used a lot of infill, like 50-60% since these parts have to bear loads. I went with a thicker wall and top/bottom config as well (I think it was something like 2mm walls and 1.6 for the floors/tops). I will leave it up to you on how best to print these, but the arms were printed in the "tall" configuration with a brim, and that worked best for me. I used zig zag supports in Cura and had to play around with supports a bit on some parts to minimize the cleanup. I also edited some parts post printing since I found the holes for the lock nuts to be too tight (7.4mm across the flats seems to be best). I have printed most of the parts that are up and am using them now, but a few I did not print the latest revisions, so if you have issues let me know.</p> <p>The biggest problem with printing them has been that the washer indents I added to some parts disappear in the mess that is left from the supports, the washers will still fit with some filing but not as I intended them to seat in the parts. Not a big deal but keep it in mind when deciding how to position these for printing and determining how to use supports.</p> <p>============================================================</p> <h3>Print Settings</h3> </li> </ul> <p><strong>Notes:</strong></p> <p>These are only suggestions, but I used a lot of infill at least 50%. I would not trust these parts with less. I also used a thicker wall and top/bottom thickness on some parts (about 1.6mm). In hindsight I would have used thicker walls on all of them but most were done when I thought about it. Some of these parts will print best with rafts while on others it is not needed - that's really a "know your printer" deal - my build plate is glass and need all the help to sick that I can give it (including hairspray).</p> <p>Regarding orientation, the only notes would be that I printed the arms in the tall configuration rather than flat, and the SD card hatch was printed on it's thin side with a raft and some other parts around it to make the raft bigger. The reason for printing the SD card hatch on it's thin side (in a tall orientation) was to keep the grain of the print from being in the same direction as the high stress area of the latch (where my first print of the original design door cracked when installing it). Regarding supports, keep in mind that some parts have some shallow indents for washers that could get filled up with supports or rafts.</p> <p>Good luck!</p> Category: 3D Printer Accessories
With this file you will be able to print Raspberry Pi 7 Inch Touchscreen display case swing out arm mount for 2020 (with STP files) with your 3D printer. Click on the button and save the file on your computer to work, edit or customize your design. You can also find more 3D designs for printers on Raspberry Pi 7 Inch Touchscreen display case swing out arm mount for 2020 (with STP files).