Raspberry Pi 7-Inch Touchscreen Mount with Keyboard Shelf
prusaprinters
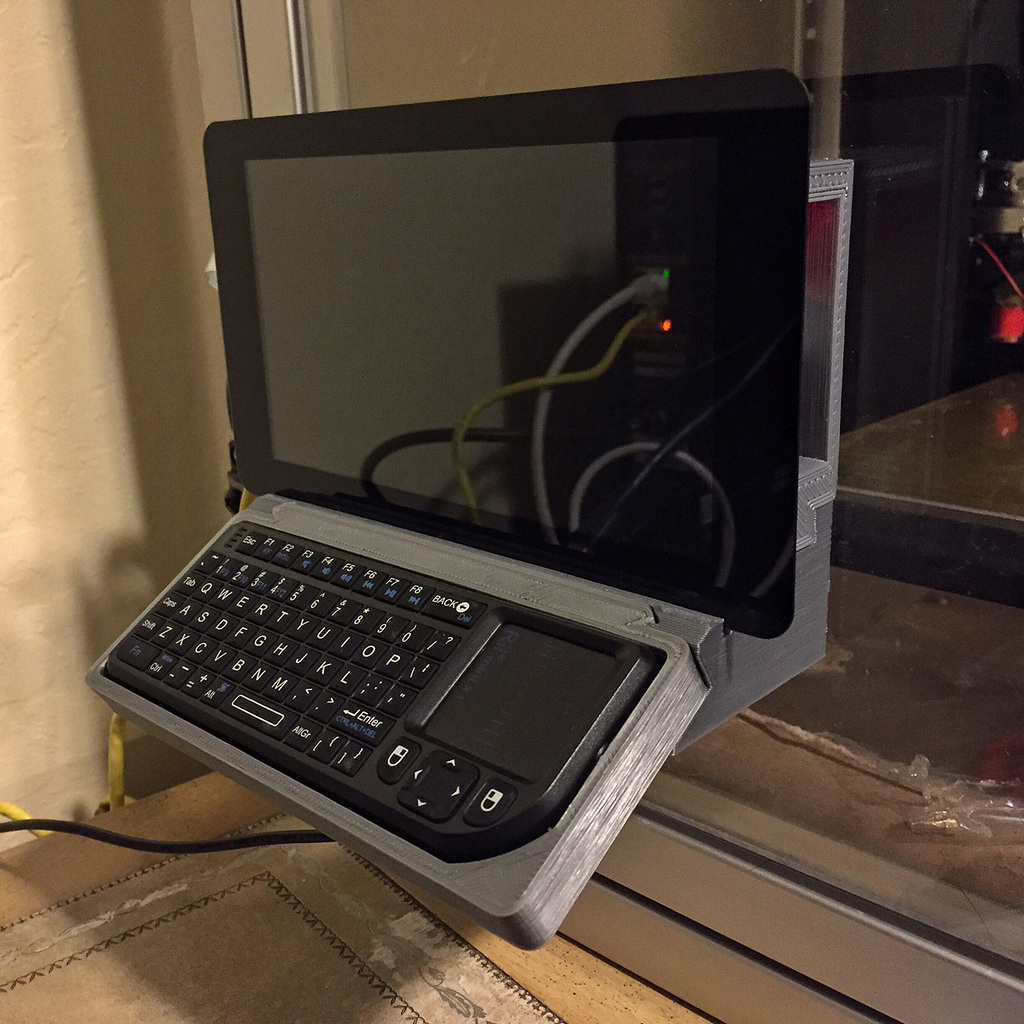
<p>*<strong>Update 6/14/2016 - added separate part files for smaller print bed owners and modders</strong>*</p> <p>This mount is for a Raspberry Pi with the official 7-inch touchscreen display, and a Rii X1 mini wireless keyboard.</p> <p>I use it with Octoprint and the Touch UI plugin to control my printer if my computer is switched off.</p> <p>The assembly is completely held together and mounts to a vertical surface (in my case my printer door) using 30mm socket head cap screws (x10). No glue is required.</p> <p>The Rii X1 wireless keyboard can be bought from <a href="https://www.amazon.com?linkCode=ll2&tag=thingiverse09-20&linkId=e4759bff1fa9a55a0f897d801ce2d765&language=en_US&ref_=as_li_ss_tl">Amazon</a> for ~$18: https://www.amazon.com/gp/product/B00I5SW8MC/ref=oh_aui_detailpage_o02_s00?ie=UTF8&psc=1</p> <p>30mm socket head cap screws can be sourced from McMaster Carr for $3.80 for a pack of 50: <a href="http://www.mcmaster.com/#91292a022/=12ugx6j">http://www.mcmaster.com/#91292a022/=12ugx6j</a></p> <p>You'll need a ~8.5" x 6.5" bed to print all pieces at once using pi_screen_mount_and_keyboard_stand_rev_2_final.stl. Alternatively, you can download the separate pieces, but note that you'll need at least 6.5" in one axis of your bed to print the larger parts.</p> <h3>Print Settings</h3> <p><strong>Printer Brand:</strong></p> <p>Printrbot</p> <p class="detail-setting printer"><strong>Printer: </strong> <div><p>Printrbot Plus</p></div> <p><strong>Rafts:</strong></p> <p>No</p> <p class="detail-setting supports"><strong>Supports: </strong> <div><p>No</p></div> <p><strong>Resolution:</strong></p> <p>0.3mm</p> <p class="detail-setting infill"><strong>Infill: </strong> <div><p>10%</p></div> <p><strong>Notes:</strong></p> <p>No supports required. It's a pretty easy print that should work with a range of infill, layer heights, and perimeter walls.</p> <p>I used 0.3mm layers because it doesn't have any fine details, and thicker layers are stronger (and obviously faster).</p> <h3>Post-Printing</h3> <p><strong>Assembly Instructions</strong></p> <p>Mount your Raspberry Pi to the touchscreen in the standard manner (stacked on top of the screen driver board).</p> <p>The two side pieces shown in yellow in the 3D illustration fit on to the (red) base using the dovetail connections. A 30mm screw inserted from the front side through each dovetail hold these pieces firmly in place. Tighten until the socket head in slightly recessed in to the screw head hole.</p> <p>The assembly is attached to the screen using four 30mm screws inserted from the back in to the holes go through to the cut outs. Align those cut outs to the screen's tapped metal mounting tabs tighten. Be careful to make sure your calibration isn't off so that the 30mm screws go in too far. When printed correctly, the ends screws should only go a millimeter or so past the metal sheet.</p> <p>The keyboard shelf should press fit (at a 30° angle) in to the base piece. I didn't need any glue.</p> <p>There are four holes without a screw head hole are for mounting the whole assembly to a wall using 3mm screws. I used the same 30mm screws as I had them, but shorter screws should work too.</p> </p></p></p> Category: Electronics
With this file you will be able to print Raspberry Pi 7-Inch Touchscreen Mount with Keyboard Shelf with your 3D printer. Click on the button and save the file on your computer to work, edit or customize your design. You can also find more 3D designs for printers on Raspberry Pi 7-Inch Touchscreen Mount with Keyboard Shelf.