Raspberry Pi 7 Inch Touchscreen Rollbar Case - easy print, no support needed
thingiverse
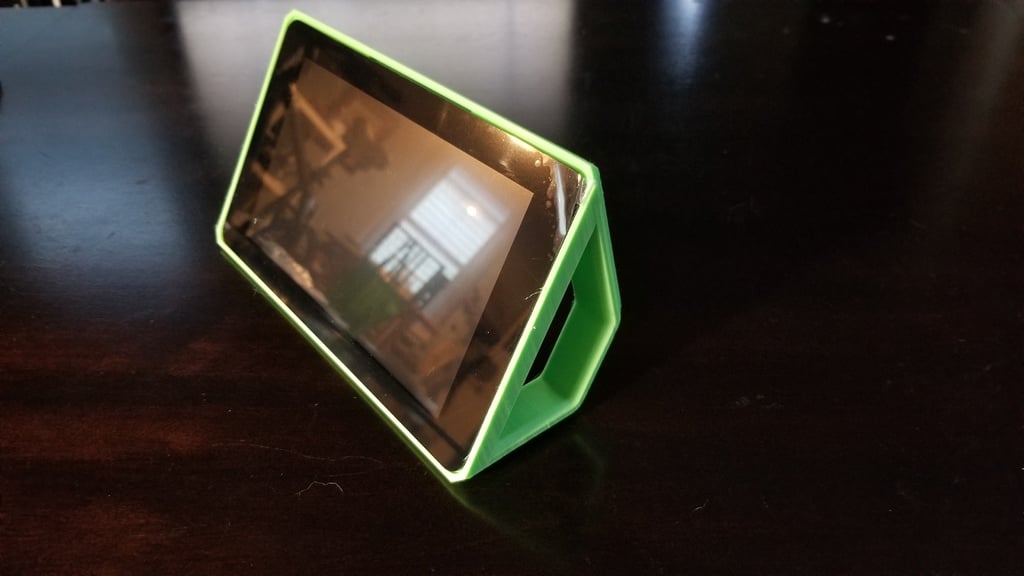
7/26/2019: Final Version here --> https://www.thingiverse.com/thing:3771857 - Bigger handles, better access for cables, protection for Pi board, optional fan mount. 7/20/2019: I uploaded a 2 part, more minimalist, even easier to print version of this thing. http://www.thingiverse.com/thing:3759336 -BASIC INFO- After numerous iterations, it's as polished as it will ever be. This is a holder (case?) specifically designed for an official Raspberry Pi 7" Touchscreen Display. It features rollbars on the back to safeguard the Pi and hold the screen at either a 60 degree angle or a 45 degree angle. The design ensures ambidexterity - the screen can be flipped by unscrewing four screws and rotating it 180 degrees, allowing users to switch between viewing angles seamlessly. While not as convenient as a tablet, this feature is still incredibly useful. The holder is designed for printing with no support required. It prints best in the 45 degree view orientation, but my Ender 3 successfully printed an iteration of it in the 60 degree orientation without any issues. It took around nine hours to print using four shells and zero infill. Approximately 85 grams of plastic were consumed during the process. -NITTY GRITTY DETAILS- To set up the holder properly, regardless of the intended viewing angle, users need to configure the power cable(s) to enter from the top of the board. This requires adjusting the default configuration and adding **lcd_rotate=2** to the config.txt file on the SD card. I strongly recommend using power cables with 90 degree elbows for a cleaner appearance. There are two slots designed to accommodate the power cable to the screen's board, one in each orientation. These slots would make printing without supports impossible, so I added small .4mmx2mm bridges that can be easily removed with wire cutters or nail trimmers. A long unsupported bridge exists within the design, but I'm confident that most printers, including my Ender 3, can handle it. However, there is a slight reverse sag at one of the aforementioned removable bridges. This occurred during the printing process in the middle of the night. The holder requires 3mm screws that are five millimeters long or eight millimeters long with the use of washers from the included Waser1-STL. Now, let's discuss the Raspberry Pi screen build quality... It's a high-quality unit, but the dimensions published by the Raspberry Pi Foundation were slightly off from my actual unit. After reading descriptions from other people's 3D printed cases and stands, this seems to be a common issue. On my specific unit, the aluminum box attached to the back of the screen was one or two millimeters off to one side. To address this, I designed the holder with slots that accommodate the ribbon cable, ensuring it doesn't get pinched. -I'D LIKE TO ADD A FEW MORE THINGS- In the design process for this holder, I accidentally pinched my ribbon cable between the back of the screen and the case. The cable was completely torqued down before I noticed it was pinched, causing a 180 degree bend in the ribbon cable. I thought for sure my ribbon cable would be ruined, so I ordered a replacement. However, when I powered up the device with the bent cable, it surprisingly still worked. I guess I got lucky. As a result, in later iterations of the design, I added two millimeter deep slots to accommodate the ribbon cable and placed little half-round cavities at the end of these slots. If the ribbon cable does get pinched in the future, it won't bend as sharply as it did on my unit. If you're feeling adventurous or have a spare ribbon cable lying around that you'd like to test, you can try intentionally using those slots. However, I do not recommend it, and I take no responsibility if it ruins your ribbon cable!
With this file you will be able to print Raspberry Pi 7 Inch Touchscreen Rollbar Case - easy print, no support needed with your 3D printer. Click on the button and save the file on your computer to work, edit or customize your design. You can also find more 3D designs for printers on Raspberry Pi 7 Inch Touchscreen Rollbar Case - easy print, no support needed.