Raspberry Pi and 7" screen case - with mounting arm for 2020 extrusion
prusaprinters
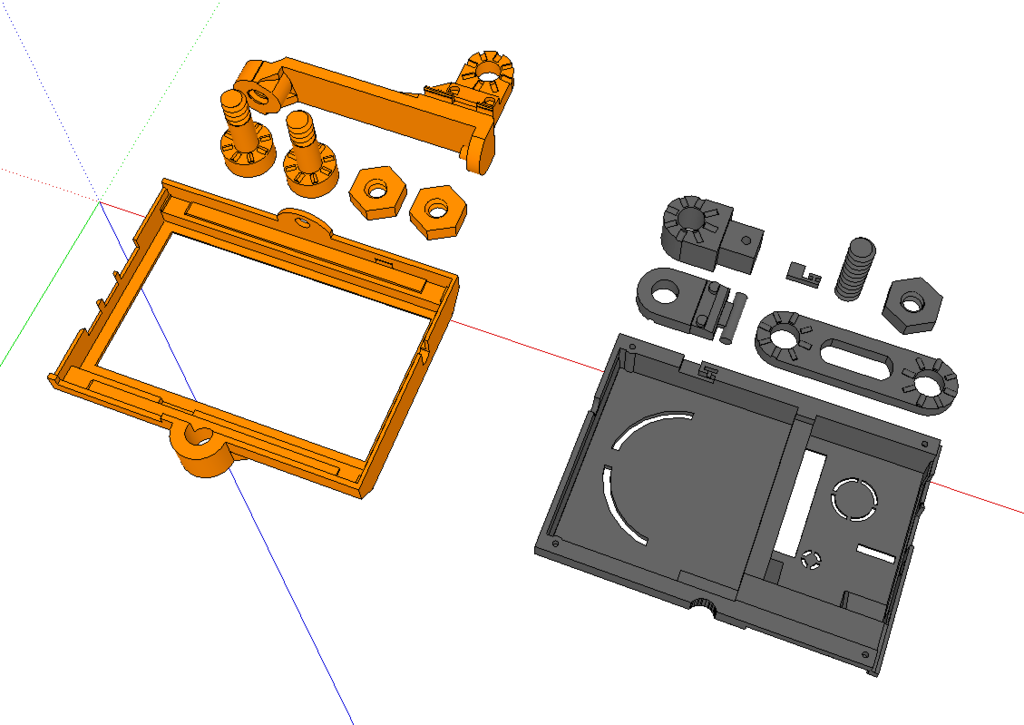
<p>This is a case design for a 7" touchscreen panel and a raspberry pi 3, it also incorporates a mounting system to interface with aluminium 2020 extrusion corner brackets.</p> <p>(<a href="https://www.amazon.co.uk/gp/product/B07QKT6L58?tag=tv-auto-20">https://www.amazon.co.uk/gp/product/B07QKT6L58</a>)</p> <p>The design of the case and bracing system is all entirely my work.<br/> The articulated arms, bolts and nuts are inspired from the articulated lamp thing.<br/> The 2020 extrusion mount is designed to plug into the 2020 corner mount things.</p> <p>I had to rebuild both the 2020 extrusion corner (and extend the design) and the articulated arm to meet my requirements and allow me to easily edit them in sketchup.</p> <h3>Print instructions</h3><p>Limitation:<br/> This was designed to print on the Prusa Mini, the Top and Base pieces only <em>just</em> fit on the bed and will kick prusaslicer warnings when sliced.</p> <p>The parts are designed to use as minimal supports as possible but do require support enforcers in some places (hinge, base, brace), I've included the 3mf files with supports.</p> <p>I've found that printing with a brim helps keep the edges crisp - the Top and base halfs will require a brim of no more than 3mm to allow them to fit on the mini build plate.</p> <p>I've included the parts as individual stls and whole platters to allow you to pick and choose how you want to print them.</p> <h3> Print Settings</h3> <p><strong>Printer Brand:</strong> Prusa</p> <p><strong>Printer:</strong> i3 MK3</p> <p><strong>Rafts:</strong> No</p> <p><strong>Supports:</strong> Yes</p> <p><strong>Resolution:</strong> 0.2</p> <p><strong>Infill:</strong> 15%</p> <p><strong>Filament:</strong> Amazon Basics PLA, PETG Black (PLA), Orange (PETG)<br/> <strong>Notes:</strong></p> <p>Most parts do not need supports, however some do need support enforcers on certain elements:</p> <h3>Support Enforcers:</h3> <ul> <li>Base - requires support for the central bolt area (the port area is bridged with no supports)</li> <li>Hinge - requires supports for the cylinder barrel</li> <li><p>Brace - requires supports for the peg on the inside of the back. (there are 2 other variants of the brace to allow you to choose bottom, topor mid bracing<br/> ### Additional requirements</p> </li> <li><p>Bolt - requires 5 perimeters minimum</p> </li> <li><p>Rod - requires 5 perimeters minimum<br/> All parts should be orientated correctly in the stl, for reference here are the part print requirements (see images also):</p> <p>### PLA:</p> </li> <li><p>Rod - print on end with brim</p> </li> <li>Hinge - print with the two locking nubs pointing up, support the barrel</li> <li>Arm - print with the mount disk area pointing up</li> <li>2020Adapter - print with the mount disk area pointing up</li> <li>Button - print flat</li> <li>Extrusion Passthru mount - Print on its diagonal edge with supports on build plate, see image. Tolerences are tight on this model and will require percussive pursuasion to fit a 2020 bar</li> <li><p>Base - print with inside pointing up, support the central overhang, the Ports section print as bridged<br/> ### PETG:</p> </li> <li><p>Top- print with the inside pointing up, this print will cause 'outside of print area alerts' with the brim of 3mm, required to stop the corners warping</p> </li> <li>Bolt - print on its head</li> <li>Nut - print flat</li> <li><p>Brace - print on its side with the adjustable disk area pointing up, support the peg inside of the brace<br/> ### Construct</p> <ol> <li>Mount the raspberry on the screen back and attach the hdmi coupler</li> <li>Slot the screen and Pi into the front pieces and line up the corner holes with the shallow indents in the corners. </li> <li>Insert the button into the wall of the Base, ensuring the top of the button is flush with the base clam edge.</li> <li>Line up the Top and Base, and push them snugly together - examine the inside corners of the screen front to ensure the Top is snapped fully flush to the screen, ensure the USB and nic ports line up, it should slide together using the layer friction keeping it in place</li> <li>Place the brace connecting nub into the mounting hole on the constructed Top/Base clam</li> <li>Snap the brace into the mounting section at the front of the clam</li> <li>Thread the Rod into the brace through the Top, holding the clamp and clams tightly together, tighten a nut on the rod</li> <li>Flip the unit over and thread the Hinge barrel into the Brace, with the connecting nubs pointing toward the brace.</li> <li>Thread a Bolt through the back of the Brace, place the Arm on the bolt, flip down and click the hinge part into place, thread the bolt through the Hinge hole, secure with a nut, once the teeth on the brace, arm and hinge mesh - the parts should sit flush with each other.</li> <li>Thread a Bolt through the 2020Adaptor and the Arm, mesh the teeth together and secure with a Nut.</li> <li>Slot the 2020 Passthru onto your 2020 bar, press the 2020 Adaptor cube end onto the passthru.</li> <li>Adjust the arms to your desired location.</li> <li>insert a 3mm bolt or screw into the aligned side holes of the 2020 adaptor and Passthru to keep the adaptor in place<br/> ### How this was built</li> </ol> <p>Entirely done in Sketchup, this took 7 full prototype revisions to get it to this stage, some individual parts had between 4 and 9 revisions, with the clams being redesigned from top to bottom 3 times as i moved from smaller parts and interconnects up to a single monolithic part when i realised my print tolerences were not good enough to create the joining pieces i wanted.</p> <p>The most challenging parts were definitely the ports and side ports on both the screen and the Pi, this coupled with the print bed capacity made it a challenge to fit and orientate it correctly while maintaining dimensional accuracy.</p> <p>I may revisit in the future to build a better/smaller/multipart clam Top and Base.</p> </li> </ul>
With this file you will be able to print Raspberry Pi and 7" screen case - with mounting arm for 2020 extrusion with your 3D printer. Click on the button and save the file on your computer to work, edit or customize your design. You can also find more 3D designs for printers on Raspberry Pi and 7" screen case - with mounting arm for 2020 extrusion.