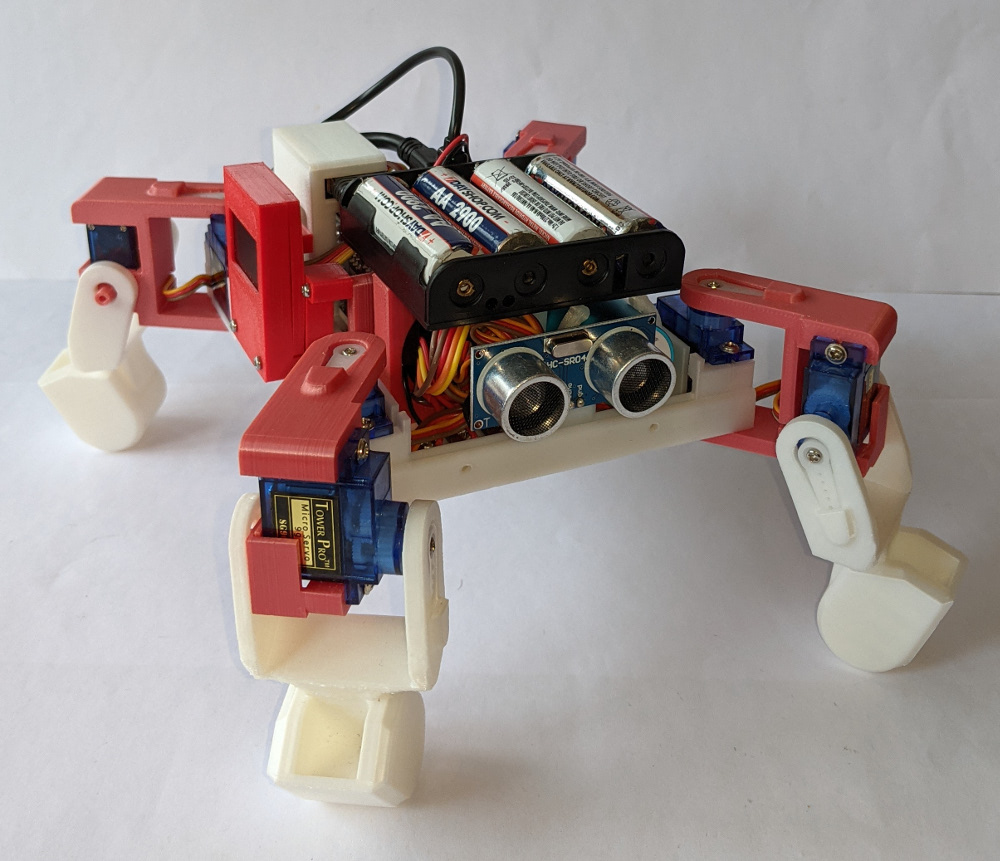
Raspberry Pi controlled 4-legged 8DOF robot
prusaprinters
<p>A Raspberry Pi controlled set of printed components to build a 4-legged / 8 degree of freedom (8DOF) walking robot 'inspired' by the various Arduino MiniKame robots that can be found on the web..</p><p>Eight servos, controlled by a PCA9685 controller board, is in turn managed by a Raspberry Pi Zero using an I2C interface.</p><p>Detailed descriptions of all aspects of this evolving project are at <a href="https://onlinedevices.co.uk/PiZero+8DOF+walking+robot+overview"><strong>this link</strong></a><strong> </strong>and the associated software plus build and usage documentation can be downloaded from <a href="https://github.com/gbrickell/8DOF_quadrabot"><strong>here</strong></a>.</p><p>The various 3D prints developed for this project allow 2 servo motors (hip + knee) to be used to control the movement of each of four legs.</p><p>A Raspberry Pi Zero provides a number of options for controlling the robot's movement with the options ‘set’ by a combination of slide switches installed in the underside of the robot body. A wireless gamepad/controller option is enabled by fitting a holder for a USB ‘dongle’, plus an ultrasonic sensor and an OLED are also fitted to the robot to sense nearby objects and to display the current ‘status’ of the robot.</p><p>It should be noted that the overall assembly has been evolved over an extended period of time with the wireless controller ‘dongle’ holder and OLED 'bolted on' to an earlier overall arrangement, so some 'consolidation' of the 3D print designs would certainly be possible!</p><p>All the 3D print components use 1.75mm PLA and a layer height of 0.15mm with print details for each component produced on an i3 Mk3 shown in the table below.</p><figure class="table"><table><tbody><tr><td><strong>component file name/description</strong></td><td style="text-align:center;width:80px;"><strong>needs support (Y/N)</strong></td><td style="text-align:center;width:60px;"><strong>brim (mm)</strong></td><td style="text-align:center;width:82px;"><strong>filament</strong><br><strong>length (m)</strong></td><td style="text-align:center;width:75px;"><strong>print time </strong><br><strong>(i3 Mk3)</strong></td></tr><tr><td><i>m-body_assembly20.stl</i> - main body ‘pan’.</td><td style="text-align:center;">N</td><td style="text-align:center;">5</td><td style="text-align:center;">15.41</td><td style="text-align:center;">5h 45m</td></tr><tr><td><i>m-hip_x2_repaired03_mirrored.stl </i>- pair of ‘hips’: 2 pairs to be printed.</td><td style="text-align:center;">N</td><td style="border:1px solid rgb(191, 191, 191);padding:0.4em;text-align:center;">0</td><td style="border:1px solid rgb(191, 191, 191);padding:0.4em;text-align:center;">5.64</td><td style="border:1px solid rgb(191, 191, 191);padding:0.4em;text-align:center;">2h 21m</td></tr><tr><td><i>m-hip-shaftsx6.stl</i> - 6 shafts for the non-drive ends of the servos fitted into the hip frames (only 4 of the 6 needed).</td><td style="text-align:center;">N</td><td style="text-align:center;">0</td><td style="text-align:center;">085</td><td style="text-align:center;">25m</td></tr><tr><td><i>m-leg_x2_angled02_mirrored.stl</i> - pair of 'legs': 2 pairs to be printed - support should not be needed but could obviously be added and a large brim used as a precaution.</td><td style="text-align:center;">N</td><td style="text-align:center;">10</td><td style="text-align:center;">8.78</td><td style="text-align:center;">3h 33m</td></tr><tr><td><i>m-leg-shaftsx6.stl </i>- 6 shafts for the non-drive ends of the servos fitted into the ‘pockets’ on the main body (only 4 of the 6 needed).</td><td style="text-align:center;">N</td><td style="text-align:center;">0</td><td style="text-align:center;">0.61</td><td style="text-align:center;">22m</td></tr><tr><td><i>4AA_battery_stand10.stl</i> - mounting bracket for a 4AA battery holder: uses 2x M3 8mm long pan head screws to self tap into the main body ‘pan’ base and 2x M2 6mm long CSK head screws to secure the battery holder to the bracket - although using just one CSK screw allows the battery holder to swivel to allow the wireless controller ‘dongle’ to be easily inserted into the USB cable.</td><td style="text-align:center;">N</td><td style="text-align:center;">0</td><td style="text-align:center;">1.5</td><td style="text-align:center;">1h 9m</td></tr><tr><td><i>PiZ_v_holder03.stl</i> - mounting bracket for Raspberry Pi Zero: uses 2x M3 8mm long pan head screws to self tap into the main body ‘pan’ base and 4x self tap 6mm long M2 flanged pan head screws to fix the Pi to the mount.</td><td style="text-align:center;">N</td><td style="text-align:center;">0</td><td style="text-align:center;">1.19</td><td style="text-align:center;">33m</td></tr><tr><td><i>PWM_module_vertical_holder03.stl</i> - mounting bracket for PCA9685 module: uses 2x M3 12mm long pan head screws that go through both the wireless controller ‘dongle’ holder and this mounting bracket to self tap into the main body ‘pan’ base and 4x self tap 6mm long M2 flanged pan head screws to fix the PCA9685 module to the mount.</td><td style="text-align:center;">N</td><td style="text-align:center;">0</td><td style="text-align:center;">1.23</td><td style="text-align:center;">34m</td></tr><tr><td><i>quadrabot_dongle_holder05_rotx180.stl</i> - holder for the female socket of a USB cable, into which a wireless controller ‘dongle’ can be inserted.</td><td style="text-align:center;">N</td><td style="text-align:center;">0</td><td style="text-align:center;">2.39</td><td style="text-align:center;">1h 6m</td></tr><tr><td><i>3x_battery_180deg_clamp01.stl</i> - 3 clamps for holding a 22mm diameter battery bank.</td><td style="text-align:center;">N</td><td style="text-align:center;">0</td><td style="text-align:center;">0.85</td><td style="text-align:center;">19m</td></tr><tr><td><i>OLED1_flat08-front+back.stl</i> - holder for a small OLED.</td><td style="text-align:center;">N</td><td style="text-align:center;">0</td><td style="text-align:center;">2.65</td><td style="text-align:center;">1h 14m</td></tr><tr><td><i>OLED_mounting_bar01_roty90.stl</i> - bolt-on mounting bar for an OLED.</td><td style="text-align:center;">N</td><td style="text-align:center;">0</td><td style="text-align:center;">1.47</td><td style="text-align:center;">42m</td></tr><tr><td> </td><td style="text-align:center;"> </td><td style="text-align:center;"> </td><td style="text-align:center;"> </td><td style="text-align:center;"> </td></tr></tbody></table></figure>
With this file you will be able to print Raspberry Pi controlled 4-legged 8DOF robot with your 3D printer. Click on the button and save the file on your computer to work, edit or customize your design. You can also find more 3D designs for printers on Raspberry Pi controlled 4-legged 8DOF robot.
