Raspberry pi laptop
thingiverse
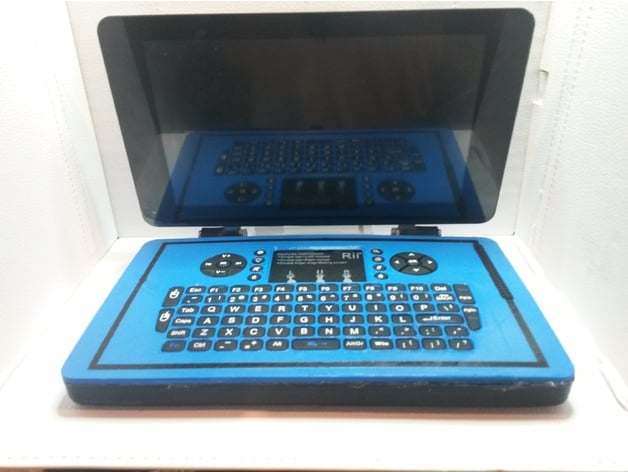
Let me start out by saying that this is not an easy project you will need a basic understanding of electronics and soldering. You will also need to remove some parts from the raspberry pi and lcd driver board so they can fit in the case. This will void the warranty of the parts. I accept no responsibility for any damages you may cause during this process. These are the parts i used for this project. You will also need some basic tools like a soldering iron, screw drivers and wire cutters. https://www.amazon.com/Raspberry-Pi-Model-512MB-Computer/dp/B00LPESRUK/ref=as_li_ss_tl?ie=UTF8&qid=1486470720&tag=thngvrs-20&sr=8-3&keywords=raspberry+pi+b+&linkCode=ll1 https://www.amazon.com/Raspberry-Pi-7-Touchscreen-Display/dp/B0153R2A9I/ref=as_li_ss_tl?s=pc&ie=UTF8&qid=1486470741&tag=thngvrs-20&sr=1-2&keywords=raspberry+pi+touchscreen&linkCode=ll1 The raspberry pi screen comes with a short DSI Ribbon Cable you will need a longer one about 15 cm long. I had one from an old printer i used but i'm sure you can find one online if you don't have one. https://www.amazon.com/Straight-Solder-Type-Female-Connector/dp/B0094DXENY/ref=as_li_ss_tl?_encoding=UTF8&pd_rd_i=B0094DXENY&pd_rd_r=XA1MGF6A8W89PV8CZHSW&pd_rd_w=UWvqg&pd_rd_wg=J2SrQ&psc=1&tag=thngvrs-20&refRID=XA1MGF6A8W89PV8CZHSW&linkCode=ll1 https://www.amazon.com/Rii-Wireless-Keyboard-Touchpad-Rechargable/dp/B00WQG6A8C/ref=as_li_ss_tl?s=pc&ie=UTF8&qid=1486470927&tag=thngvrs-20&sr=1-4&keywords=rii+mini+keyboard&linkCode=ll1 https://www.amazon.com/2-54mm-40-Pin-Female-Header-Connector/dp/B00R1LLM1M/ref=as_li_ss_tl?s=aps&ie=UTF8&qid=1486483960&tag=thngvrs-20&sr=1-2-catcorr&keywords=female+header+pins+2+x+20+row&linkCode=ll1 https://www.amazon.com/Uxcell-Ribbon-Cable-Length-40-Way/dp/B01E78ZD02/ref=as_li_ss_tl?ie=UTF8&qid=1486484998&tag=thngvrs-20&sr=8-3&keywords=40+way+ribbon+cable&linkCode=ll1 I will not go over every step of this build but i will try and give you a basic idea of how it goes together. You will need to remove the usb port on the lcd driver and the two dual usb ports on the raspberry pi (the usb ports on the side of the case are wired straght into the board). You will also have to remove the Ethernet port. I removed the battery from the rii mini keyboard and wired it straight to 5v and ground on the gpio. I also disassembled the receiver and soldered it to one of the spare usb ports on the raspberry pi. The gpio is wired to a female header on the side for easy use. If you don't need access to the gpio you don't need to do this. To assemble the laptop you will need 9 m3 x10mm bolts and 2 M3 x 25mm bolts with 4 nuts. The lid screws onto the lcd with 4 M3 x 10mm bolts and the base is screwed onto the keyboard holder with 5 M3 x 10mm bolts. To hold the hinges together i used 2 m3 x 25mm bolts with 2 nuts on the end to lock it in place. As always if you have any questions or ideas on how to improve this project please comment or send me a message. Print Settings Printer Brand: Prusa Printer: Prusa Steel Rafts: No Supports: Yes Resolution: 0.2 Infill: 20%
With this file you will be able to print Raspberry pi laptop with your 3D printer. Click on the button and save the file on your computer to work, edit or customize your design. You can also find more 3D designs for printers on Raspberry pi laptop.