Raspberry Pi laptop for general everyday use
thingiverse
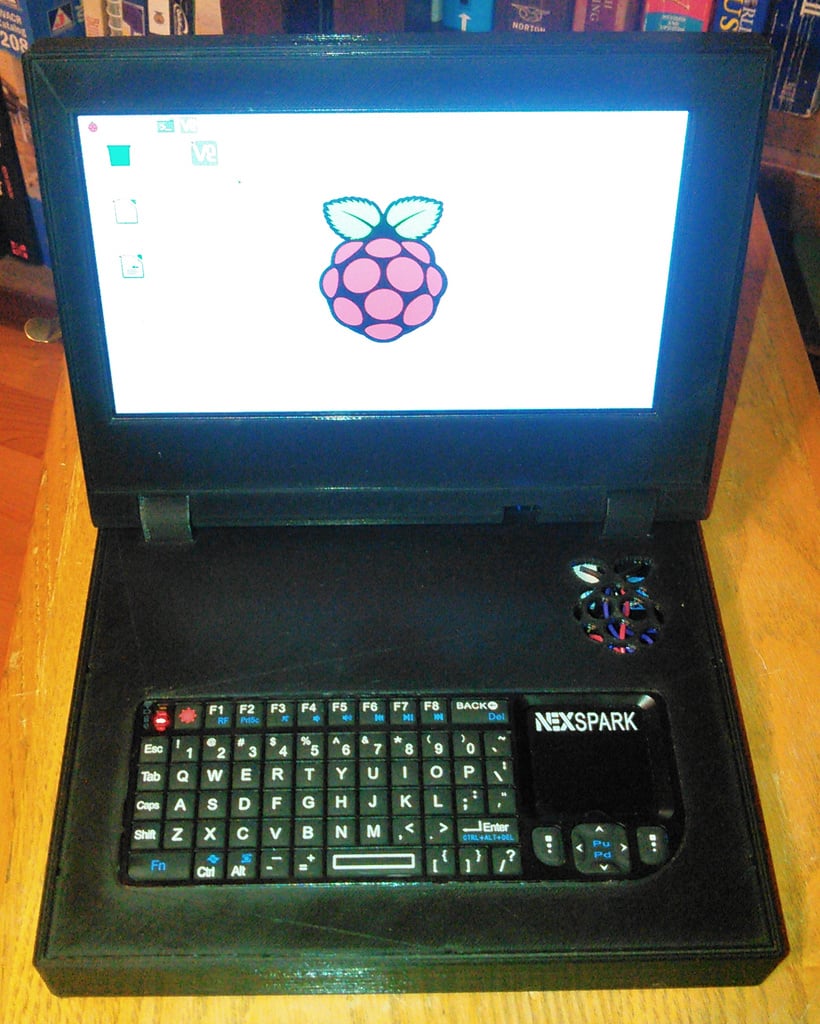
This is my custom-built Raspberry Pi laptop computer. None of the other Raspberry Pi laptops I could find met my requirements, so I designed one myself. I created it as a laptop for everyday use. It's ultra compact and features 3 USB ports, an Ethernet port, a latching power switch, a headphone jack, and speakers. All of the Raspberry Pi's ports are flush with the case, ensuring that if the location of these ports changes in future revisions or when using other boards, the case won't become obsolete. Inside the main compartment, there is plenty of room to reconfigure the components as you see fit. It's powered by two 18650 lithium-ion batteries, which provide 1-3 hours of runtime depending on how hard you use the Pi. You'll need a good understanding of electronics and a soldering iron to assemble this project. The USB ports, Ethernet jack, and headphone jacks must be super-glued in place. The keyboard requires careful disassembly, removal of the lithium-ion polymer battery, and reassembly. Be cautious not to bend or short-circuit the battery's terminals or poke it with a sharp object, as this may cause it to catch on fire or explode. To accomplish this, I used a razor blade to carefully slice through the middle of the double-sided tape. You'll also need to trim the sides of the keyboard case using a jigsaw and super-glue the remaining part to the 3D-printed keyboard insert. The keyboard's circuit board must be secured with several drops of glue around its edges. Two long rectangular bars are glued onto the back of the screen insert to prevent it from buckling outward. Printing: Print in any resolution you prefer, but I recommend 100% infill for all parts. Support material is necessary for the lower body, while the screen benefits from being printed without supports. The power supply consists of two independent Adafruit 1000C boards: one powers the Pi, and the other powers everything else. You could set it up differently or use a different setup altogether. A flat HDMI cable connects the Raspberry Pi to a display, while a package of male micro USB connectors is used for connecting peripherals. Two 18650 LiPo batteries power the laptop, which can be replaced with another type of battery if necessary. Two 18650 holders are required to secure these batteries in place. A Nexspark Mini USB keyboard and a power switch complete the setup. The power supply is a 5V 8A adapter, which may be overkill but provides ample power for the laptop. Assembly requires super glue, two 8-32x1" screws for the screen hinge, some tiny wood screws for the screen, and an assortment of wire for connecting everything together.
With this file you will be able to print Raspberry Pi laptop for general everyday use with your 3D printer. Click on the button and save the file on your computer to work, edit or customize your design. You can also find more 3D designs for printers on Raspberry Pi laptop for general everyday use .