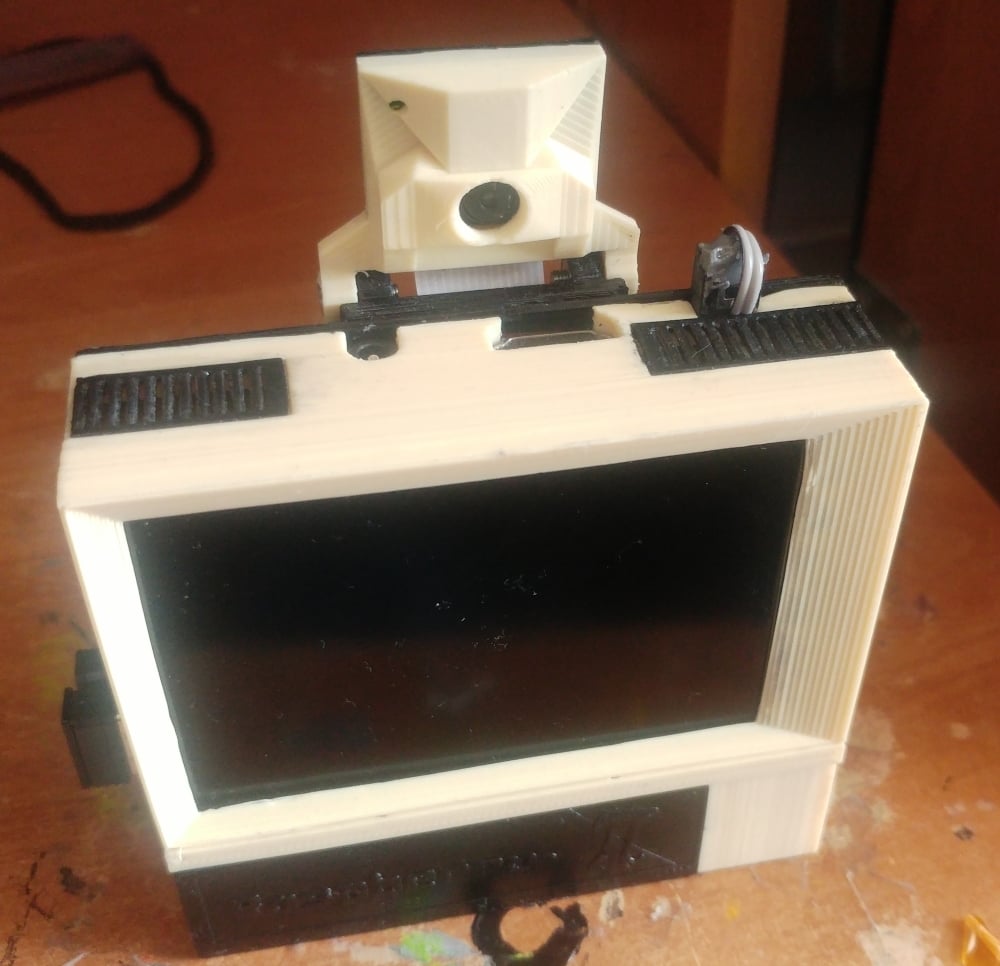
Raspberry Pi model 1, 2, 3, 3+ B "retro computer" case with camera pod 3.5" touchscreen LCD and 18650 basket and room for associated citcuitry
thingiverse
It's a Raspberry Pi case that holds a generic (or WaveShare) 3.5" GPIO LCD screen with touch panel(WARNING: some Chinese displays from Aliexpress have the display panel installed upside down like the one I got now, so that the frame here will have to be edited as the actual picture in all those screens is off-center). It fits a WaveShare display in its current state, a 18650 battery, a charger board that looks like this: https://www.banggood.com/5pcs-3_2V3_7V4_2V-USB-Li-ion-Battery-Charger-Module-Board-Protected-Upgrade-Version-p-1215386.html?cur_warehouse=CN (get one with over-discharge protection as there are also ones without), a step-up converter that looks like this: https://www.aliexpress.com/item/MT3608-DC-DC-Step-Up-Power-Apply-Module-Booster-Power-Module-MAX-output-28V-2A/32279772484.html and a switch. All ports apart from GPIO and display ribbon have dedicated holes, and there is space for a thin USB cable to go through near the micro USB connector. I set the pot on my step-up converter so that it outputs 5V, desoldered it, measured it, and then replaced it with SMD resistors of the same value to shave off about 1.5mm from total board height and also to avoid accidental turning of it that would change the voltage. I get two step up converters because they are dirt cheap but some (rarely) don't work. If it works, it works reliably and I use them in many things. The case is currently a "work in progress" because my current screen has fallen and the digitizer cracked so I just removed it altogether, making it a little thinner. There's a version of screen bezel, battery door, and switch cover that accommodates a screen with digitizer and a screen without digitizer. If your digitizer becomes mechanically broken, you may wish to peel it off and throw it away – the resulting screen still works and has better colors. Now I have a screen with digitizer as well, but I mostly use this specific RPi to play music from Youtube when I do something else that doesn't require a PC, so it's not entirely worth for me printing another front to fit a flipped cheap Chinese screen – I'll make something else from it, maybe a Pip-Boy or something similar. The switch is mounted by mushrooming the two pegs off with a soldering iron after you've soldered the wires for it as that way it's a lot easier. The grids print out best standing on their side and on a raft, while the rest can just use brim. The nut holes are designed to hold M2.5 nuts by friction but gluing them in just in case is a good idea. I need 5 M2.5 x 8mm screws and 7 M2.5 nuts (minus the camera part). The 18650 socket comes from https://www.thingiverse.com/thing:456900 by enif. I have also drilled 2 0.6mm holes above the LEDs from the charger so that the charge status is visible, but their position may vary and small holes like these do not print out very well so making them manually is the better way to do this. The hinge axle is made of a piece of bicycle brake line, but a thick wire will do as well. Now I have added a camera enclosure that attaches to the back and flips to face either towards or away from the screen side, but with default settings camera picture faces up when pointing at the user, and is upside-down when facing back. It attaches with 2 M2.5x4mm screws that can be made by cutting off M2.5x8mm screws with a saw if you can't buy them (that's what I did), and the hinge is using two M2.5x8mm screws, and the camera box needs two self-tapping screws that are 8mm long or a bit shorter and have 2mm diameter or slightly less of the shaft between the threads (from toys, broken devices, etc.). It takes the standard Raspberry Pi camera with a ribbon that is 15cm or more, but not so long it won't fit in the case. There's also a terminator for the ribbon that you can screw in instead of the camera and hide the end of the ribbon underneath to avoid it shorting to random objects in your environment as well as having to open the case to get it out of the Pi. It also helps avoid screw loss in such situation as it is installed using the same screws.
With this file you will be able to print Raspberry Pi model 1, 2, 3, 3+ B "retro computer" case with camera pod 3.5" touchscreen LCD and 18650 basket and room for associated citcuitry with your 3D printer. Click on the button and save the file on your computer to work, edit or customize your design. You can also find more 3D designs for printers on Raspberry Pi model 1, 2, 3, 3+ B "retro computer" case with camera pod 3.5" touchscreen LCD and 18650 basket and room for associated citcuitry.