Raspberry Pi Zero Cluster Case
thingiverse
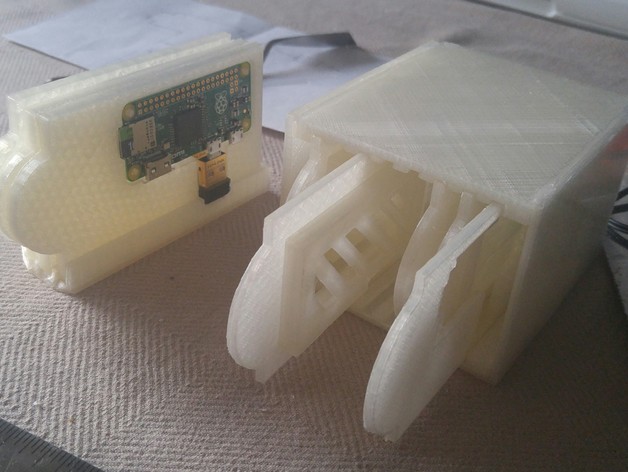
A nod to the classic blade(or hot-swap) boxes in any given rack room, this is designed to take either 8 Raspberry Pi Zeros with minimal support, or if you prefer, 4 Pi Zeros with the included cap. NOTE: The Final Designs are "Bramble Box - 8 PC", and "Bramble Box - MODULAR". I have uploaded the seperate STLs,, zips and a combo zip called "Bramble Both- BOTH" Print Settings Printer: XYZPrinting Davinci Jr. `1.0w Rafts: Yes Supports: No Resolution: .2 Infill: 10-25 Notes: The infill depends on the surface area being built: for instance, the rails would be destroyed EVERYTIME I tried 10%, but kept getting better and better the higher I went. Same thing with the sides. The actual Zero Mounts seemed okay with low infill. You will need to print the rails and sides twice. I left a lip in the back side for people to use what they want for a backplane. This is held together by superglue, but I, for example, plan on using a PCB Power rail system in the back to make the box stronger. Post-Printing Clean up the Brims Just take the brims off and use a knife to clear them quickly, and some sandpaper to finish up. Build The Case Take one of the rails and line up one of the side's keyed blocks. Use super glue and coat the mating surfaces. Join them together, and use support to keep them perpendicular while the glue cures. Once one side is done, do the other. When you have a U shape, take the other rail print and coat the mating surfaces. Join it to the sides, mirroring what the bottom rail has. Prep the Computer Mounts Not much here. Just put a Pi Zero in the slab with the half moon tab, lining up the USB connectors with the break in the fence. If you don't want to use screws to mount the board, then just place the slotted cap over the fence on the CPU mount. It's a slip fit. NOTE: In order to fit 8 Pi Zeros in this case, you will have to forego the slotted caps. The rails are about 1 mm too narrow to allow for the caps to be present. I didn't know how to put pegs onto the CPU tabs. Connect the computers This is up to you. I have some ideas that may require rebuilding this due to clearances, and other parts to be possibly added for an almost complete hot-plug system. How I Designed This Modelling Software I used Google Sketchup (free 30-day license) and a STL export plugin to generate the STLs after drawing it out on paper figuring out the minimal clearances.
With this file you will be able to print Raspberry Pi Zero Cluster Case with your 3D printer. Click on the button and save the file on your computer to work, edit or customize your design. You can also find more 3D designs for printers on Raspberry Pi Zero Cluster Case.