Raspberry Pi Zero W Case w/ Camera
thingiverse
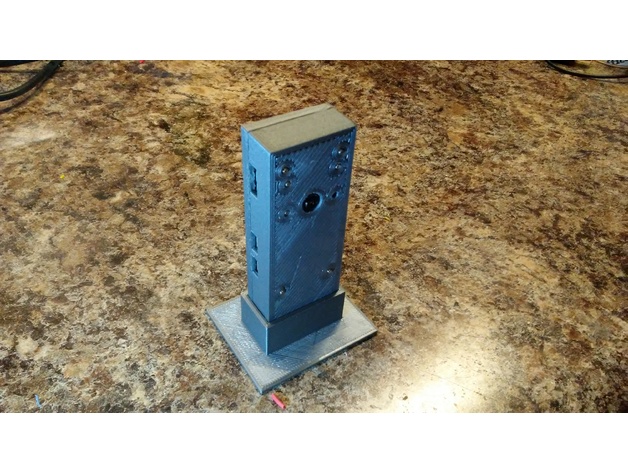
This is a basic rectangular Pi Zero case with camera. I made this for remotely monitoring things around my house in WIFI range. I'm using the the Pi Zero W (with WIFI), and it's set up for headless (VNC) connection so it only needs a power supply. The Rpi-Cam-Web-Interface (http://elinux.org/RPi-Cam-Web-Interface ) makes it easy to monitor and control this unit from any device that has a web browser. This case features a simple rectangular shape so it can rest on end or side. It comes with a slide-on base for stability when standing the case on end. The HDMI, USB, and Power connections are accessible so it can be connected to a monitor and keyboard/mouse. There is enough space in end of the case to weave the camera ribbon cable without kinking the ribbon. The Pi and camera are secured with M2 screws through printed standoffs, so it does not rely on 2 mm diameter printed pins. The same M2 screws hold the case together. For my design, I used Raspberry Pi Zero Version 1.3 Reference Model by Anathae, Published on June 6, 2016 and can be found here: http://www.thingiverse.com/thing:1612021 UPDATE 10/3/17: I just printed another case so I made some improvements. The files names with "fixed" are the improved version. The tabs on the case back (PiZbottomFixed.stl) were pulled back a bit so the case fits together without post printing adjustment. The camera hole size was increased in the front of the case (PiZtopFixed.stl). Print Settings Printer: MP3DP Rafts: No Supports: No Resolution: .2 mm Infill: 30% Notes: Printed in PLA Post-Printing Assembly: You will need your Rpi Zero W with camera attached with the ribbon cable. Place camera into the front case half and align the mounting holes over the four short standoffs. Attach the camera with short M2 screws. Place the Rpi zero over the camera on the the long standoffs on the front case half. Let the camera ribbon fold in half with no kinks. Fold the ribbon cable back and forth like a piece of ribbon candy in the bottom space in the front case half. It should weave back an forth a few times in the open space at the bottom of the case without kinks. Place the case back on and carefully close the case halves together. The ribbon should compress without kinking. Secure the entire assembly together with 4 M2 screws. The assembled case will slide into the base. It can be used with our without the base. Assembly Tips: Test fit the case halves before inserting the camera or pi. Use a small file to clean up any artifacts so the case halves fit together snugly but not too tight. I made this a tight fit so I could fine tune the fit with a file. Test fit the screw holes. You can use longer screws with nuts. I drilled the holes in the case back so the M2 screws slid in easily, and threaded the screws into the front case half standoffs. If you drill out the holes, drill from the outside of the case, not on the standoffs from the inside. The standoffs can snap off if you have any flaws in the bond between the layers. Your less likely to snap off the standoff by drilling from the case outside.
With this file you will be able to print Raspberry Pi Zero W Case w/ Camera with your 3D printer. Click on the button and save the file on your computer to work, edit or customize your design. You can also find more 3D designs for printers on Raspberry Pi Zero W Case w/ Camera.