Rat Rig V-Core 3 500 Enclosure
thingiverse
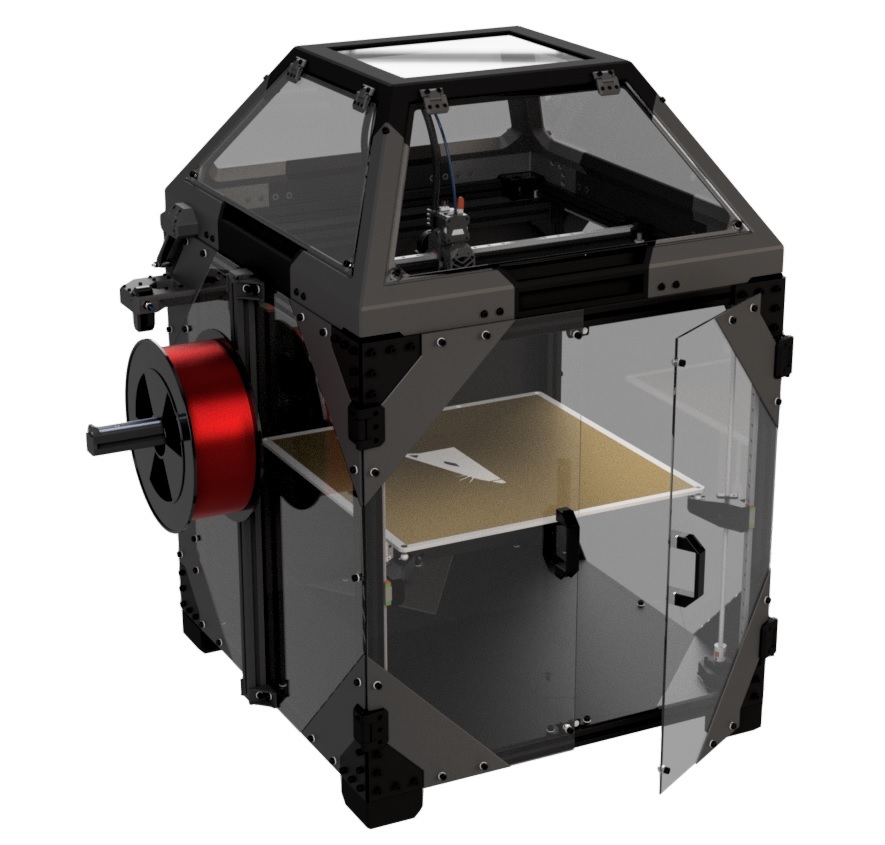
Updates listed below the main text. NOTICE! BTT Smart filament sensor does not fit in older updates. This is fixed in Update 6. I am now only weeks away from getting my own printer :) but in my preparations, i found, that i had used an inaccurate BTT filament sensor model, in my design. It was pointed out to me that i never mentioned, which panel thickness i planned on. The design is ment for 4 mm panels. I suggest just Slicing the corners thinner, if you go for 3 or 2 mm panels. 6th Update 30-01-2022 5th Update 18-12-2021 4th Update 24-11-2021 3rd Update 22-11-2021 2nd Update 20-11-2021 Hi there Rat Riggers, First of all, i have to give thanks to Nalar. His corner bracket design https://www.thingiverse.com/thing:4912929 Got me started on this solution. The starting point for me, was to make, cutting the PC panels easy. He already fixed that. Nice work Nalar. I also want to thank Mikkel Schmidt. https://www.thingiverse.com/thing:4862697 The feet can be found here. https://www.thingiverse.com/thing:4862655 I have borrowed a coulpe of parts from his complete .step assembly. And thank you Mikkel, for all your work for RR, and in the RR community. And now to the actual Post. I have not yet recived my RR V-core 3 500, mainly because i havent made the order yet :) But i will. As mentioned i wanted an easy way to cut the panels. But since Nalar took care of that part, i just kept on with the design. It might still be a work in progress. And since i dont own the printer yet, nothing is tested. Feel free to give feedback, so that i can make this work. Post contains: - All my files separately as STL - The panels (as i want to cut them) as .Step and DXF - My complete projekt as .Step and .f3d for those wanting to work further on the concept The build will require som extra Nuts, bolts and some parts. But all, can be purchase on Ratrigs online store. See the downloaded PDF Plus you need to build the V-core 3 500x500x500 first. Most of the parts, need that big build plate. Hope you enjoy. Best regards Jonas Markussen 6 Update: - The BTT Smart Filament Sensor will now fit inside the sidemounted holder. - More room has been added for the BTT Smart Filament Sensor wires, on the underside of the holder. - The panel corners now overlap the panels a bit, in order to hide the gasket and hopefully give a better finish. - Added fan shroud for internal mounting of ADXL345 - Added a low profile version of the feet (not really my design, just made them shorter) 5th Update: Note: the gap between the panels, printed corners, corner brackets and the lid. Is meant for a thin gasket. - Corner covers with integraded hinges has been removed. - New solution for holding large spools of filament. Made from parts available on RatRig online Store - New side panel, to accommodate for the new spool holding solution. Step and DXF added - The BTTSensor/PTFE guide for filament has been moved. It is no longer a part of the Top lid. But is mounted on one of the back corners. PTFE tube and wires, now runs directly in to the electronics area. The PTFE tube will now run along side the wires, to the extruder. - Chamfers has been added to all parts, for better finish - Nut orientation changed on the lid assembly. for cleaner print quality - Gas pistons has been added, to help hold the lid open while working under it. - All nuts and bolts related to my modifications, has been added and sorted in the projekt files. - BOM (shoppinglist) as PDF has been added - All STL files are now oriented correctly on the buildplate 4th Update: - Hole placment on the door panel and the door corner hinges, has been changed slighty. 4 holes, no longer hit the edge of the panels. - Hinge corners without hinges, has been added, these can be used with the original Rat Rig hinges. - Original Rat Rig hinges, has been added to this download. - Added new enclosure panel step files, and now also DXF. 3rd update: All parts for the top lid, has once again been re-designed. - The frame has been extended up, by 10mm - A groove/handle was added in the front. - The Top part has been changed, so that the window panel, will be mounted/glued, from the indside. This makes it print without supports, and gives a better finish. - The amount of material on the inside geometry, has been reduced. - The connection points between the upper part, and the 4 corners, has been re-designed, for better assembly. The changes should now allow, for full movement, without hitting the enclosure. When using any of the EVA 2.3.0 supported extruders. 2nd update: - All Parts for the top lid, has been changed, to give the extruder more room to move. Now, with the Bondtech LGX, it can move freely to alle the physical stops, without hitting the enclosure. 1st Update: - The top lid is now without an opening for filament. - Original RR filament holder added on the side. - BBT smart filament sensor mount with PTFE tube, added in one corner.
With this file you will be able to print Rat Rig V-Core 3 500 Enclosure with your 3D printer. Click on the button and save the file on your computer to work, edit or customize your design. You can also find more 3D designs for printers on Rat Rig V-Core 3 500 Enclosure.