Rat Rig v-core 3 custom parts
thingiverse
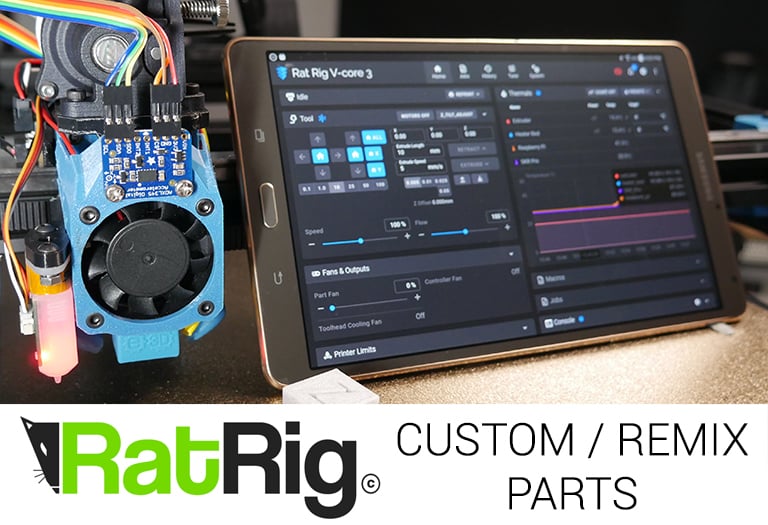
I'm building a Rat Rig v-core 3 premium coreXY 3D printer kit: https://www.youtube.com/playlist?list=PLGqRUdq5ULsO0oLRZ1wiYvvpbhj4EV-Nf During this build I have created some custom/remixed parts to suit my needs. As seen in this video: https://youtu.be/8B12D_D1i0s The electronics panel is to suit an SKR Pro V1.2 and Raspberry Pi 4B, as opposed to a Duet mainboard. It was created by taking the Duet DXF and then altering the mounting holes. I CNC routed mine from 3mm black acrylic using a Lowrider 2. Also suitable for laser cutting. Edit: DXF now included, I have no idea how that happened! The cable tie and cable holder parts are remixed from the Rat Rig STEP files ( https://v-core.ratrig.com/bom/ ) and EVA STEP files ( https://main.eva-3d.page/step_files/ ). The only changes are to add a central orifice to support 4mm PTFE tube as a means of cable support. The Rat Rig side needs manual support placed under the flat portion of the belly. The screw mount cable holders assist in keeping wiring flat against the electronics panel and in the right place. They act like a washer, going inbetween the bolt and the panel. The jig is to assist in drilling two 14mm diameter holes for grommets. They will allow the Y axis endstop and three Z stepper motor wires to travel neatly from the front of the machine through the electronics panel. The ADXL345 shroud is a remix of the great design from Steffen Brandner ( https://contrib.eva-3d.page/accelerometer_mounts/adxl345_shroud/ ). My changes are to remove any geometry covering the fan (to match the standard shroud design) and widening the ADXL spacing to 19mm to suit the Adafruit accelerometer I purchased. V2 is more robust to try and reduve any potential slop in the ADXL mounting. The webcam mount sits in either upper front corner, holding to the frame with T-nuts. There is a hole and clearance underneath to take a screw to go into the tripod mount of a webcam. No support needed. The reverse bowden filament guide allows a 4mm OD PTFE tube to plug in near the spool holder to neatly guide the filament into the top of the extruder drive. The PSU plug holder secures the mains input to the rear/side frame, as well as holding a 24V compatible twin USB adaptor ( https://www.amazon.com/gp/product/B074JBM8CQ/ref=as_li_qf_asin_il_tl?ie=UTF8&tag=teachingtech-20&creative=9325&linkCode=as2&creativeASIN=B074JBM8CQ&linkId=247f0a7ddd227454f3d2f67de6a9116d ) for powering the Raspberry Pi and something else. Details in this video: https://youtu.be/65ED0GNe7hk The tablet holder mounts a spare 7" tablet on the front right of the machine to act as a full featured interface. The two parts are secured with bolts and T nuts. Details in the above video. The bed insulator is intended to be laser cut from cork or foam to go under the silicone heater pad. This is to aid efficiency and add an additional safety measure in case the mains heater delaminates (unlikely). The universal cable holder - 20mm extended version is simply a longer version of the base EVA part to provide more clearance for SuperSniffles' Dual 5015 Part Fan Mod: https://contrib.eva-3d.page/cooling/dual_5015_part_fan/ The extended cable mount is needed if you switch to SuperSniffles’ Dual 5015 cooling mod: https://contrib.eva-3d.page/cooling/dual_5015_part_fan/ The fans sit higher and this simple remix help the cable management parts clear them. The SKR Pro fan mount positions a 5015 blower fan to direct cool air accross the stepper motor driver heatsinks. Now include Klipper config, and #speedboatrace slicer profile and gcode. More details on all of these parts in the linked videos.
With this file you will be able to print Rat Rig v-core 3 custom parts with your 3D printer. Click on the button and save the file on your computer to work, edit or customize your design. You can also find more 3D designs for printers on Rat Rig v-core 3 custom parts.