RatRig VCore 3 Tool Changer
prusaprinters
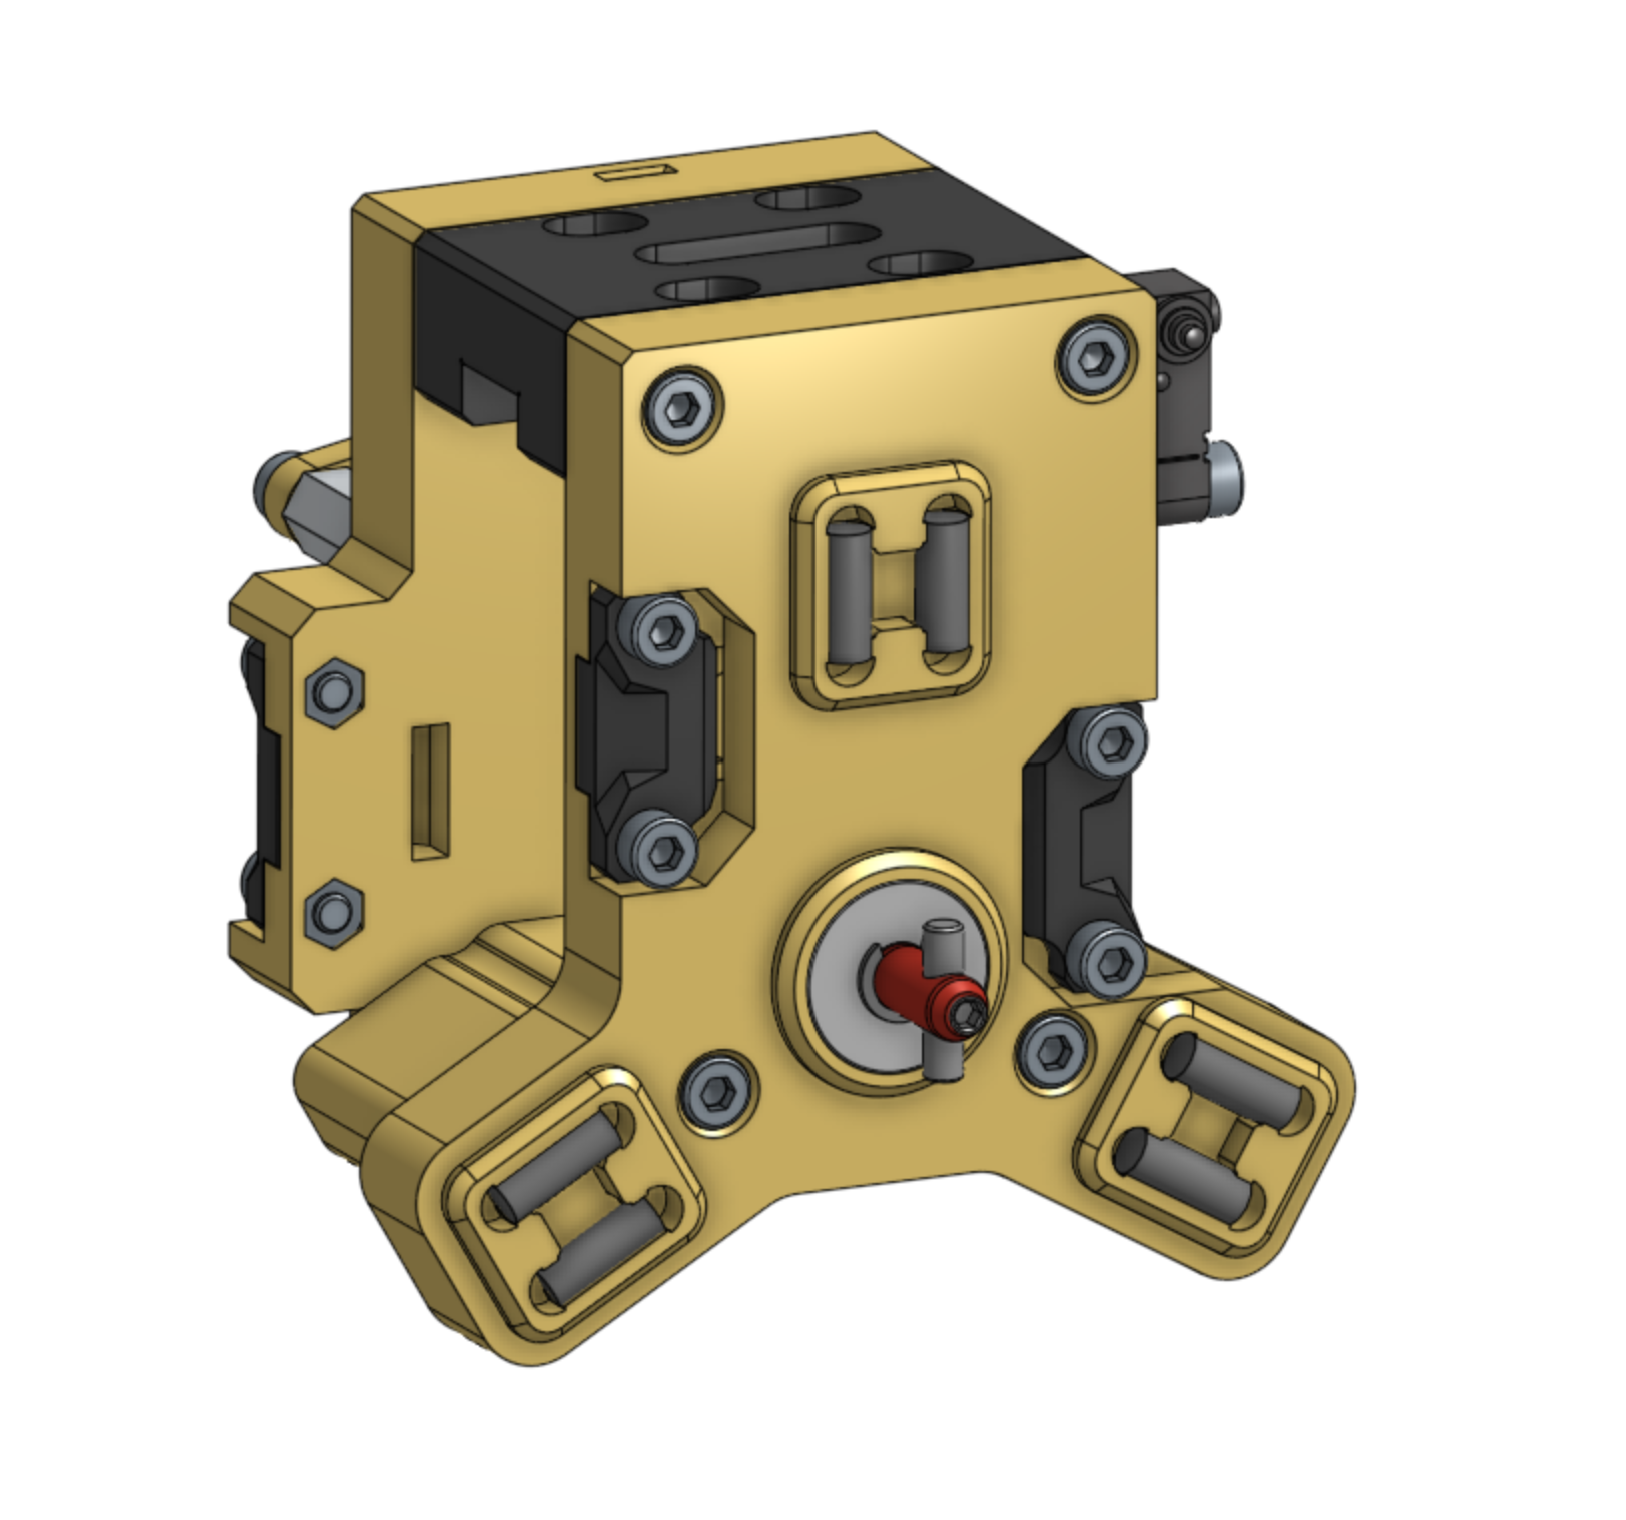
<h3><strong>About</strong></h3><p>This is a tool changer modification for the RatRig VCore 3 printer that utilises an E3D style coupling.</p><p><strong>Belts</strong></p><p>This modifications is designed with the intention of being used on an VCore 3 with the so called “OpenFront” modifications where an alternative location exists for tensioning the printer belts.</p><p><strong>Z-Probe</strong></p><p>This modification is designed with the intention of using the z-probe mounts (or similar) used with the EVA system and specifically a SuperPINDA. I will possibly design an alternative mount using a SPDT endstop type switch.</p><p><strong>X-Endstop</strong></p><p>This modification uses the blank EVA MGN12 top and therefore EVA X-endstop mounts can be reused.</p><p><strong>Y-Endstop</strong></p><p>This modification moves the Y-endstop to the front of the frame - once tested I will attach an STL.</p><p> </p><h3>Demo</h3><figure class="media"><oembed url="https://www.youtube.com/watch?v=sRe3pZT9Fkg"></oembed></figure><figure class="media"><oembed url="https://youtu.be/8Z3bdzcItSQ"></oembed></figure><figure class="image"><img src="https://media.printables.com/media/prints/137147/rich_content/a9581b52-f718-4764-a99a-2c19b2874d9a/20220331_135718.webp#%7B%22uuid%22%3A%228aa14947-0337-4687-9e0e-93baa7d76f14%22%2C%22w%22%3A1280%2C%22h%22%3A960%7D"></figure><h3>Bill of Materials</h3><h4><strong>Head</strong></h4><figure class="table"><table><thead><tr><th>Part</th><th>Quantity</th><th>Comment</th></tr></thead><tbody><tr><td>TC - Head - Front.stl</td><td>1</td><td>6 perimeters / top / bottom</td></tr><tr><td>TC - Head - Top.stl</td><td>1</td><td>4 perimeters / top / bottom</td></tr><tr><td>TC - Head - Bottom - Small.stl</td><td>1</td><td>4 perimeters / top / bottom</td></tr><tr><td>TC - Head - Back.stl</td><td>1</td><td>6 perimeters / top / bottom</td></tr><tr><td>TC - Head - Belt Grabber.stl</td><td>4</td><td>4 perimeters / top / bottom</td></tr><tr><td>10mm x 4mm Dowel Pin</td><td>6</td><td> </td></tr><tr><td>SF695ZZ Bearing</td><td>1</td><td> </td></tr><tr><td>4mm E-Clip</td><td>1</td><td> </td></tr><tr><td>12mm x 3mm Dowel Pin</td><td>1</td><td> </td></tr><tr><td>M3x3mm Grub Screw</td><td>1</td><td> </td></tr><tr><td>Tool Coupler Shaft</td><td>1</td><td>From E3D</td></tr><tr><td>M3x6 Socket Head Screw</td><td>1</td><td> </td></tr><tr><td>MR105RS Bearing</td><td>1</td><td> </td></tr><tr><td>F5-12M Thrust Bearing</td><td>1</td><td> </td></tr><tr><td>15mm x 1mm Spring</td><td>1</td><td> </td></tr><tr><td>40T Mod 0.5 Gear</td><td>1</td><td>From E3D</td></tr><tr><td>M3 Washer</td><td>1</td><td> </td></tr><tr><td>M3x10 Socket Head Screw</td><td>1</td><td> </td></tr><tr><td>20T Mod 0.5 Gear</td><td>1</td><td>From E3D</td></tr><tr><td>M3x50 Socket Head Screw</td><td>4</td><td> </td></tr><tr><td>Stepper Motor</td><td>1</td><td>From E3D</td></tr><tr><td>M3x8 Socket Head Screw</td><td>13</td><td> </td></tr><tr><td>M2.5x8 Socket Head Screw</td><td>2</td><td> </td></tr><tr><td>Omron D2HW-C201H Switch</td><td>1</td><td>Optional tool detect switch</td></tr><tr><td>M3xD4.6mmxL5.0mm Heat Insert</td><td>3</td><td> </td></tr><tr><td>M3 Full Hex Nut</td><td>12</td><td> </td></tr><tr><td>M3x6mm Grub Screw</td><td>2</td><td> </td></tr><tr><td colspan="3"><strong>Motor Brace Options</strong></td></tr><tr><td colspan="3"><strong>Small</strong> - As designed by E3D</td></tr><tr><td>TC - Head - Motor Brace - Small.stl</td><td>1</td><td>4 perimeters / top / bottom</td></tr><tr><td>16mm Standoff</td><td>2</td><td>15mm standoff if using non-E3D stepper</td></tr><tr><td>M3x8 Socket Head Screw</td><td>2</td><td> </td></tr><tr><td>M3xD4.6mmxL5.0mm Heat Insert</td><td>2</td><td> </td></tr><tr><td colspan="3"><strong>Large</strong> - A larger version of the E3D design with 4 standoffs for more support</td></tr><tr><td>TC - Head - Motor Brace - Large.stl</td><td>1</td><td>4 perimeters / top / bottom</td></tr><tr><td>16mm Standoff</td><td>4</td><td>15mm standoff if using non-E3D stepper</td></tr><tr><td>M3x8 Socket Head Screw</td><td>4</td><td> </td></tr><tr><td>M3xD4.6mmxL5.0mm Heat Insert</td><td>4</td><td> </td></tr><tr><td colspan="3"><strong>Switches</strong> - A 4 standoff version with 2 SPDT switches for lock/unlock detection</td></tr><tr><td>TC - Head - Motor Brace - Switches.stl</td><td>1</td><td>4 perimeters / top / bottom</td></tr><tr><td>TC - Head - Cam.stl</td><td>1</td><td>4 perimeters / top / bottom</td></tr><tr><td>16mm Standoff</td><td>4</td><td>15mm standoff if using non-E3D stepper</td></tr><tr><td>M3x8 Socket Head Screw</td><td>6</td><td> </td></tr><tr><td>M3xD4.6mmxL5.0mm Heat Insert</td><td>6</td><td> </td></tr><tr><td>Omron D2HW-C261H Switch</td><td>2</td><td> </td></tr></tbody></table></figure><p><strong>Stepper Motor: </strong>This build assumes the usage of the motor although I have trialled and used a 24BYJ-48 (available from Mouser and RS Components) which seems to work well too. I can provide alternative parts for this if required. </p><p><strong>Spring:</strong> I purchased a 20mm spring initially which was too long and I cut it down, the 10mm I have is slightly too short so would recommend a 15mm or 20mm and cut if required.</p><h4> </h4><h4>Dock</h4><p>Note: This is for a single tool dock.</p><figure class="table"><table><thead><tr><th>Part</th><th>Quantity</th><th>Comment</th></tr></thead><tbody><tr><td>TC - Dock - Stand.stl</td><td>1</td><td>4 Perimeters / top /bottom</td></tr><tr><td>TC - Dock - Receiver.stl</td><td>1</td><td>4 Perimeters / top / bottom</td></tr><tr><td>M6x12 Socket Head Screw</td><td>2</td><td> </td></tr><tr><td>M6 3030 T-Nut</td><td>2</td><td> </td></tr><tr><td>M3xD4.6mmxL5.0mm Heat Insert</td><td>3</td><td> </td></tr><tr><td>M4x45 Locating Dowel Pin</td><td>2</td><td>Can be longer</td></tr><tr><td>M3x10 Socket Head Screw</td><td>1</td><td> </td></tr><tr><td>M3x12 Socket Head Screw</td><td>2</td><td> </td></tr><tr><td>M3x6mm Grub Screw</td><td>1</td><td> </td></tr><tr><td>6mmx3mm Neodymium Magnet</td><td>1</td><td> </td></tr></tbody></table></figure><h4> </h4><h4>Tools</h4><p><strong>Tool Face:</strong> An additional tool face will be provided for use with E3D metal tool plates.</p><p><strong>Helical Lock Ramp:</strong> This can be 3D printed (TC - Tool - Ramp.stl) and I would recommend 0.1mm layer height or less.</p><p> </p><h5>E3D Revo Micro / LGX Lite</h5><figure class="table"><table><thead><tr><th>Part</th><th>Quantity</th><th>Comment</th></tr></thead><tbody><tr><td>TC - Tool - Face.stl</td><td>1</td><td>6 Perimeters / top / bottom</td></tr><tr><td>TC - Tool - LGX Lite Mount.stl</td><td>1</td><td>6 Perimeters / top / bottom</td></tr><tr><td>TC - Tool - Revo Mount.stl</td><td>1</td><td>6 Perimeters / top / bottom</td></tr><tr><td>TC - Tool - 5010 Fan Mount.stl</td><td>1</td><td>6 Perimeters / top / bottom</td></tr><tr><td>TC - Tool - Revo Fan Duct.stl</td><td>1</td><td>4 Perimeters / top / bottom</td></tr><tr><td>LGX Lite</td><td>1</td><td> </td></tr><tr><td>E3D Revo Micro</td><td>1</td><td> </td></tr><tr><td>12mm M3 Steel Ball </td><td>3</td><td> </td></tr><tr><td>Helical Lock Ramp</td><td>1</td><td>From E3D</td></tr><tr><td>M3xD4.6mmxL5.0mm Heat Insert</td><td>15</td><td> </td></tr><tr><td>M3x6mm Grub Screw</td><td>1</td><td> </td></tr><tr><td>6mmx3mm Neodymium Magnet</td><td>1</td><td> </td></tr><tr><td>Bowden Tube</td><td>1</td><td> </td></tr><tr><td>M3x10 Countersunk Socket Head Screw</td><td>5</td><td> </td></tr><tr><td>M3x6 Socket Head Screw</td><td>3</td><td> </td></tr><tr><td>M3x16 Socket Head Screw</td><td>4</td><td> </td></tr></tbody></table></figure><p> </p><h5>Phaetus Dragon HF / LGX Lite</h5><figure class="table"><table><thead><tr><th>Part</th><th>Quantity</th><th>Comment</th></tr></thead><tbody><tr><td>TC - Tool - Face.stl</td><td>1</td><td>6 Perimeters / top / bottom</td></tr><tr><td>TC - Tool - LGX Lite Mount.stl</td><td>1</td><td>6 Perimeters / top / bottom</td></tr><tr><td>TC - Tool - Dragon Mount.stl</td><td>1</td><td>6 Perimeters / top / bottom</td></tr><tr><td>TC - Tool - 5010 Fan Mount.stl</td><td>1</td><td>6 Perimeters / top / bottom</td></tr><tr><td>LGX Lite</td><td>1</td><td> </td></tr><tr><td>Phaetus Dragon</td><td>1</td><td> </td></tr><tr><td>3010 Fan w/ Duct</td><td>1</td><td> </td></tr><tr><td>12mm M3 Steel Ball </td><td>3</td><td> </td></tr><tr><td>Helical Lock Ramp</td><td>1</td><td>From E3D</td></tr><tr><td>M3xD4.6mmxL5.0mm Heat Insert</td><td>15</td><td> </td></tr><tr><td>M3x6mm Grub Screw</td><td>1</td><td> </td></tr><tr><td>6mmx3mm Neodymium Magnet</td><td>1</td><td> </td></tr><tr><td>Bowden Tube</td><td>1</td><td> </td></tr><tr><td>M3x10 Countersunk Socket Head Screw</td><td>5</td><td> </td></tr><tr><td>M3x6 Socket Head Screw</td><td>3</td><td> </td></tr><tr><td>M3x16 Socket Head Screw</td><td>4</td><td> </td></tr></tbody></table></figure><h3> </h3><h3>Software Configuration</h3><p>The configuration here presumes the usage of Klipper - Duet is not be covered.</p><h4>Plugin Installation</h4><p>Install this excellent Klipper plugin by Andrei Ignat - <a href="https://github.com/TypQxQ/Klipper_ToolChanger">https://github.com/TypQxQ/Klipper_ToolChanger</a></p><h4>Klipper Configuration</h4><p>I have uploaded my RatOS configuration folder to the following repository:</p><p><a href="https://github.com/psyvision/vcore3-configuration">https://github.com/psyvision/vcore3-configuration</a></p><p>This is mostly typical RatOS configuration and the tool changer configuration is in the “additions” folder:</p><figure class="table"><table><thead><tr><th>File / Folder</th><th>Purpose</th></tr></thead><tbody><tr><td>btt-octopus-11/*</td><td>Files providing configuration for a BTT Octopus 1.1 as a tool board</td></tr><tr><td>board.cfg</td><td>Pin definitions for the coupler and each individual tool (extruder, tmc etc.)</td></tr><tr><td>toolchanger.cfg</td><td>ToolChanger Klipper plugin configuration and macros to handle tool changes</td></tr><tr><td><p>speed-limits-performance.cfg</p><p>steppers.cfg</p><p>tmc2209-performance.cfg</p></td><td>These files provide the same functionality/configuration as the original RatOS configuration except removing the extruder configuration</td></tr></tbody></table></figure><p> </p><h3>Version History</h3><figure class="table"><table><thead><tr><th>Version</th><th>Date</th><th>Comment</th></tr></thead><tbody><tr><td>v0.6</td><td>08/04/2022</td><td>Updated TC - Head - Back files</td></tr><tr><td>v0.5</td><td>01/04/2022</td><td><p>Revised dock with cable bracing</p><p>Partial STEP file publication</p></td></tr><tr><td>v0.4</td><td>31/03/2022</td><td><p>Improved dock cable management</p><p>Mirrored fan/cable on LGX Lite mount</p><p>Software configuration update</p><p>Add head bottom with ADXL mounting</p></td></tr><tr><td>v0.3</td><td>10/03/2022</td><td><p>Update dock files</p><p>Added carriage motor brace options</p></td></tr><tr><td>v0.2</td><td>25/02/2022</td><td>Updated after initial trials</td></tr><tr><td>v0.1</td><td>21/02/2022</td><td>Initial beta release</td></tr></tbody></table></figure><h3> </h3><h3>Attribution</h3><p>This modification would not be possible without designs from:</p><ul><li>E3D Online (Tool changer)</li><li>Pawel Kucmus (EVA platform)</li><li>Joshua Vasquez (Jubilee 3D)</li><li>Andrei Ignat (Klipper Toolchanger plugin)</li></ul>
With this file you will be able to print RatRig VCore 3 Tool Changer with your 3D printer. Click on the button and save the file on your computer to work, edit or customize your design. You can also find more 3D designs for printers on RatRig VCore 3 Tool Changer.